Best Practices: Approaches to Classifying with Cognitive Toolkit
What is data classification?
Data classification enables organizations to track and control data access, adhere to regulatory compliance, reduce data storage costs, and enhance data security.
One of the key elements to understand about data classification is that a single file can have more than one classification. For example, a file could be classified by its type of content (for example, contract or employee record), its sensitivity level (for example, confidential or public), or its business function (for example, HR or finance). These classifications are not mutually exclusive and a single file can carry multiple tags or metadata entries that correspond to these various classifications.
Tips:
![]() It’s crucial to know what type of classification(s) you would like to set BEFORE you begin the classification process.
It’s crucial to know what type of classification(s) you would like to set BEFORE you begin the classification process.
![]() Each type of classification should be treated separately.
Each type of classification should be treated separately.
![]() Field names for the classifications should be indicative of the classification type.
Field names for the classifications should be indicative of the classification type.
Field names matter
The name of the classification field in the index should indicate the classification type. This means that the classification field name must be self-explanatory and representative of the category it is classifying. Examples of classification field names include content_type, sensitivity_level, or business_function. Using clear and meaningful field names helps ensure proper usage of the classifications and helps to prevent confusion during data management processes.
It's crucial to differentiate between general data classification and records management classification.
General data classification
General data classification focuses on categorizing data based on its sensitivity and the impact to the organization should that data be disclosed, altered, or destroyed without authorization. When classifying by sensitivity, typical classifications include public, internal, confidential, and restricted. These types of classifications are instrumental in defining access controls and security measures, and is particularly important for compliance with privacy laws and regulations.
Organizations might also consider other classification types such as classifying by data ownership, which identifies the responsible department or individual; classifying by legal requirements, which helps to ensure compliance with laws and regulations; and classifying by value to the organization, which help inform decisions about storage, backups, and disaster recovery plans.
Records Management classification
Records management classification is concerned with the lifecycle management of specific records within an organization. This includes the creation, receipt, maintenance, use, and disposal of records. This kind of classification is typically guided by a records retention schedule, which determines how long different types of documents must be kept before they can be destroyed or archived. This is crucial for compliance with various laws and regulations regarding recordkeeping.
Use a classification field name similar to retention_code if there is a retention code assigned in the policy (for example, HR1000) and/or a classification field name of rm_classification for the retention schedule category (for example, recruitment). The organization can choose to use either or both, whichever will be most helpful to the organization.
Summary
Classification is a crucial part of data management, serving to track and control data access, ensure regulatory compliance, reduce storage costs, and enhance data security
Each type of classification should be addressed separately and the classification field name should indicate the classification type
A file can carry multiple classifications, such as content type, sensitivity level, or business function. These classifications are not mutually exclusive
The name of the classification field should be self-explanatory, such as content_type, sensitivity_level, or business_function
Differentiating between general data classification and records management classification is important
General data classification practices categorize data based on sensitivity and impact on the organization, which is key for privacy law compliance. Other classifications might be based on data ownership, legal requirements, or value to the organization
Records management classification focuses on the lifecycle of specific records, guided by a Records Retention Schedule. It's critical for compliance with laws and regulations on recordkeeping. Classification field names might be retention_code for specific retention policies or rm_classification for retention schedule categories
Which classification fields should you use?
The following guidelines may need to be adapted to specific use cases.
Field name | Type | Suggested use |
|---|---|---|
content_type | General | Use this classification to categorize the type of content within each file or document. Examples include contract, invoice, meeting_minutes, and employee_record. This helps in streamlining data retrieval and management, allowing users to quickly identify and locate specific types of documents. |
sensitivity_level | General | This classification serves to denote the level of sensitivity or confidentiality of the data. Typical levels might include public, internal, confidential, or restricted. It's a key aspect in managing data security, determining access controls, and ensuring regulatory compliance. |
business_function | General | This classification helps to denote the specific business function or department associated with a file or document, such as HR, finance, sales, and operations. It assists in department-specific data management and allows for a more organized data repository. |
retention_code | Records Management | Use this classification to tag each record according to its respective retention policy code, such as HR1000 for HR records that need to be retained for a certain period of time, as per the records retention schedule. This supports compliance with various laws and regulations regarding recordkeeping and assists in timely archiving or destruction of records. |
rm_classification | Records Management | This classification is used to categorize records according to the records retention schedule categories such as recruitment, financial_reports, and contracts. It helps to manage the lifecycle of different records in the organization, from creation and use to disposal, and ensures compliance with recordkeeping laws and regulations. |
Classify by path
Classifying by file path can be especially beneficial in scenarios where large volumes of files are stored across numerous directories. By utilizing file paths, you can create a logical, intuitive categorization scheme that enhances file discovery, retrieval, and management.
It's important to note, however, that file path classification might not be as effective in environments with dynamic or frequently changing file locations. It can also become overly complex in systems with highly nested or unstructured directories. If your data landscape changes rapidly, or if your files are not organized in a logical, hierarchical manner, classifying by file path could introduce more confusion than clarity.
These are the general steps when classifying by path:
Analyze the existing structure
Define classification categories
Set rules for classification
Implement classification
Verify and validate
Maintain and review
1. Analyze the existing structure
Examine the hierarchy, organization, and naming conventions in place. This will give you an insight into how files are distributed and categorized within your system.
For example, if departments are represented in the file path, SharePoint URL, or Content Server breadcrumbs, you can leverage that information to tag the data accordingly.
Let’s say ACME Corp. has the following folder structure on their file share: Paths:
CODE
You can see the department is part of the path, implying that all content within those directories belongs to that department. This is fairly high-level, but it doesn’t end there! This same logic can be used for sub-departments within the path/parent. |
2. Define classification categories
In this step, you'll decide on the specific categories that will be used for tagging in this classification process. It's useful to create these categories in a spreadsheet for easy organization and editing. During this stage, you should list all the known or possible categories that you plan to use.
Returning to our ACME Corp. example, suppose the categories are based on different departments or business functions within the company: |
business_function |
Financial |
Sales |
IT |
RnD |
3. Set rules for classification
Establish rules based on file path patterns to map files to the defined categories. Again, the use of a spreadsheet will make this a lot easier. In this step, the goal is to assign a value to the term(s) that will be searched for that value. In essence, generate a mapping. It is critical there are no duplicates, as duplicates can lead to incorrect tagging.
Let’s see how this would work for our ACME Corp. example: | |
business_function | path |
Financial | \\acmesrv1\financial |
Sales | \\acmesrv1\Sales |
IT | \\acmesrv2\IT |
RnD | \\acmesrv2\RnD |
business_function (the classification) The heading used for this column will be used to create the field in the index. Note: Spaces are not allowed in field names. Use an underscore to replace a spaces. The value in this column for any given row will be the tag assigned for results that match the path. path This heading will not make its way into the index, but will be referenced in the query used for the BulkDocumentEnricher Cognitive Toolkit operation. The value in this column will be matched in the index. If the goal is to tag sub-departments (for example, Purchasing) AND parent departments (for example, Finance), they should be separate fields, one for the parent category and one for the sub category. This would also be a separate CSV file. sub_business_functions.csv | |
business_function | path |
Financial | \\acmesrv1\financial |
Sales | \\acmesrv1\Sales |
IT | \\acmesrv2\IT |
RnD | \\acmesrv2\RnD |
sub_business_functions.csv | |
sub_business_function | path |
Purchasing | \\acmesrv1\financial\purchasing |
Financial Analysis | \\acmesrv1\financial\fin-analysis |
Budgeting | \\acmesrv1\financial\budget |
Treasury | \\acmesrv1\financial\treasury |
|
You may need to try some queries in the visualizer at this point to validate. | |
4. Implement classification
Upon completion of the mapping process, we're now ready to implement the classification. We will be leveraging the functionality of the BulkDocumentEnricher to tag our data. For compatibility, ensure your mapping spreadsheet, is transformed to a CSV format with UTF-8 encoding.
Take, for instance, our example with ACME Corp. Our CSV, encompassing the business function and corresponding path, would display as follows: | |
business_function | path |
Financial | \\acmesrv1\financial |
Sales | \\acmesrv1\Sales |
IT | \\acmesrv2\IT |
RnD | \\acmesrv2\RnD |
Now, we need a query to pair with our CSV and the BulkDocumentEnricher. These queries are special as they facilitate substitution in the query based on the CSV values. This is achieved by wrapping the CSV column name in curly braces { }. Here's the query used:
CODE
Coupled with this query, the BulkDocumentEnricher executes row-by-row substitutions, based on the CSV values. In the BulkDocumentEnricher command, the To illustrate, consider the first row of our example CSV: | |
business_function | path |
Financial | \\acmesrv1\financial |
The substituted query then becomes:
CODE
Here, all the results generated by the query will receive the tag It’s important to check the Cognitive Toolkit logs to ensure there were no errors when you are running a classification process for the first time or after it has been modified. | |
5. Verify and validate
After the execution of the classification process, it is pivotal to verify and validate the accuracy of the data tagging. The Visualizer, with its interactive interface and data exploration capabilities, emerges as an indispensable tool in this phase.
Once the classification process has been completed, it may be necessary to update the index pattern for the newly added field. Once this is done, you can engage in a thorough examination of your data visually via data visualizations, dashboards, or utilizing the Discover view.
To get an overview of the tagging, apply filters within the Visualizer. For instance, a filter like business_function: Financial reveals which files have been assigned the Financial tag and help in identifying any outliers. Given the potential volume of data, manual verification of each tagged item might be impracticable. Instead, a broader approach of scanning through the results to detect anything unusual or inconsistent is advised.
In the event of incorrect tagging, begin by analyzing the metadata of the queried fields. In our ACME Corp. example, the parent field was the basis for our query. The presence of unexpected data in these fields could be the root cause of incorrect tagging. Common issues include extraneous space characters or partial string matching leading to unintended results.
For instance, if your match criterion is \\\\acmesrv1\\quality, but your data contains both \\\\acmesrv1\\quality and \\\\acmesrv1\\quality-lunch-options, both paths would be considered a match as they both contain \\\\acmesrv1\\quality. While technically accurate, this is likely not the intended outcome.
In such scenarios, a more refined query is needed. Leveraging a regular expression (regex) based query or a regexp query can provide a solution. This method allows for enhanced precision by terminating matching beyond a specific character, thus ensuring a more accurate classification.
6. Maintain and review
After successfully classifying your data, it is crucial to regularly maintain and review the classification process. This involves periodically re-evaluating your classifications, ensuring they are still accurate and relevant.
Over time, changes within your organization, such as the introduction of new departments or alteration of business functions, might necessitate modifications to your classification categories. Keep an eye on any changes that could affect the classification and adjust your CSV files accordingly for use with the BulkDocumentEnricher.
Moreover, any anomalies or mistakes spotted during the verification and validation phase should be rectified. This might involve reanalyzing metadata or adjusting your queries to better match your needs. For example, if you noticed mismatches due to partial-string matches, consider using more precise match methods such as regular expression (regex) based queries.
Remember, classification is not a one-time process but an ongoing one that evolves with an organization. Regular reviews will help ensure the data classification remains effective and accurate, allowing you to get the most from your data.
Classify by keyword(s)
Classifying documents by keywords is a practical and efficient way to categorize data. This method is especially useful when dealing with diverse content across a range of files where specific keywords can denote a category or theme. Keywords can be identified in the fullText, path, parent, name, or virtually any other text-based field, providing flexibility and depth to the classification process.
However, keyword classification might not be the best fit for every scenario. In environments where files lack rich or relevant textual content, or the content is highly technical, encrypted, or context-specific, keyword classification could be less effective or even misleading.
An essential aspect of this process is the careful selection of keywords. Using the same keyword across multiple categories can lead to confusion and inaccurate classification. It is critical to ensure each keyword is unique to its category to maintain clarity and precision.
To further refine the classification process and reduce false positives, the use of exclusion keywords can be valuable. These are specific terms that, when present in a document, can exclude it from a particular category. This strategy can help filter out irrelevant files and enhance the overall accuracy of your document classification.
These are the general steps when classifying by path:
Define classification objectives and requirements
Identify and define classification keywords and categories
(optional) Define exclusion keywords
Implement classification
Verify and validate
Maintain and review
1. Define classification objectives and requirements
To start, you need to establish what the organization aims to achieve with keyword classification. This might be to improve data retrieval, ensure compliance, or enhance data security. Understand the organization's specific needs and set clear objectives for the keyword classification process. You don’t need to complete this process in its entirety before implementation, but it is important to keep consistent in approach and naming conventions. Using the Visualizer and/or Enterprise Search will be the perfect tools for this investigation as it allows for easy keyword-based searches.
At this stage, you should start defining what each classification should encapsulate. It’s critical to keep in mind that you will be using keywords to define these classifications. The classifications need to be specific enough that keywords will be able to capture that data correctly.
Let’s take a look at the situation at ACME Corp.: ACME Corp. is aiming to streamline their document management process to enable faster and more user-friendly enterprise search results and to set up an efficient disposition system. The objective here is two-fold:
The requirements for this process include:
These are high-level categories ACME Corp. wants to start with:
Categories can be as macro or micro in scope as the organization needs. What’s important is that keywords can be defined for those categories. It may not be possible to define keywords for every category; path-based classification can be used in these cases. |
2. Identify and define classification keywords and categories
Next, you need to identify the keywords that will be used for classification. Based on your defined objectives, identify specific keywords within fullText (if available), path, parent, name, or any other text-based fields that can denote a category or theme.
Ensure each keyword is unique to its category to avoid confusion and misclassification.
ACME Corp. wants to start with these categories:
What keywords should be used for these categories? It’s time to investigate! The method of determining these keywords varies significantly and depends largely on the organization's knowledge about its departments and the granularity of its records retention schedule. In some cases, the project team may already possess the insights necessary to derive suitable keywords. This could be based on specific form numbers or the details contained within a comprehensive records retention schedule. It's worth noting that every organization stands at different levels of understanding their data. For larger organizations and datasets, it may be more practical to meet with the subject matter experts from each department to help define this mapping. To define their classification objectives, ACME Corp. could conduct inclusive discussions with stakeholders across different departments—IT, records management, and all business functions. The goal of these discussions is to gain a deeper understanding of each department's needs concerning data retrieval and usage. The project team at ACME Corp. has gathered these keywords for their categories: | |
business_function | keywords |
Sales | Sales Report, Contract, Prospects |
Financial | Invoices, Receipts, Tax Document, Financial Statement |
HR | Employee Contract, Benefits Information, Performance Review |
IT | System Documentation, Software License, Incident Report |
These are pretty good keywords! They are unique enough that they should yield promising results on the first pass if ACME Corp’s data uses these terms in their documents. It is essential to remember that there isn't a universally applicable list of keywords. Every organization, with its unique cultural nuances, regional influences, linguistic preferences, data policies, and structural differences, requires a tailor-made approach. The keyword selection is as distinctive as the entity that instituted these practices, demonstrating the diversity of organizational structures and systems. | |
3. Define exclusion keywords (optional)
To refine the classification process and reduce false positives, you should also identify and define exclusion keywords. These are terms that, if present in a document, will exclude it from being classified under a particular category. This step helps to increase classification accuracy.
Exclusionary keywords are not always required, but are helpful when keywords can span multiple categories.
Let's take the example of ACME Corp., which has defined "Report" as a keyword for classifying documents into the Sales and IT categories. Now, the word "Report" is quite common and could be present in various types of documents across these departments. Suppose ACME Corp. is aware that IT documents often contain the keyword "Software". They can then add "Software" as an exclusionary keyword for the Sales category. This way, if a document contains both "Report" and "Software", it won't be incorrectly classified under Sales. The presence of the exclusionary keyword "Software" will ensure the document is more likely classified as an IT document, thereby improving the accuracy of the classification. | ||
business_function | keywords | excluded_keywords |
Sales | Sales Report, Contract, Prospects | Software, Receipts, Receipt |
Financial | Invoices, Receipts, Tax Document, Financial Statement | Resume |
HR | Employee Contract, Benefits Information, Performance Review | Software, Product Benefits |
IT | System Documentation, Software License, Incident Report | Resume |
Shinydocs' Visualizer and Enterprise Search can be invaluable in refining your list of exclusion keywords. These tools allow you to search using your defined keywords and identify any undesired file patterns or mismatches. By recognizing common keyword patterns among these outliers, you can generate effective exclusion terms. For instance, consider ACME Corp.'s project team conducting a search using the keyword "Prospects" within the path field. They discovered numerous results originating from the IT department's file shares due to a folder named "Software Prospects". To rectify this and enhance the accuracy of their results, they added an exclusionary term to their search query. By modifying the search to: | ||
4. Implement classification
Upon completing the mapping process, we’re ready to implement the classification using the BulkDocumentEnricher Cognitive Toolkit operation to tag our data.
For compatibility, ensure your mapping spreadsheet is converted to a CSV format with UTF-8 encoding.
Using our ACME Corp. example, let’s take a look at our CSV, encompassing the business function and corresponding keywords and excluded keywords: | ||
business_function | keywords | excluded_keywords |
Sales | Sales Report, Contract, Prospects | Software, Receipts, Receipt |
Financial | Invoices, Receipts, Tax Document, Financial Statement | Resume |
HR | Employee Contract, Benefits Information, Performance Review | Software, Product Benefits |
IT | System Documentation, Software License, Incident Report | Resume |
Now, we need a query to pair with this CSV and the BulkDocumentEnricher. These queries are special as they facilitate substitution in the query based on the CSV values. This is achieved by wrapping the CSV column name in curly braces { }. Here's the query used:
CODE
Keyword-based classification often performs better on path or parent fields due to less text, reducing false positives. However, broader searches can also be beneficial, extending to Coupled with this query, the BulkDocumentEnricher executes row-by-row substitutions, based on the CSV values. In the BulkDocumentEnricher query, the To illustrate, consider the first row of our example CSV: | ||
business_function | keywords | excluded_keywords |
Sales | Sales Report, Contract, Prospects | Software, Receipts, Receipt |
The substituted query then becomes:
CODE
Here, all the results generated by the query will receive the tag 'Sales' under the field It’s important to check the Cognitive Toolkit logs to ensure there are no errors when you are running a classification process for the first time or after it has been modified. | ||
5. Verify and validate
After the execution of the classification process, it's pivotal to verify and validate the accuracy of the data tagging. The Visualizer, with its interactive interface and data exploration capabilities, emerges as an indispensable tool in this phase.
Once the classification process has been completed, it may be necessary to update the index pattern for the newly added field. When this is done, you can engage in a thorough examination of your data visually via data visualizations, dashboards, or utilizing the Discover view.
To get an overview of the tagging, apply filters within the Visualizer. For instance, a filter like business_function: Sales reveals which files have been assigned the Sales tag and help in identifying any outliers. Given the potential volume of data, manual verification of each tagged item might be impracticable. Instead, a broader approach of scanning through the results to detect anything unusual or inconsistent is advised.
In the event of incorrect tagging, begin by analyzing the metadata of the queried fields. In our ACME Corp. example, the path field was the basis for our query. The presence of unexpected data in these fields could be the root cause of incorrect tagging. Common issues include extraneous space characters or partial string matching, leading to unintended results.
In such scenarios, a more refined query is needed and leveraging exclusion keywords is the ideal solution. This method allows for enhanced precision by removing results that contain keywords not associated with your classification category, thus ensuring a more accurate classification.
6. Maintain and review
After successfully classifying your data, it's crucial to regularly maintain and review the classification process. This involves periodically re-evaluating your classifications, ensuring they are still accurate and relevant.
Over time, changes within your organization, such as the introduction of new departments or alteration of business functions, might necessitate modifications to your classification categories. Keep an eye on any changes that could affect the classification and adjust your CSV files accordingly for use with the BulkDocumentEnricher.
Moreover, any anomalies or mistakes spotted during the verification and validation phase should be rectified. This might involve reanalyzing metadata or adjusting your queries to better match your needs. For example, if you noticed mismatches due to partial-string matches, consider using more precise match methods such as regular expression (regex) based queries or utilize the exclusion keywords to filter out outliers.
Remember, classification is not a one-time process but an ongoing one that evolves with an organization. Regular reviews will help ensure the data classification remains effective and accurate, allowing you to get the most from your data.
Classify by More-Like-This (MLT)
More-Like-This (MLT) queries offer a means to extract and identify documents in a data collection that are similar to a given piece of text. The MLT query is not just about unearthing similar documents, it’s about identifying and retrieving similar documents of the same type. This subtle but essential difference can greatly impact the effectiveness of your data analysis.
For instance, if you have a collection of invoices and you wish to find ones from a specific vendor, the MLT query can be exceptionally handy. Given one invoice, it can locate others from the same vendor, thereby enabling an organized, focused retrieval of documents.
However, the scope of MLT queries can be too narrow when tasked with finding all invoices across a multitude of vendors. In cases where the underlying document types are significantly different, the MLT query might not perform as effectively. That’s why it is important to understand that the actual text in a document must be similar for MLT to work optimally.
These are the general steps when classifying by MLT:
Define classification objectives and requirements
Identify a small set of representative documents
Try MLT on the document set
Refine parameters
Implement
Maintain and review
1. Define Classification Objectives and Requirements
Setting clear objectives and requirements is the cornerstone of any successful data classification project. Using MLT queries for classification, the process begins with a distinct understanding of what you aim to achieve. MLT queries work best on text extracted from a document, as a result, the scope of MLT queries is limited to data where its text has been extracted and indexed.
2. Identify a small set of representative documents
In the context of MLT queries, an essential aspect of this step is identifying representative documents. These examples play a crucial role in guiding the MLT algorithm toward accurate classification. Often, well-structured templates, which clearly represent a certain document type or class, make for excellent choices as representative documents.
For instance, if you intend to classify invoices or purchase orders, you'd choose a well-filled, standard invoice or purchase order template as a representative document.
Remember, the choice of these representative documents directly impacts the classification process. Therefore, ensure they are truly representative of the data category they are meant to embody.
3. Try MLT on the document set
First, navigate to the Discover tab in the Visualizer. Locate your chosen representative document in the index, ensuring that the document has extracted text. Take note of this document's unique identifier, its _id, by copying it and saving it in a convenient location, such as a Notepad file. You should repeat this process for each of your representative documents.

You'll want to add a new filter. Choose + Add filter
Select Edit Query DSL
Remove the contents of this field and paste in the following query:
{
    "bool": {
      "must": [
        {
          "bool": {
            "must": [
              {
                "more_like_this": {
                  "fields": [
                    "fullText"
                  ],
                  "like": [
                    {
                      "_id": ""
                    }
                  ],
                  "minimum_should_match": "90%",
                  "min_term_freq": 1,
                  "min_doc_freq": 1,
                  "min_word_length": 3,
                  "include": "true"
                }
              }
            ]
          }
        }
      ]
    }
  }
In this query, replace the empty "_id" value with the "_id" of your chosen representative document(s) that you saved earlier. If you have more than one example, repeat the _id element (JSON syntax)
{
  "_id": "061157f9f5a06a5318bad7e8d632dbe5474a770c"
},
{
  "_id": "07d0782eb1b2f86e7d68ebd4ecddc09fcf367c1c"
}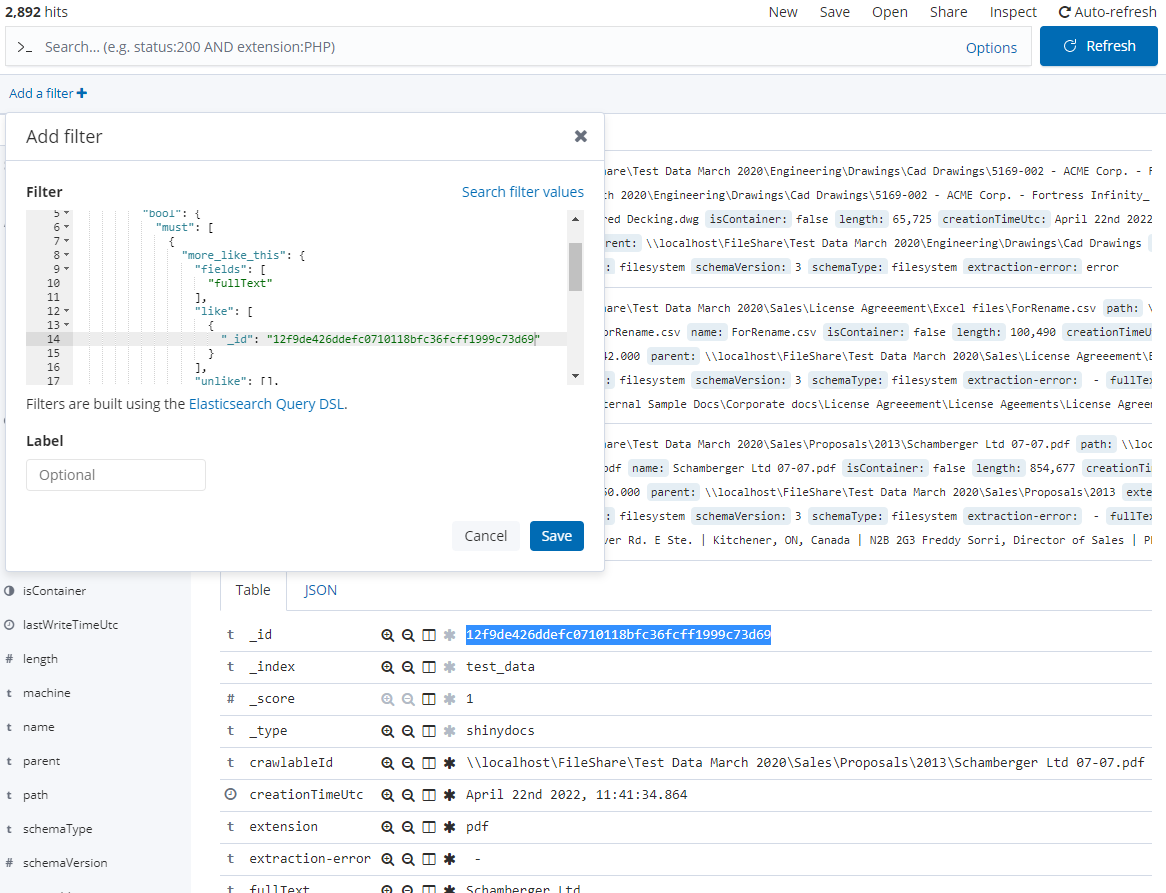
Once you've updated the query with your document's _id(s), save the filter and review the results. Ideally, the documents at the top of your results should align closely with your representative documents.
However, don't stop at the top results. Browse through to the bottom of your results to ensure there aren't any outlying documents being included unintentionally. You can achieve this by adding the _score field to the Discovery view and changing the sort direction. To make this process easier, consider also adding the name and fullText fields to the view.

Once completed, you get a comprehensive overview of how well the MLT query is working with your chosen document set.
4. Refine parameters
The initial results from the MLT query may require refinement. This can be achieved by adjusting several parameters to improve the accuracy of the matching documents.
Minimum_should_match: This parameter defines the percentage of terms that must match between the query document and potential matching documents. If your results include documents that don’t match your intent, increase the
minimum_should_matchincrementally, up to 100%, until most results align with your target documents. Conversely, if there is a high level of text variation among the documents, it may be beneficial to lower theminimum_should_matchpercentageMin_term_freq: The
min_term_freqparameter determines the minimum frequency below which the terms will be ignored from the source document. If your query is generating too broad a range of documents, you might consider increasing this number to narrow down the matches.Min_doc_freq: This parameter sets the minimum frequency in the number of documents below which the terms will be ignored. Increasing
min_doc_freqcan help exclude rare terms, which can be particularly useful when dealing with larger data sets.Min_word_length: Lastly, the
min_word_lengthparameter determines the minimum length of the word below which terms will be ignored. Adjusting this parameter can help filter out shorter, potentially irrelevant words from your search.
After making these adjustments, if you still encounter outlying results, delve deeper into the documents. Sometimes, similar content might be hidden deeper in the documents, causing them to appear in the results.
If the results are still not satisfactory, consider adding more to the must statement or must_not conditions to filter out unwanted data. Use the unlike condition sparingly, as it can potentially exclude relevant data.
{
    "bool": {
      "must": [
        {
          "bool": {
            "must": [
              {
                "more_like_this": {
                  "fields": [
                    "fullText"
                  ],
                  "like": [
                    {
                      "_id": ""
                    }
                  ],
                  "minimum_should_match": "90%",
                  "min_term_freq": 1,
                  "min_doc_freq": 1,
                  "min_word_length": 3,
                  "include": "true"
                }
              }
            ]
          }
        }
      ],
      "must_not": []
    }
  }
This revised MLT query has a blank must_not condition where you can declare what you DON'T want to return.
Once the results are satisfactory, save the query as a JSON file.
5. Implement
With the optimized parameters and refined query saved as a JSON file, you're ready to implement the classification. This is achieved by using the JSON file as an input for the TagQueryResult.cs RunScript in the Cognitive Toolkit.
Run the following command, with the necessary parameters replaced with your specific details:
CognitiveToolkit.exe Runscript -p "tagqueryresult.cs" -q mlt_acme_invoice.json -i shiny -u http://localhost:9200 --field-name content_type --field-values acme_invoice-pindicates the path to the script to be executed, here it'stagqueryresult.cs-qpath to the JSON query file, in this casemlt_acme_invoice.json-idenotes the index name-uis for the URL of your Indexer instance--field-namerefers to the field that will be updated, here it'scontent_type--field-valuesrepresents the value to be applied, in this caseacme_invoice
Once you execute this command, the Cognitive Toolkit tags the documents that match your query.
Finally, you can automate the running of this command, thereby applying your specialized query routinely. This facilitates the ongoing classification of new and updated documents, keeping your data organization up-to-date and relevant.
6. Maintain and review
Maintaining and reviewing your classification process is a crucial step in ensuring the ongoing accuracy and relevancy of your data organization. The effectiveness of classification methods can change over time due to several factors such as changes in document structure, the evolution of language usage, and the emergence of new topics, themes, or document types.
Start by routinely checking the results of the classification. This involves reviewing a random sample of tagged documents to verify if they are correctly classified. Also, check for any unclassified documents that should have been tagged, and explore the reasons why they were not tagged.
Monitor the performance of the MLT queries by tracking their accuracy over time. If there's a noticeable decline, it might be time to revisit and tweak the parameters of the MLT query or even update the representative document set.
In the event of significant changes in your documents, consider re-running the entire process starting from defining the classification objectives. This ensures that your classification strategy remains aligned with your evolving data environment.