Setting up clusters for Analytics Engine (Shinydocs Indexer)
This guide will show you how to set up the Analytics Engine powered by Elasticsearch in a cluster configuration. This guide will also cover some of the fundamentals of a cluster and how it all works.
What is a cluster?
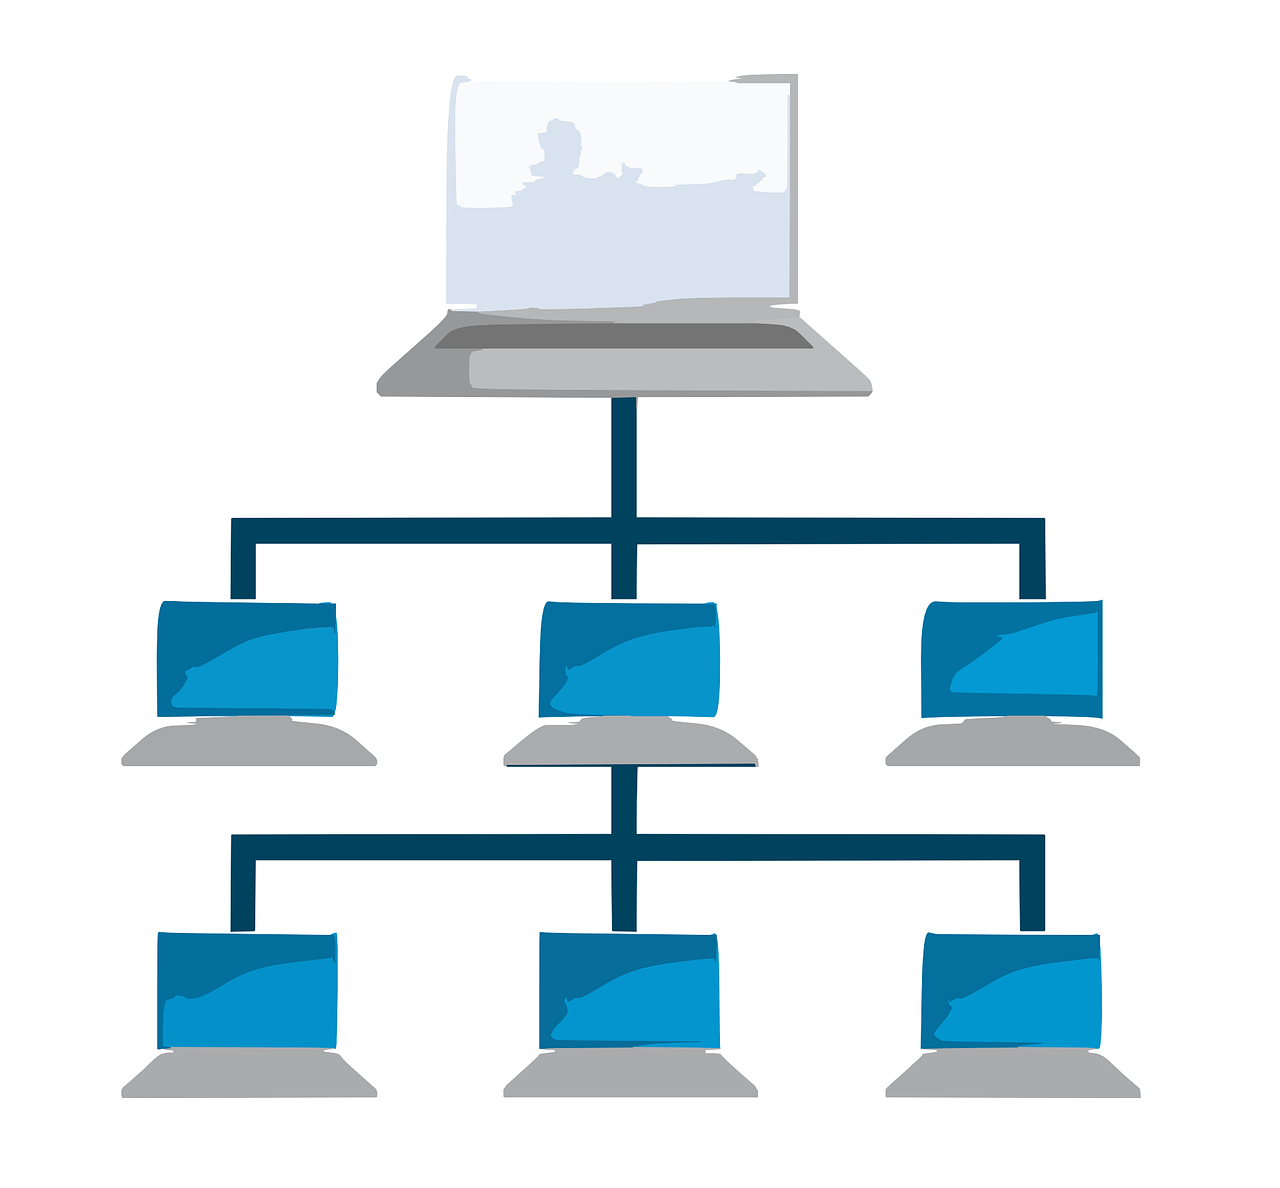
Simply put, a cluster is a group of nodes working in harmony with each other. Large tasks would take too long and be too resource-intensive for one machine to process. Having multiple machines share the work is critical for scaling big data.
Terminology
Cluster
A collection of nodes working together.
Node
Individual machine in the cluster. A node is a computer in this case.
Shard
Where index data is stored.
Types of Nodes
There are four main node types in the Analytics Engine.
Master-Eligible: Executes commands to data nodes and controls the cluster’s internal operations. Typically also stores data.
Data: Stores and serves data in shards, controlled by the master node. Stores data.
Ingest: Ingests data into the index, controlled by the master node. Does not store data.
Coordinator: Similar to a load balancer, coordinates data entering and leaving the index. Does not store data.
Considerations when forming a cluster with the Analytics Engine
There must be less than 1ms network response time between nodes.
Production cluster deployments must have at least 3 master-eligible nodes.
Note: There is an exception to this when dealing with smaller data (~<10 TB), please follow requirements given to your organization by Shinydocs.All machines in the cluster should have the same hardware configuration.
Master-eligible nodes will typically also be data nodes.
The master node is self-elected by the cluster based on the cluster's current state. There will only be one master node at any given time.
By default, nodes operate as master-eligible, data, and ingest all at the same time.
Coordinator nodes are unique. These nodes only become coordinator nodes when master-eligibility, data, and ingest are manually disabled.
Typical large-scale cluster deployment
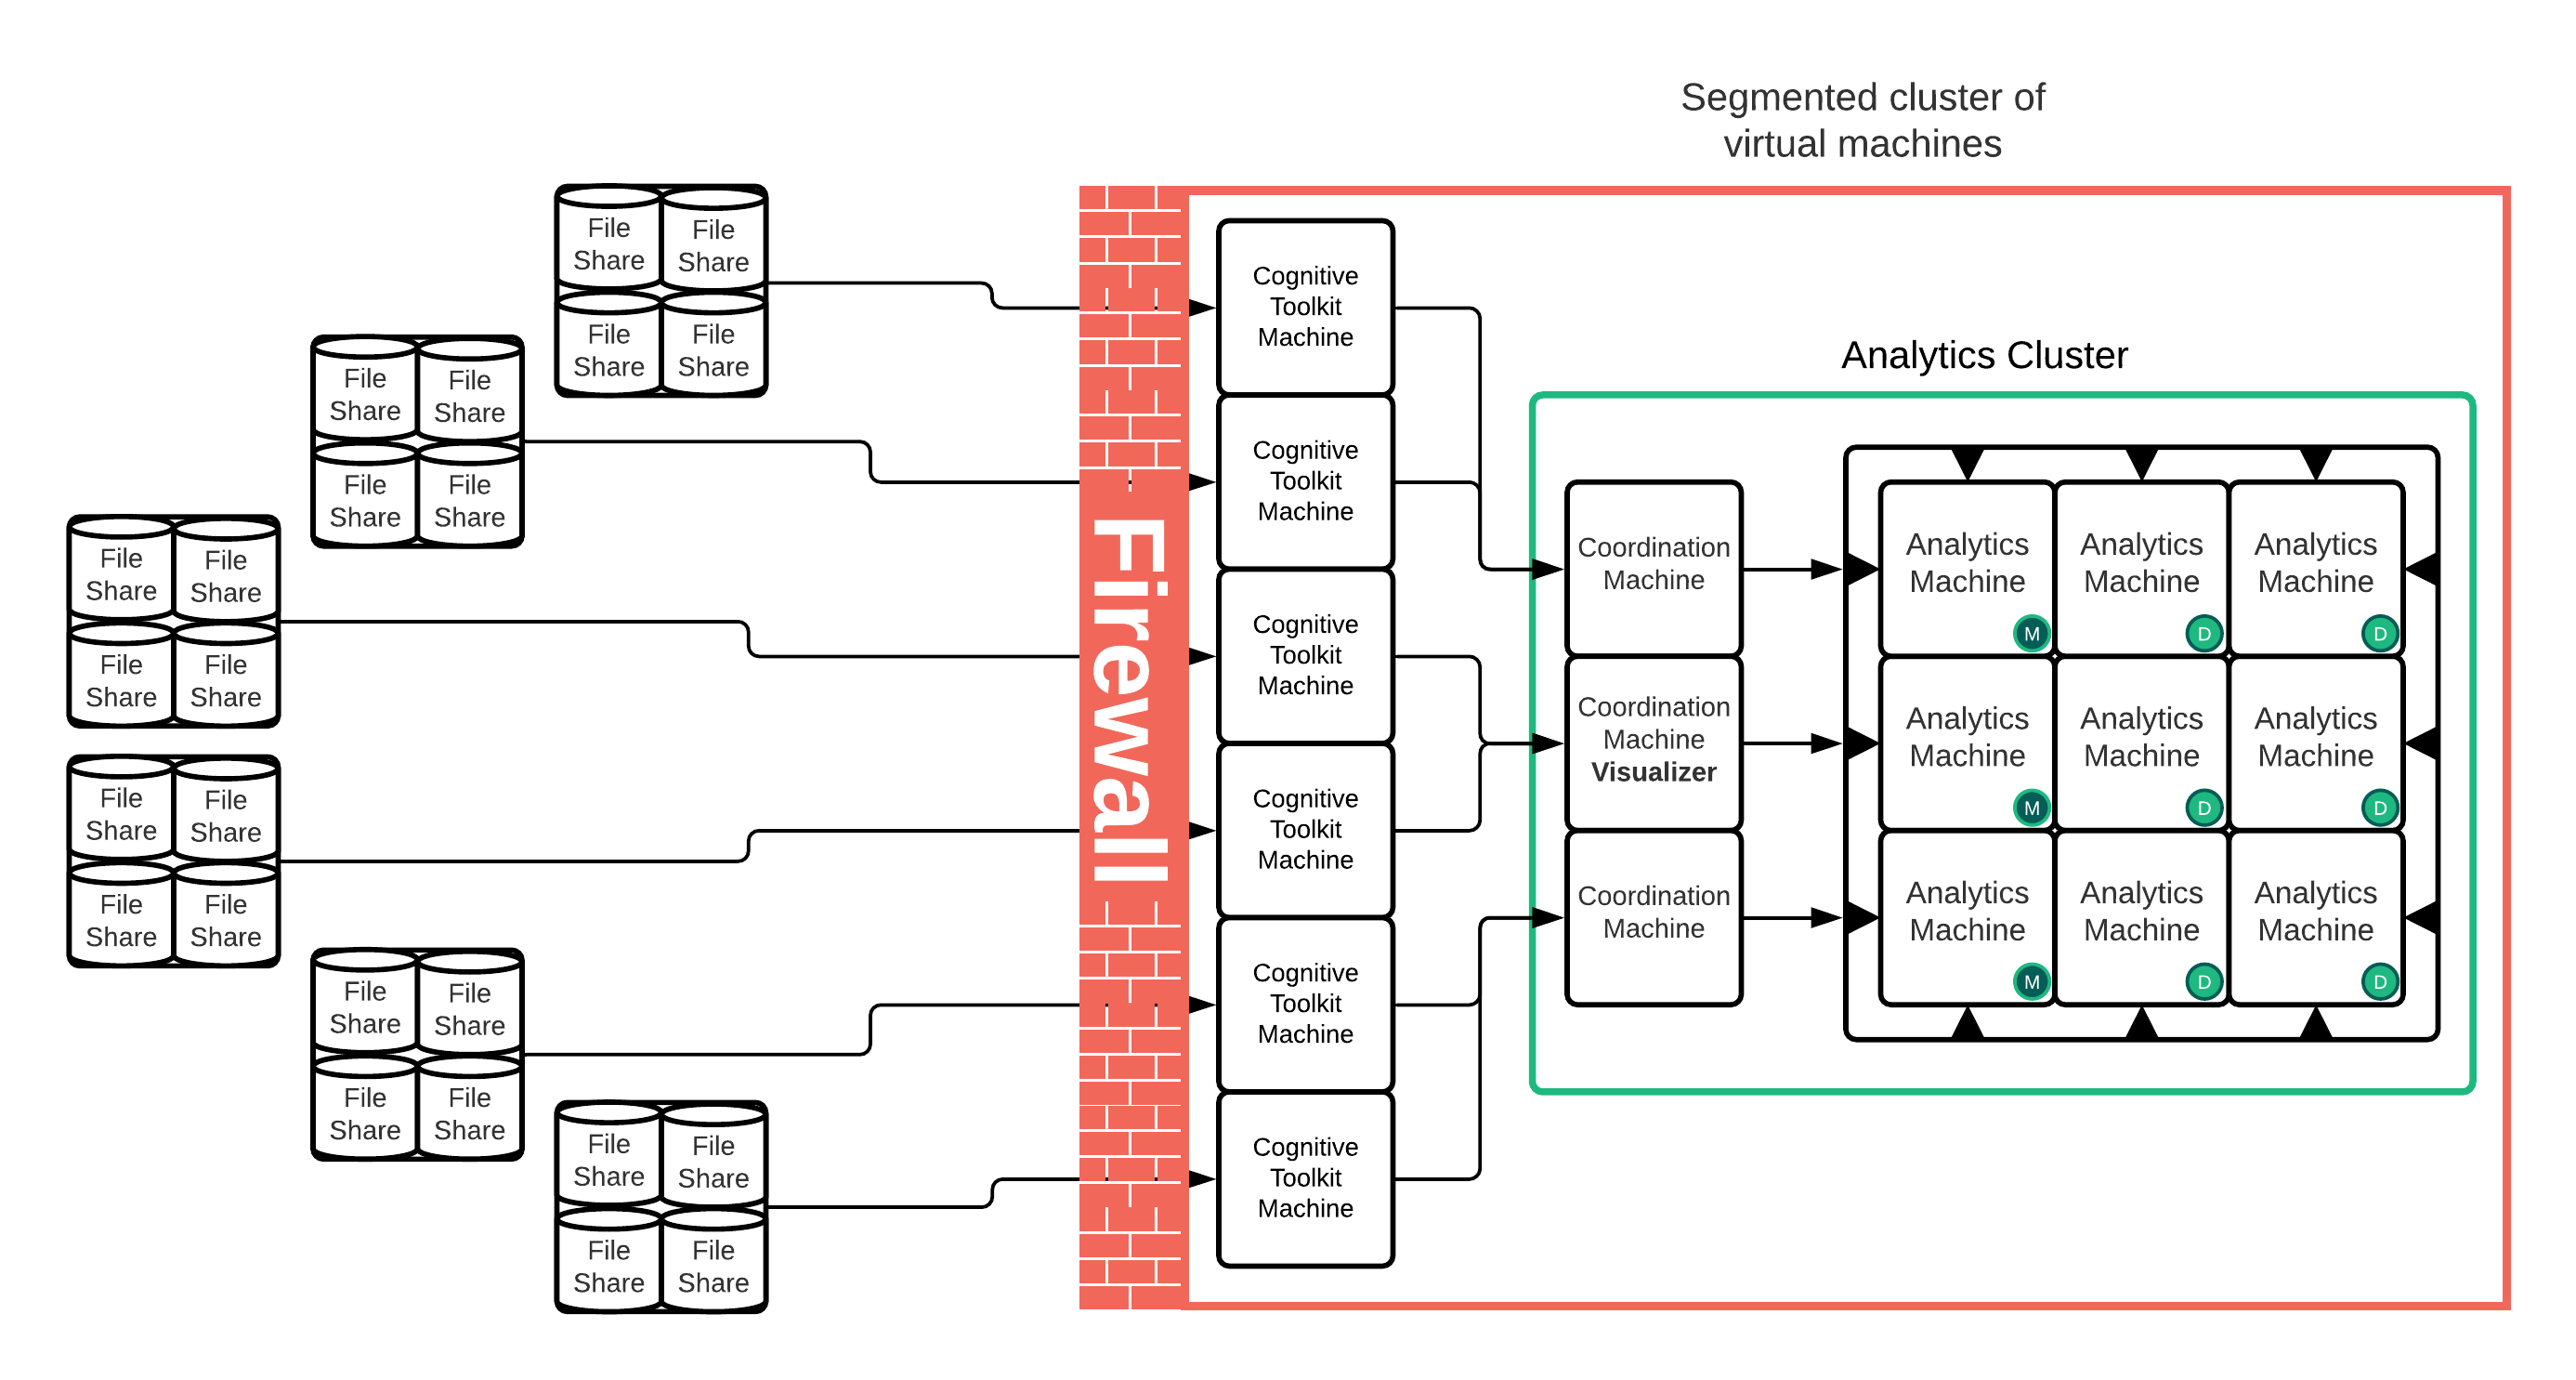
M = Master-Eligible/Data/Ingest Node
D = Data/ingest only node
In this deployment, we have:
3 Master-eligible/Data/Ingest nodes
6 Data/Ingest nodes
3 Coordinator nodes
How to cluster
Before we get into assigning Master, Data, or Coordination nodes, it’s important to understand how to set up a cluster. Clustering with the Analytics Engine powered by Elasticsearch is very easy! All cluster configuration is done in the elasticsearch.yml file (found in ..\indexer\config).
There is a Discovery section in the yml file where you can configure the machines you want to cluster.
# --------------------------------- Discovery ----------------------------------
#
# Pass an initial list of hosts to perform discovery when new node is started:
# The default list of hosts is ["127.0.0.1", "[::1]"]
#
#discovery.zen.ping.unicast.hosts: ["host1", "host2"]
#
# Prevent the "split brain" by configuring the majority of nodes (total number of master-eligible nodes / 2 + 1):
#
#discovery.zen.minimum_master_nodes:
#
# For more information, consult the zen discovery module documentation.
#
Remove the # (comment) symbol from the line:
discovery.zen.ping.unicast.hosts.Between the square brackets, put the Fully Qualified Domain Name (FQDN) or static IP address of all machines in the cluster. These machines are the same machines running the Analytics Engine. Make sure each machine is wrapped in double quotes and separated by commas.
Note: Each machine should have all machines (including itself) listed. You will have the exact same list on each machine.Your configuration may look similar to this:
CODE# --------------------------------- Discovery ---------------------------------- # # Pass an initial list of hosts to perform discovery when new node is started: # The default list of hosts is ["127.0.0.1", "[::1]"] # discovery.zen.ping.unicast.hosts: ["SDOC1", "SDOC2", "10.0.243.54"] # # Prevent the "split brain" by configuring the majority of nodes (total number of master-eligible nodes / 2 + 1): # #discovery.zen.minimum_master_nodes: # # For more information, consult the zen discovery module documentation. #This change MUST be identical on each machine in the cluster. Failing to do so causes these machines to either fail when joining the cluster or intermittently leave the cluster. Any changes to this configuration will require the indexer service to be restarted to load the configuration.
Once each machine has had the services restarted, you can use the web browser on any of the machines to check the cluster state: http://localhost:9200/_cat/nodes?v.
You will see each machine that is part of the cluster. If a machine is missing, check that the service has started on that machine. Depending on your environment, it can take up to five minutes to see all machines.
That’s it! Now, these machines are clustered together. But that is not the last step, you need to configure the different types of nodes!
Minimum master nodes
When deploying a cluster, you must configure the minimum number of master nodes. Elasticsearch sums up this function really well:
To prevent data loss, it is vital to configure the
discovery.zen.minimum_master_nodessetting (which defaults to1) so that each master-eligible node knows the minimum number of master-eligible nodes that must be visible in order to form a cluster.To explain, imagine that you have a cluster consisting of two master-eligible nodes. A network failure breaks communication between these two nodes. Each node sees one master-eligible node… itself. With
minimum_master_nodesset to the default of1, this is sufficient to form a cluster. Each node elects itself as the new master (thinking that the other master-eligible node has died) and the result is two clusters, or a split brain. These two nodes will never rejoin until one node is restarted. Any data that has been written to the restarted node will be lost.Now imagine that you have a cluster with three master-eligible nodes, and
minimum_master_nodesset to2. If a network split separates one node from the other two nodes, the side with one node cannot see enough master-eligible nodes and will realize that it cannot elect itself as master. The side with two nodes will elect a new master (if needed) and continue functioning correctly. As soon as the network split is resolved, the single node will rejoin the cluster and start serving requests again.- Source: https://www.elastic.co/guide/en/elasticsearch/reference/6.8/modules-node.html
This also serves a purpose when an update is required to the cluster. You will be able to shut down and update one of the master-eligible nodes without having to shut down the cluster. Once that update is complete and the node joins the cluster again, the next master-eligible node can be updated.
There is a formula for calculating what value to adjust this setting to:
(master_eligible_nodes / 2) + 1
Using our Typical large-scale cluster deployment as an example, there are three master-eligible nodes, let’s plug that into our formula
(3 / 2) + 1 = 2.5
We can’t set the minimum master nodes to 2.5, so in this case, it makes sense to round down to 2. That means at any given time, there must always be at least two master-eligible nodes online and responding to calls. If at least two are not online, the cluster will go down to prevent data loss.
How to set up a specific node type in a cluster
Master-eligible data node
No configuration change needed! This is the default node configuration
Data only node
Add the following to your elasticsearch.yml file on the designated node/server:
node.master: falseThis configuration will remove this particular node from the master-eligible pool and used to store data.
Coordinator Node
Add the following to your elasticsearch.yml file on the designated node/server:
node.master: false
node.data: false
node.ingest: false
Everything is false? Yes! By disabling master, data, and ingest functions, you turn the node into a coordinator node.
Remember: You must restart the Indexer service when making changes to the elasticsearch.yml file!
How to add a node to a cluster
Adding a node to a cluster typically requires no downtime.
Nodes added to the cluster should perform similarly and have similar capacities.
Ensure the same major version of Java is installed (ex. Java 11) on the new node as the other nodes in your cluster.
Install Shinydocs Indexer and Visualizer on your new node.
Disable Shinydocs Visualizer service on the new node unless this new node will also be the new endpoint for the Shinydocs visualizer.
Note: You should only have one Shinydocs Visualizer service running across the cluster.Stop the Shinydocs Indexer service on the new node as it may have started during the install.
On the new node, in the elasticsearch.yml file, change the following:
cluster.nameto the same cluster name as other nodesnode.nameto a unique name. This will be the name the cluster reffers to this node as.
Start the Shinydocs Indexer Service.
Open Shinydocs Visualizer (Kibana) > Dev Tools (for example, http://localhost:5601/app/kibana#/dev_tools/console?_g=()).
Run
GET _cat/nodes?vto check that the node has been added. It may take a few minutes for the node to show.If the node has not joined the cluster after 5 minutes, you will need to stop the cluster and make the following changes on each node in the elasticsearch.yml file:
discovery.zen.ping.unicast.hosts
List each server that is part of the cluster (ex. [“server-1”,”server-2”,”server-3”])
Set the discovery.zen.minimum_master_nodes according to the following formula
(Number of master eligible nodes) \ 2 + 1
ex. (3 \ 2) + 1 = 2.5 = 2 (rounded down)
discovery.zen.ping.unicast.hosts: 2
Start all Shinydocs Indexer services and the one Shinydocs Visualizer service.
Summary
Clustering is very simple to implement. Pay close attention to the minimum master nodes setting, and ensure all machines have the same list of servers set in discovery.zen.ping.unicast.hosts.
Overview of steps
Plan how many master, data, and coordinator nodes you will need.
Install the Shinydocs Indexer on each node (Shinydocs Visualizer can be installed, but you should run one visualizer in the cluster).
Disable the Shinydocs Visualizer on all nodes but the one you plan to access it on.
Edit the elasticseach.yml file on each node:
List all node’s IP or FQDN to form the cluster in
discovery.zen.ping.unicast.hostsOn each node, set which type of node it will run as
Restart all of the node's Shinydocs Indexer service.
Access http://localhost:9200/_cat/nodes?v in one of the node’s browsers or run GET _cat/nodes?v in Visualizer/Kibana > Dev Tools to verify each node is in the cluster.