Installing and Upgrading Cognitive Suite
Table of Contents
Overview
The Shinydocs Cognitive Suite installation involves the following components:
Search Engine and Dashboards
Cognitive Toolkit, Cognitive Resources
Extraction Service
Hardware Prerequisites
The Shinydocs Cognitive Toolkit is your data worker, these machines are separate from the Search Engines and have different requirements. In most cases, more Cognitive Toolkit machines will improve throughput.
For information on hardware and software prerequisites, see Cognitive Suite Requirements.
Before you begin
Cognitive Toolkit requires a license. Please reach out to your account manager or support to secure a download link for your license file.
Download the following files from our Egnyte file share or contact your support representative:
Cognitive Toolkit | |
|---|---|
Cognitive Toolkit Resources |
|
Shinydocs Extraction Service |
|
Analytics Engine |
|
Data Visualizer |
|
It is recommended that the software is deployed to a non-OS drive, like an Apps drive (i.e. E:\Shinydocs). The downloaded files might be placed in E:\Software, for example. Do not use the default installation, (i.e. without parameters or by double-clicking on the installers) unless the default location in C:\Program Files\Shinydocs Professional is your preferred location, it is not recommended.
Installing the Shinydocs Search Engine
Please ensure that you log into the server with the Service Account.
Open a Command Prompt as the Administrator
Locate the files downloaded (see above), we’ll presume these are in
E:\Softwareand that the software will be installed intoE:\Shinydocs. Navigate toE:\Software.Execute the following command from the Command Prompt:
msiexec /i shinydocs-search-installer-<version>.msi INSTALLFOLDER="e:\Shinydocs\shinydocs-search-engine"Installing the Shinydocs Dashboards
Please ensure that you log into the server with the Service Account.
Open a Command Prompt as the Administrator
Locate the files downloaded (see above), we’ll presume these are in
E:\Softwareand that the software will be installed intoE:\Shinydocs. Navigate toE:\Software.Execute the following command from the Command Prompt:
shinydocs-dashboards-<version>.exe INSTALLFOLDER="e:\Shinydocs\shinydocs-dashboards"Installing the Shinydocs Extractor
The Shinydocs Extractor is best accommodated on the same system as the Cognitive Toolkit
is deployed on.
Please ensure that you log into the server with the Service Account.
Open a Command Prompt as the Administrator
Locate the files downloaded (see above), we’ll presume these are in
E:\Softwareand that the software will be installed intoE:\Shinydocs. Navigate toE:\Software.Execute the following command from the Command Prompt:
shinydocs-extraction-<version>.msi INSTALLFOLDER="e:\Shinydocs\shinydocs-extractor"Installing the Shinydocs Cognitive Suite
The following instructions outline how to complete a fresh installation of Shinydocs Cognitive Suite. Typically all installs should be done on a non OS drive. Copy the Cognitive Toolkit .zip files to the E:\Shinydocs location.
Cognitive Toolkit
Right-click the Cognitive Toolkit (
shinydocs-cognitive-toolkit-[version]-[date].zip) zip file and select Properties.Under the General tab, select Unblock and then select Apply.
Right-click on the Cognitive Toolkit (
shinydocs-cognitive-toolkit-[version]-[date].zip) zip file and select Extract All.
Note the location to which you extract the Cognitive Toolkit. The Cognitive Toolkit Resources will be extracted to this folder location in the next step.
Cognitive Toolkit Resources
Right-click the Cognitive Toolkit Resources (
shinydocs-cognitive-toolkit-resources-[version]-[date].zip) zip file and select Properties.Under the General tab, select Unblock and then select Apply.
Right-click on the Cognitive Toolkit Resources
(shinydocs-cognitive-toolkit-resources-[version]-[date].zip) zip file. Select Extract All... and unzip the file into the same folder location the Cognitive Toolkit was extracted.The Cognitive Toolkit folder now has 2 sub-folders: External Resources and Scripts.
Success! You’ve installed the Shinydocs Cognitive Suite!
What’s next? Get started by Activating the Cognitive Toolkit License.
Advanced Configurations
Allocating more heap space to the analytics engine jvm:
From the Command Prompt, navigate to
E:\Shinydocs\shinydocs-search-engine\binstart the Shinydocs Search Engine Properties using this command:
opensearch-service-mgr.exe //ES//shinydocs-search-engine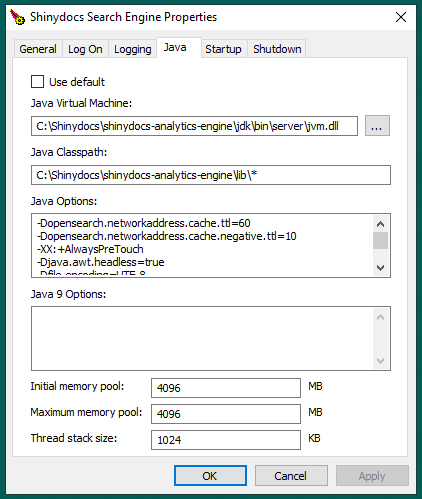
Selecting the Java tab on this dialog, you may change the Initial memory pool and Maximum memory pool values to suit your requirements. On a server with 64Gb of RAM a value of 28000 or 28Gb is reasonable.
The following configurations are located in the
opensearch.ymlfile located inE:\Shinydocs\opensearch-search-engine\configLine 17 -
cluster.nameRemove the comment character
#at the beginning of the lineReplace
my-applicationwith a name for your cluster (e.g.acme-analytics)This name will need to be the exact same on every node in the cluster
Line 23 -
node.nameRemove the comment character
#at the beginning of the lineReplace
node-1with a unique name for this machine. This will be the name reported on the Monitoring page of the Dashboards. Using the server's name is a good choice!
Line 43 -
bootstrap.memory_lockRemove the comment character
#at the beginning of the lineKeep the value
true
Line 55 -
network.host- This is important when the search engine is separated from the Cognitive Toolkit server, or if Visualizer is accessed remotely from the server the search engine is installed on.Remove the comment character
#at the beginning of the lineGenerally, the easiest value to set
network.hostto is0.0.0.0meaning that it will bind on all network interfaces on the machine.If this line is not modified, the index and Dashboards will not be accessible outside of the local machine.
Subsequent this change, to satisfy security requirements of opensearch, add a line (56) reading
CODEdiscovery.type: single-node
If you are configuring a cluster of servers, please see our guide on Cluster Setup for Analytics Engine (Shinydocs Indexer)
Save the file and restart the Shinydocs Indexer service for your changes to take effect
To reach the visualizer from a different machine, you will need to edit the
opensearch-dashboards.ymlfile:opensearch-dashboards.yml file located in E:\Shinydocs\opensearch-dashboards\config
Line 7 - server.port
Remove the comment character # at the beginning of the line
Line 14 - server.host
Remove the comment character # at the beginning of the line
Set the server.host to "0.0.0.0"
Save the file and restart the Shinydocs Dashboards service for your changes to take effect
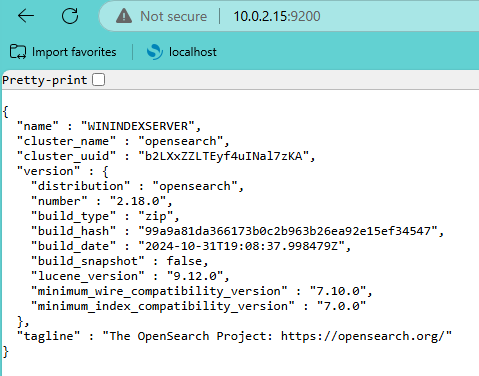
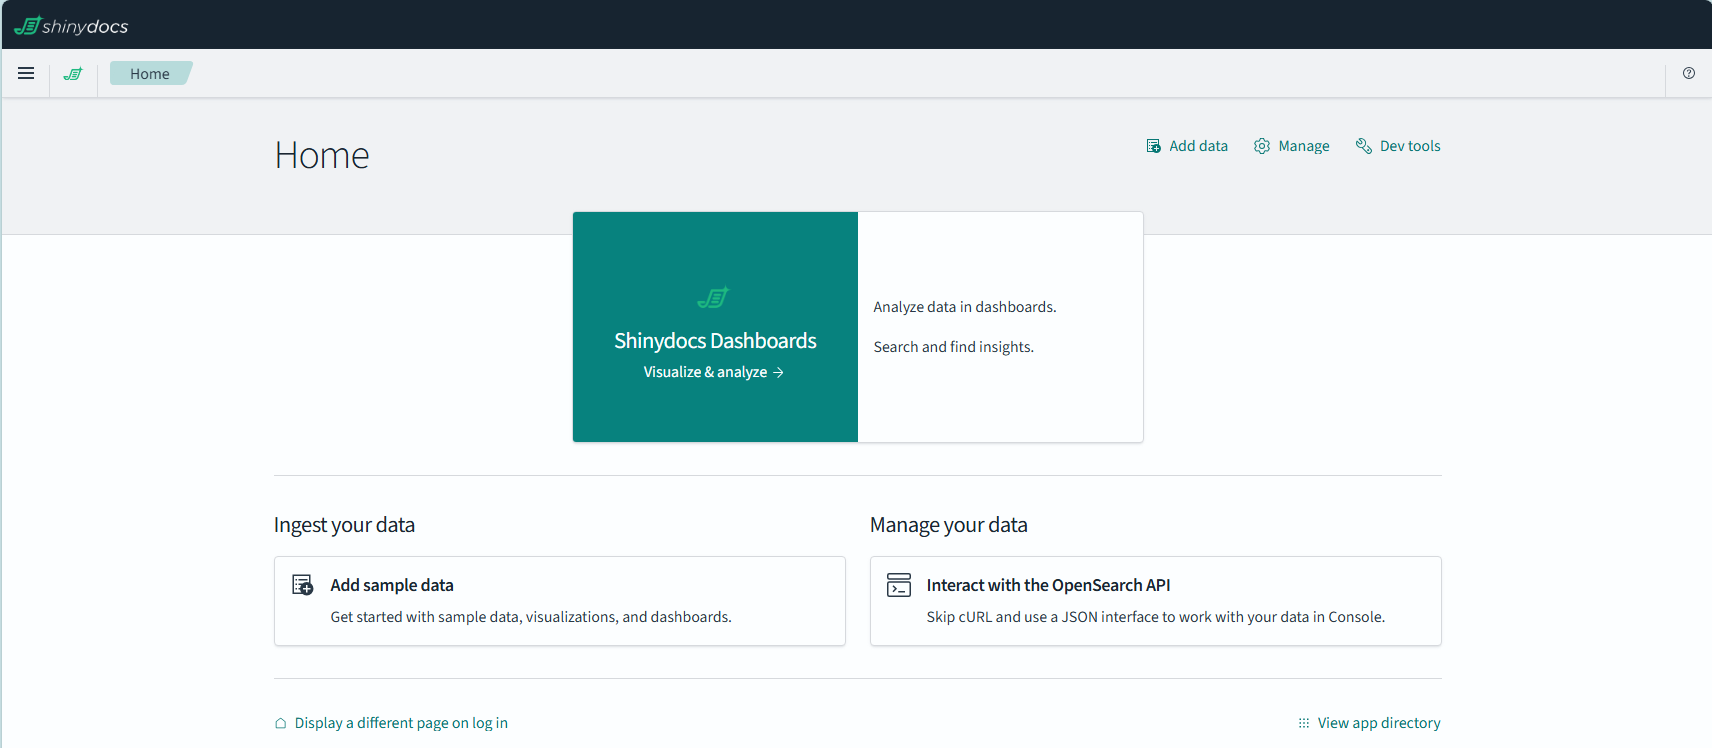
In your web-browser, verify you are able to access the following web pages:
http://localhost:9200 : Indexer - will return a JSON file if working normally
http://localhost:5601 : Visualizer - will load Shinydocs Analytics
Upgrade
The following instructions outline how to upgrade an existing version of Shinydocs Cognitive Suite to a newer version.
Cognitive Toolkit
Right-click the Cognitive Toolkit (
shinydocs-cognitive-toolkit-[version]-[date].zip) zip file and select Properties.Under the General tab, select Unblock and then select Apply.
Right-click on the Cognitive Toolkit (
shinydocs-cognitive-toolkit-[version]-[date].zip) zip file and select Extract All...When selecting the extraction location, overwrite the old Cognitive Toolkit directory with this new one.
Note the location to which you extract the Cognitive Toolkit. The Cognitive Toolkit Resources will be extracted to this folder location in the next step.
Cognitive Toolkit Resources
Make a copy of your source settings files BEFORE updating your Resources. If source settings files are updated, you will need to copy your existing authentication values to the new source settings files
If you use the SaveValue operation in the Cognitive Toolkit and have a saved-parameters.yaml file for encrypted passwords, ensure that file is not deleted. If it was previously stored within the old Cognitive Toolkit folder, it will need to be re-saved to the same location within the new folder.
Right-click the Cognitive Toolkit Resources
(shinydocs-cognitive-toolkit-resources-[version].zip) zip file and select Properties.Under the General tab, select Unblock and then select Apply.
Right-click on the Cognitive Toolkit Resources (
shinydocs-cognitive-toolkit-resources-[version].zip) zip file. Select Extract All... and unzip the file into the same folder location the Cognitive Toolkit was extracted.When selecting the extraction location, overwrite the old shinydocs-cognitive-toolkit-resources with this new one.
The Cognitive Toolkit folder now has 2 sub-folders: External Resources and Scripts.
If source settings files are updated, copy your existing authentication values to the new source settings files
Congratulations! You have completed the upgrade of the Cognitive Toolkit portion of the Shinydocs Cognitive Suite