Migrating to Content Server with Shinydocs Review
Overview
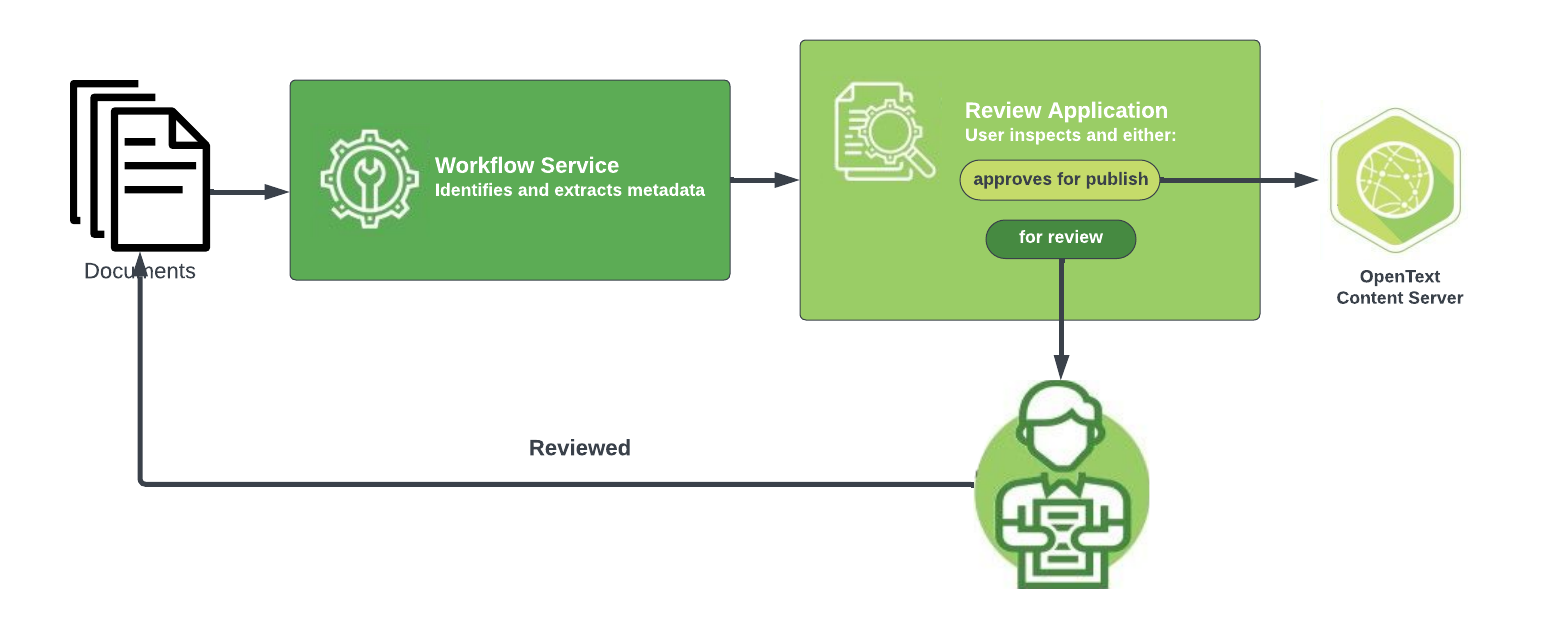
Our Workflow service and Review application make up the Shinydocs™ Review solution. Working with Cognitive Suite, this solution allows documents to be uploaded into OpenText™ Content Server with all the appropriate categories and attributes (CATS & ATTS) after a review is completed.
Workflow is a backend service that monitors data, performs document recognition, and initiates the Workflow process.
Review is a web application that users run to validate and modify automatically classified documents before starting the automated workflow.
Process
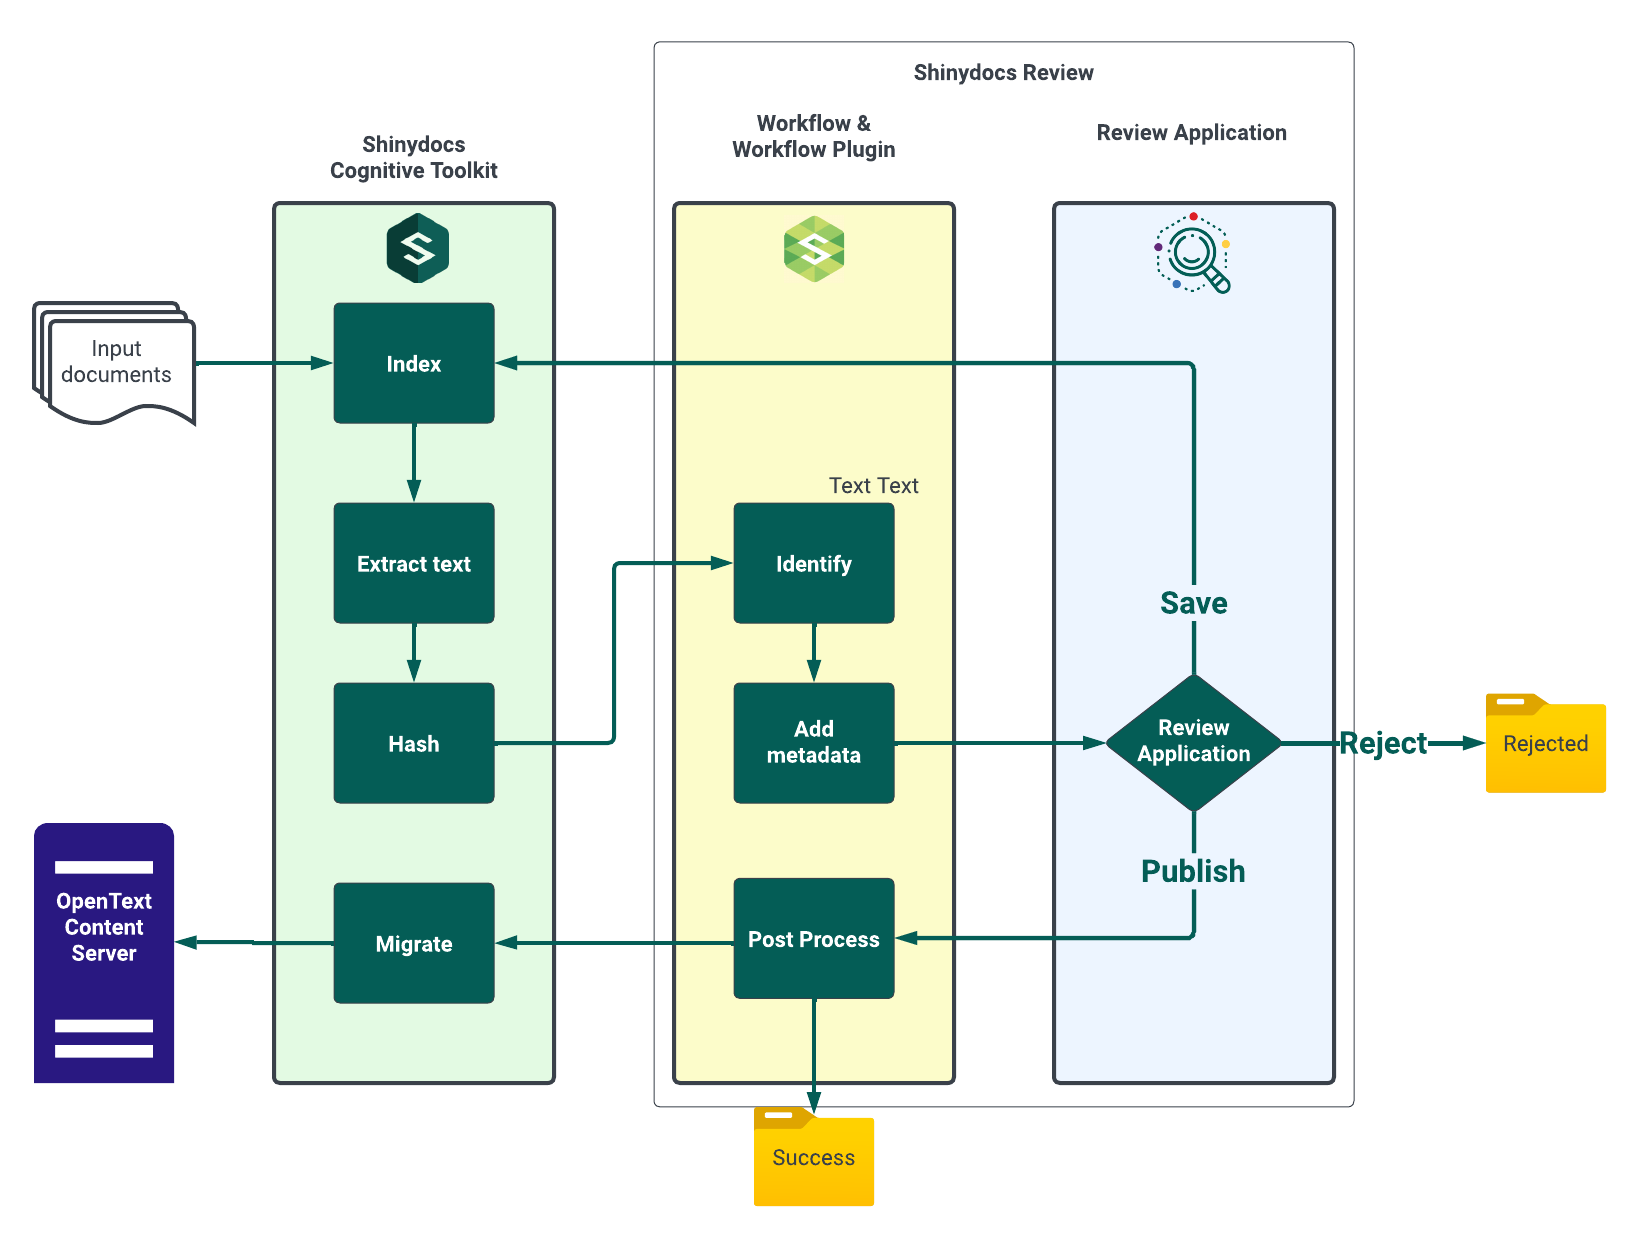
The Workflow service utilizes three components, two of which are part of the Cognitive Toolkit, to automate the migration of documents into a Content Server:
Cognitive Toolkit
An initial crawl indexes the Content Server data
A second scan during which text extraction and hashing occur
Workflow Plugin, a DLL file that works in the backend to manage document definitions and to action matching logic
Workflow: A backend service that monitors data, performs document recognition, and initiates workflows.
When completing the identification and processing tasks, the Workflow service calls the methods defined in the Workflow Plugin.
The Workflow Plugin matches the extracted text with manually programmed “document definitions”. These definitions are based on standard identified patterns and fields and are baked into the DLL file during development.
Using a series of folders and automated tasks the Workflow service populates all the document definition fields and data for Automation Review.
Review: A web application that allows users an opportunity to view, validate, and modify automatically identified documents before commencing an automated workflow.
User profile information is retained for any changes that occur. This auditing functionality allows the tracking of completed work and provides the ability to identify who has published and/or flagged documents for further inspection during the process.
Workflow
Folder Structure
Workflow contains a folder structure that ingests documents into Review. There are four defined folders for processing. Each folder has a specific task and is required for the system to operate. They can be located either locally on the machine Shinydocs Workflow is installed or, or on a network share that is accessible by the automation workflow service user.
Monitoring
Processing
Success
Unknown
Monitoring Folder |
Documents are scanned and/or transferred into this folder to start the process. By default, Workflow looks for new files every 10 seconds. New files are then transferred into the processing folder to begin the Workflow process.
|
Processing Folder |
|---|
Document analysis and data extraction is performed in this folder to automatically identify the document type. Once completed, the document will be available for review.
|
Success Folder |
Documents that have been reviewed and published to the Content Server are displayed in this folder.
|
Unknown Folder |
Documents that require further inspection are displayed in this folder.
|
Processing Flow
The Workflow process starts when documents are scanned, pasted, or saved to the Monitoring folder.
From the Monitoring folder, documents are automatically uploaded to the Processing folder.
Documents are analyzed in the Processing folder and information is extracted, to populate document property fields. Fields are set and stored in a single location, with document types being defined and identified based on the fields.
Documents remain in the Processing folder and are viewable in the Review application.
Following a user’s review:
Documents successfully published to the Content Server are moved into the Success folder.
Documents set aside for further review or, those that were not successfully uploaded to the Content Server for publishing, are moved to the Unknown folder.
Documents remain in either the Success or Unknown folders until they are manually deleted.
Review
Homepage
After files have been discovered in the Monitoring folder, they are uploaded to the Review application’s home page to be reviewed and validated. This page lists all documents that are ready for review before uploading to the Content Server.
Documents can be reviewed individually, or the reviewer can select multiple documents by clicking the checkbox next to each one intended to be reviewed and then clicking Continue.

If you have selected multiple documents to review, view the next or previous document by clicking Next or Previous at the top of the page.

Completeness Gauge
On the far right side there is a Complete? column. This column shows the number of metadata fields pre-populated by the Workflow Plugin. The numerator is the number of fields that the Workflow Plugin was able to populate. The denominator is the total number of fields that could be populated before you start reviewing and editing.
This calculation is done by the Workflow service at the time of ingestion only. The value is not updated after changes are made by users in the Review application.
Reviewing a Document
Select a document by clicking anywhere along the document row.
A split screen review page is rendered:
The left panel displays a PDF document preview.
The right panel displays the document properties.
If the document has multiple pages, you can scroll to the bottom of the left panel and select Next or Previous to preview the other pages of the document.
In the right panel, various document properties are displayed, such as classifications and/or categories and attributes associated with the document:
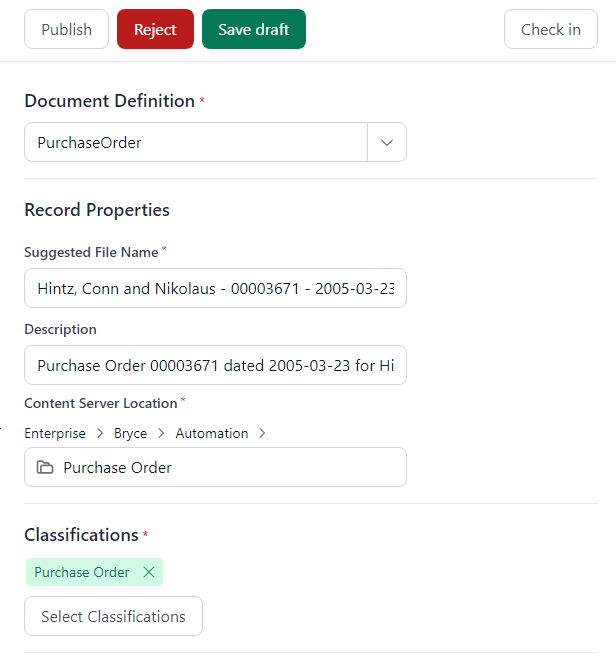
The program will automatically insert any fields it can find, and match based on the text and values extracted from the document.
If a field is not found on the document, it will be left blank or marked with x’s and will require the reviewer to insert the appropriate field value.
Some properties in the right panel will be linked to each other (for example, the Content Server Location selection will automatically populate other fields and classifications).
Entering the Content Server Location triggers Review to check if the destination folder contains a document with the same name. If so, a warning will appear and allow the user to view the content in Content Server.
Once all fields have been populated and reviewed you can choose to either view the property sheet, publish or reject the document.
Viewing a Property Sheet
A property sheet provides information regarding the document type, document type grouping, and the help URL, used for reference purposes.
Publishing a Document
Upload the document into Content Server.
Select Publish at the top of the page and a window is displayed to verify your selection. The path (breadcrumbs) for the destination migration folder is displayed for reference.
Select Publish again and a confirmation notice is displayed. The current user is recorded as the owner when a document is published.
If reviewing multiple documents, repeat this step for each document. You will be rerouted to the home page once all documents have been either published or rejected
Publishing an item will:
Save any changes made during Review
Move the item to the Content Server Location, entered during the edit mode of Review
Rejecting a Document
Illegible documents that do not contain the appropriate information to classify and upload into the Content Server can be rejected
Click Reject at the top of the page.
In the popup, provide a reason for the rejection. A confirmation window is displayed and you will be redirected back to the home page.
It may take a moment for the home page to refresh and reflect the changes.
Rejecting an item will:
Save the rejection reason, entered during the edit mode of Review
Move the item to the Unknown folder
The rejection reason will be logged in the index and available through a dashboard visualization.
Inserting Values/Fields Manually
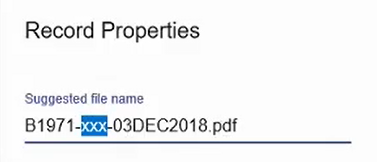
Values and fields that cannot be extracted from the document automatically will require the reviewer to find and manually add to the appropriate field the right panel. Often these values and fields cannot be extracted because they were handwritten.
Search the document for this information (it may be found on another page within the document).
For example, part of this document’s file name is missing some information (marked by the xxx placeholder).
The missing information is found handwritten in the “Tracking #” field and can be typed over the placeholder.
Review displays help text to assist with file naming conventions based on manually entered attributes.
Inherited Classification
When a document inherits a classification in the Content Server, it does not need to be set first in the Index.
Where a document inherits a classification for the folder and that value is missing from the index, an error is not displayed.
Post-Processing
Post-processing capability enables customers to perform any additional processing required on a document before it is migrated to the Content Server, such as combining two or more fields to generate a single field.
Example
An attribute named equipment code is comprised of a part number, a serial number, and a location. In the user interface, you could prompt for a serial number, part number, and location to generate the equipment code.
Further Review Required
Any documents that have either been set aside for further review or have failed to upload to the Content Server after being published will be moved into the Unknown folder.