Search Administration - Roles
Shinydocs Pro Search supports role-based access control (RBAC). Roles allow administrators to increase their control over settings and access for each user by assigning specific roles in the system. These roles are based on each user’s active directory group.
Creating a Role
From the Admin Panel, click Roles
Click + Add role to create a new role
Enter a Name that is easy to distinguish and represents the role’s usage/settings (for example, “Data Steward” or “Regular User”)
Enter at least one valid Active Directory Group path for Group Name
Click + to add another Active Directory Group to this role
Click Add to create the role
Find the newly created role based on the Name entered in Step 2 and Select “Edit” to start configuring
Configuring a Role
To configure a role, locate the role based on the Name provided at the time of creation and click Edit. The following options are configurable.
Role settings
Edit or update the display name for this role in Role name.
Active directory groups
Edit current Active Directory Groups or add Active Directory Groups to this role in Group name.
Data enrichment
Enable or disable access to data enrichment features.
For more information about data enrichment features, see Configuring Enrichment tags.
Microsoft Online
Enable automatic Microsoft login prompts within Search, to ensure results from a Microsoft online source (for example, SharePoint or Exchange) are not returned if the user is not logged in to their Microsoft account.
If this setting is enabled, users performing a search while they are logged out of their Microsoft Online account will see the Microsoft Online Login screen before the results are returned. After users log into their account the Search results are returned.
We recommend Administrators enable this feature for roles that have connections to Microsoft Online sources, such as SharePoint or Exchange.
NOTE: If the setting is not enabled when Microsoft Online sources are connected, the system may not behave as expected. Results may be hidden from results until configured.
Role Customization
In addition to the configuration options for a role, you can also customize the role by adding Advanced Search forms and Filters, as well as setting up which Source(s) are searchable by the role
Creating and Configuring an Advanced Search Form
Create an Advanced Search form that allows users to perform searches against an index facet (for example, a specific file type). Then Configure supporting fields on this form to align with the type of index facet.
Creating a New Form
Click + Add form
Enter a value in Title for the name of the form that you want users to see when selecting an Advanced Search form
Configuring Fields
In the Fields section, select a value from Index field name
Select a value from the Type dropdown for how users will interact with the form. The different Types are: Autocomplete, Date, Dropdown, Range, Switch, Text field.
If Date is selected, users will be shown a widget allowing them to pick a date range
If Autocomplete or Dropdown is selected, define a list of values that will be presented dynamically in the form. There are two options for defining the list of values:
Select Custom list
Enter text under VALUES
Click + to enter another value
Or select File
Paste the path to a file that contains a JSON-formatted list of values.
Here is an example of the contents of such a file: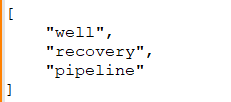
If Switch is selected, the underlying field should be Boolean (true or false)
If Range is selected, check Show tick marks on or off then enter values for Min, Max, Step (increment), and Unit
If Text Field is selected, the form will allow users to enter text values to search for within the specified field
Enter a Display name value for what users will see as a representation for the selected Index field name (for example, display “Tags” for index field enrichmentTags)
Select a Size for the width of the field appearing on the form
Save or continue to Hidden Fields
Hidden Fields
Hidden fields can be included in an advanced search, but are not shown as options to users. This allows you to preset search terms to be matched when using the advanced form. For example, you could add a hidden field to only include PDF files in the search results by setting the “extension” field to PDF.
Configuring Filters
Filters are options that can be dynamically applied to the current search results. You can create one set of filters per Source.
Adding a new Filter Set
Click + Add filter set
Select the Source you want the filter set to be associated with
Select an Index field name that you want configure for the filter set (for example, extension)
Select the Type of filter that is most appropriate (for example, dropdown or text field)
Select whether or not the filter will be visible by default
Select the Language that the filter, visible to the user, is in
Enter a Title, the filter name that will be visible to users in the filter set
Click + Add filter to add another filter to the filter set
Click Save changes
Configuring Sources
A Source corresponds to a specific index to be searched. You can define multiple sources in a role if you want that role to be able to search in multiple indexes.
Configuring Sources
Click + Add source
Enter a Name for the source
Enter the name of the index that was generated from Cognitive Toolkit in Indices
Select the Language that Title, visible in the search bar Sources dropdown, is in
Enter a Title, the name that will be visible to users in the search bar sources dropdown
Repeat these steps for each index this role needs access to
Click Save changes
Configuring Source Groups
Source Groups allow you to define a groups that contains multiple sources. When that source group is selected, a search will be performed against all the sources in the group.
At least one source must be configured for this role before proceeding.
Click + Add Source
Select the Source you want to group from the dropdown
Click + to add this source to a group
Enter a Group Label, the name that will be visible to users in the search bar sources dropdown
Select + to add another source to this group
Repeat until all sources for this group are added
Click Save changes
Once all settings and configurations are complete, click Save to ensure all changes are updated
To confirm changes made to Source groups, launch Discovery Search and click on Source in the search bar.
What is Role-Based Access Control (RBAC)?
Default Role
The default role is where Advanced search configuration, Filters configuration, Sources configuration, and Source groups configuration are set up. The Default role serves as a role to which any user without a specific role will be defaulted to and can be used as a normal user to match functionality for users to a pre-roles state. It is recommended to configure specific roles and not assign end-users only to the default role.
Roles can be assigned to users
A user can be assigned a role by administrators based on their current active directory groups and roles. When creating a new role, the Group Name value must align to a currently existing Active Directory group in the client’s system. When a user launches the Enterprise Search site they will be assigned the role that most closely matches their current Active Directory group. If a user is part of multiple Active Directory groups/roles that are also aligned to more than one Enterprise Search role, they can switch between all available roles from Preferences in their user menu.
Specific settings are role-dependent
Advanced search configuration, Filters configuration, Sources configuration, and Source groups configuration are configured in Roles > Edit Role (per role). Each setting is configured per role and each new role can have different configurations.
Recommendations and notes for RBAC
When to use new roles
Each new role should align to some difference in settings for any or for all of Advanced search configuration, Filters configuration, Sources configuration, and Source groups configuration.
Example use case
One set of users should have access to Index A only, but another set of users should have access to Index B only. Each set of users should have their own role where the source configuration aligns (Role A has Index A configured under sources, Role B has Index B configured under sources, etc.). Note that all users assigned a specific role must also be part of the Active Directory Group(s) aligned to that role in Discovery Search because users can only access and use roles that match their Active Directory Group.
Active Directory alignment
All users assigned a specific role in Enterprise Search must also be part of the Active Directory Group(s) aligned to that role because users can only access and use roles that match their Active Directory Group.
Example use case
If I am part of the Human Resources Active Directory Group, I can only use and be assigned roles in Enterprise Search that are configured to align with the Human Resources Active Directory Group. Administrators can align any Active Directory Group to match their needs.
Administrators
Administrators need early access to Enterprise Search, to set up each role, source, and setting. By default, Administration access is granted to all users who belong to the local Users group on the server where Shinydocs Pro is installed. If you wish to change the group that grants Administration access, you must set the ActiveDirectoryAdminGroup property in [Install location]\Shinydocs Pro\Search\appsettings.json.