Setting Up Kerberos authentication for Shinydocs Pro
What is Kerberos?
Kerberos is a network authentication protocol designed to provide strong authentication for client/server applications. Shinydocs Pro and Shinydocs Enterprise Search use Kestrel with Windows Authentication and Kerberos to authenticate a user from their browsers.
The following guide walks through how to set up a Windows Server environment to support Kerberos pass-through (2-hop authentication).
Setup
Setting Shinydocs Search service account
To set up the Kestrel web server to authenticate using Kerberos, the process, “Shinydocs Search”, needs to run as a named user from the domain controller. This can be either a regular user account on the domain or a group-managed service account (For more information, see: Group Managed Service Accounts Overview | Microsoft Learn)
Granting administrative access to the service account on the machine where Shinydocs Pro is installed would provide it with the access needed to run the service. This could be achieved by adding it to the local Administrators group.
Alternatively, you can grant the account only specific privileges to run the service by configuring the below criteria;
have read access to the machine that Shinydocs Pro is installed on
this should work by putting the account in the local default “Users” account
have “Full control” permissions on the Shinydocs Search folder
the default location would be “C:\Program Files\Shinydocs Professional\Search”
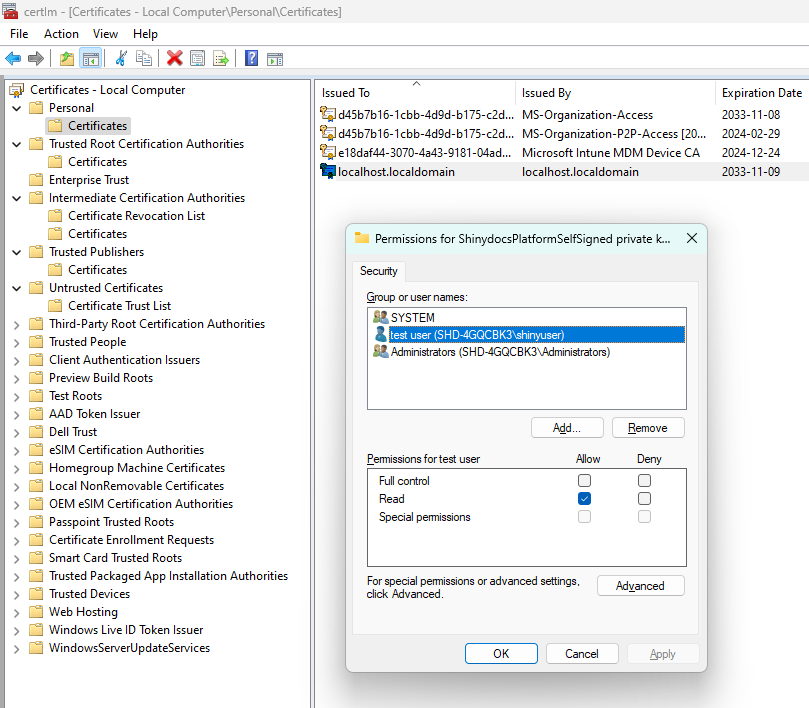
have “read” access to the Shinydocs Search service certificate
the default certificate is “localhost.localdomain” in the local keystore
you can achieve this with the below steps
on the Shinydocs Pro server, open “certlm.msc”
go to “Certificates - Local Computer”
go to “Personal” > “Certificates”
select localhost.localdomain
from the menu bar, select Action > All Tasks > Manage Private Keys
select “Add”
find/select the service account
once the service account has been added
under “Allow”, checkmark “Read”
select “Apply”
Setting the SPNs
Open a command prompt or PowerShell prompt as a user that can modify SPNs. An active directory admin has the correct rights, but the right can be delegated by a domain admin to a user that has lesser rights.
Determine the hostnames of the systems that Shinydocs Enterprise Search will be running on. This may be one machine or multiple machines if running a load-balanced cluster. If running a load-balanced cluster, ensure that you include the DNS name that will be used for the load balancer in the list of host names.
e.g. When running a single instance, the hostname may be search.example.local
e.g. When running a clustered instance, the host names may be search01.example.local, search02.example.local and search.example.local for the load balancer DNS entry.
Run the following commands to add the SPNs to the service account created above for each of the hostnames. Note, if using a group managed service account, the account name will always end with a $.
setspn -S HTTP/<hostname> <domain>\<serviceAccount> setspn -S HTTP/<fqdn> <domain>\<serviceAccount>e.g: single instance with the service account called searchService on the domain example
setspn -S HTTP/search example\searchServicesetspn -S HTTP/search.example.local example\searchServicee.g: load balanced instance with the service account called searchService on the domain example
setspn -S HTTP/search01 example\searchServicesetspn -S HTTP/search01.example.local example\searchServicesetspn -S HTTP/search02 example\searchServicesetspn -S HTTP/search02.example.local example\searchServicesetspn -S HTTP/search example\searchServicesetspn -S HTTP/search.example.local example\searchServiceVerify that the SPNs were set correctly by running the command
setspn -l <domain>\<serviceAccount>Shinydocs Pro requires that you run the Shinydocs Search Windows service. As a result, Kestrel needs to be configured. Please refer to the Kestrel Configuration section below.
Kestrel Configuration
Ensure the prerequisites (above) have been met prior to configuring Kestrel with the service account.
Open the Services panel on the servers that Search is being configured on.
Navigate to the Shinydocs Search service.
Open the properties for the Shinydocs Search service.
Select the Log On tab for the service.
Change the radio button from Local System account to This account:
Enter the username and password for the service account. Note, if you are using the group-managed service account, enter the domain\serviceAccount followed by a $, and blank out the password fields.
Click Apply.
You may be prompted that the user has been given Logon as a Service right.
Start / Restart the service for the login user to take effect.
Attempt to login to the website from another machine to ensure Kerberos authentication is working.
Source-Specific Settings
You must authorize the Shinydocs Search server hostname as a Principal that the file share server name(s) can delegate to (
PrincipalsAllowedToDelegateToAccount).First, check to see if there is any existing authorizations already set for the file share server name(s) using this command in PowerShell (as an Administrator).
CODEGet-ADComputer FileShareServerName -Properties PrincipalsAllowedToDelegateToAccount
if Get-ADComputer returns an error you will need to add this component to the server or execute these commands from an Active Directory Domain Controller. To add the component use the following command:CODEGet-WindowsCapability -Name RSAT.ActiveDirectory* -Online | Add-WindowsCapability -OnlineOnce the component is installed retry the above Get-ADComputer command.
Any existing authorizations must be put into the next query, otherwise they will get deleted when the new authorizations are set.
To set the
PrincipalsAllowedToDelegateToAccount, run the following command:$Server1 = Get-ADComputer -Identity searchserverhostname1Set-ADComputer FileShareServerName -PrincipalsAllowedToDelegateToAccount $Server1
example:CODE$Server1 = Get-ADComputer -Identity SHINY-PRO1 Set-ADComputer FILESHARE-01 -PrincipalsAllowedToDelegateToAccount $Server1If there were existing authorizations (or the Shindocs Search machine is load-balanced), you might run a command like the one below:
$Server1 = Get-ADComputer -Identity searchserverhostname1$Server2 = Get-ADComputer -Identity searchserverhostname2(if load balanced)$Server3 = Get-ADComputer -Identity existinghostname1(if existing)$Server3 = Get-ADComputer -Identity existinghostname2(if existing)Set-ADComputer FileShareServerName -PrincipalsAllowedToDelegateToAccount @($Server1, $Server2, $Server3, $Server4)
example:CODE$Server1 = Get-ADComputer -Identity SHINY-PRO1 $Server2 = Get-ADComputer -Identity SHINY-PRO2 $Server3 = Get-ADComputer -Identity OTHER-MACHINE1 $Server3 = Get-ADComputer -Identity OTHER-MACHINE2 Set-ADComputer FILESHARE-01 -PrincipalsAllowedToDelegateToAccount @($Server1, $Server2, $Server3, $Server4)
An Example:
- simulation will repeat -
You will need to run a command similar to the above for each file share server name
Initial Testing
After configuring the above settings, you should test from your desktop and search for documents that you know you already have access to. From Shinydocs Search page, in the upper right hand corner, you should see that you are logged in as your network account and not be presented with an authentication dialogue.
If you are not logged in automatically, check the following items first:
You are logged into your computer as a network user that is on the same network as the Shinydocs Search service.
For the Shinydocs Search URL, you are using either the computer name, fully qualified computer name or DNS entry name and there is an HTTP SPN registered for the service account running Kestrel or IIS for this name (you cannot use localhost if you are on the server directly)
The name used above is part of your trusted sites. To check this, go to Internet Options in the Control Panel and under the Security Tab, select Local Intranet then click on Sites and click on Advanced and ensure that the Enterprise Search server either added or matches one of the wild card entries in the list
If you are still prompted to log in, ensure that you prefix the username with the domain you are logging into ( in the format of <DOMAIN>\<USER NAME>)
Troubleshooting
Kerberos logging can be enabled by editing the following registry key:
HKEY_LOCAL_MACHINE\SYSTEM\CurrentControlSet\Control\Lsa\Kerberos\Parameters
Registry Value: LogLevel
Value Type: REG_DWORD
Value Data: 0x1
If the Parameters subkey does not exist, create it.
Further details at:https://docs.microsoft.com/en-us/troubleshoot/windows-server/identity/enable-kerberos-event-logging
The logging events will show in the System event log, in the Windows event viewer.
Ensure that the OTDS server is running as the content server user account created above, and negotiate authentication is enabled within OTDS.
Review the OTDS logs, otds.log, directory_access.log for any errors during authentication.
Ensure the SPNs have been replicated through the domain.