Search Configuration for Microsoft Connectors
App Registration & API Permissions
To configure Shinydocs Pro Search, you need to register the app in Azure and set the necessary API permissions. Shinydocs Search is designed to use a single Microsoft app registration for all supported Microsoft connectors. This simplifies management and ensures streamlined integration across different connectors.
You should create one app registration for Shinydocs Search and then add the appropriate permissions based on the specific Microsoft connector(s) you intend to use, such as SharePoint, OneDrive, or Teams.
Step 1: Create the App Registration
Log in to the Azure portal as an administrator.
Navigate to Azure Active Directory > App registrations.
Click New registration.
Enter a name for the app (e.g., "Shinydocs Pro Search").
For Supported account types, select Accounts in this organizational directory only.
In the Redirect URI section, select Web and enter
http://[server]:9702/azuread/success(you can update this later). Replace[server]with your server name or FQDN.You can have multiple values for the redirect
If using an FQDN, you likely will not need the port information.
Click Register.
Step 2: Generate a Secret Key
In the app registration, go to Certificates & secrets.
Click New client secret.
Add a description (e.g., "Shinydocs Pro Key") and select an expiration period.
Click Add.
Copy the secret value and store it securely. You will not be able to view it again.
Step 3: Take notes
From the application registration, you will need the following values later in Shinydocs Control Center:
Client ID
e.g.
1fe2bcf8-e077-4e47-8bc3-271cd934636e
Client Secret Key
e.g.
_rQ65~XwQ0u-G4_auC2u2HG9TunplKo.N1iyGa0w
Your Microsoft Tenant ID
e.g.
42abc123-a76a-4j03-bf1e-4e51c696d65d
The redirect URL
Step 4: Connector specific
The following are steps for each respective connection type you are analyzing:
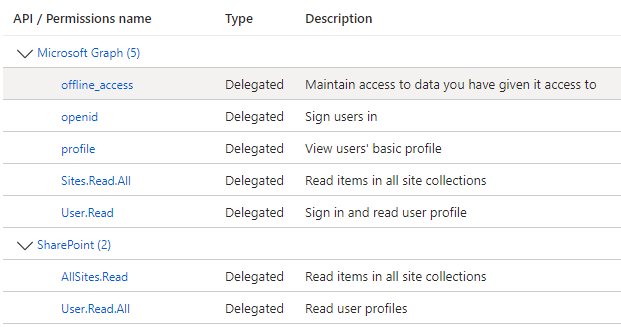
Microsoft SharePoint Online Set API Permissions
To allow Shinydocs Pro Search to access SharePoint Online and perform searches, configure API permissions.
Configure Microsoft Graph Permissions
In the app registration, go to API permissions.
Click Add a permission.
Select Microsoft Graph > Delegated permissions.
Grant the following delegated permissions:
offline_access
openid
profile
User.Read
Sites.Read.All
Click Add permissions.
Configure SharePoint Permissions
In API permissions, click Add a permission.
Select SharePoint > Delegated permissions.
Grant the following permission:
AllSites.Read: Allows the app to view any sites and their contents the signed-in user has access to. This enables permissions checks during searches.
Click Add permissions.
Click Grant admin consent for _____ to apply the permissions.
If you are configuring a seperate application registration for Search, seperate from Shinydocs Pro Control Center (crawling), your permissions should look like this. If you are using the same application registration, these permissions are in addition to your existing entries.
Shinydocs Control Center Configuration
With the introduction of Shinydocs Streamlined Search, which is now part of Shinydocs Control Center, search configuration is now performed in the Sources page of Control Center.
You can choose this setting when creating a source, or update it later by editing the connection from the Sources page (see images below).
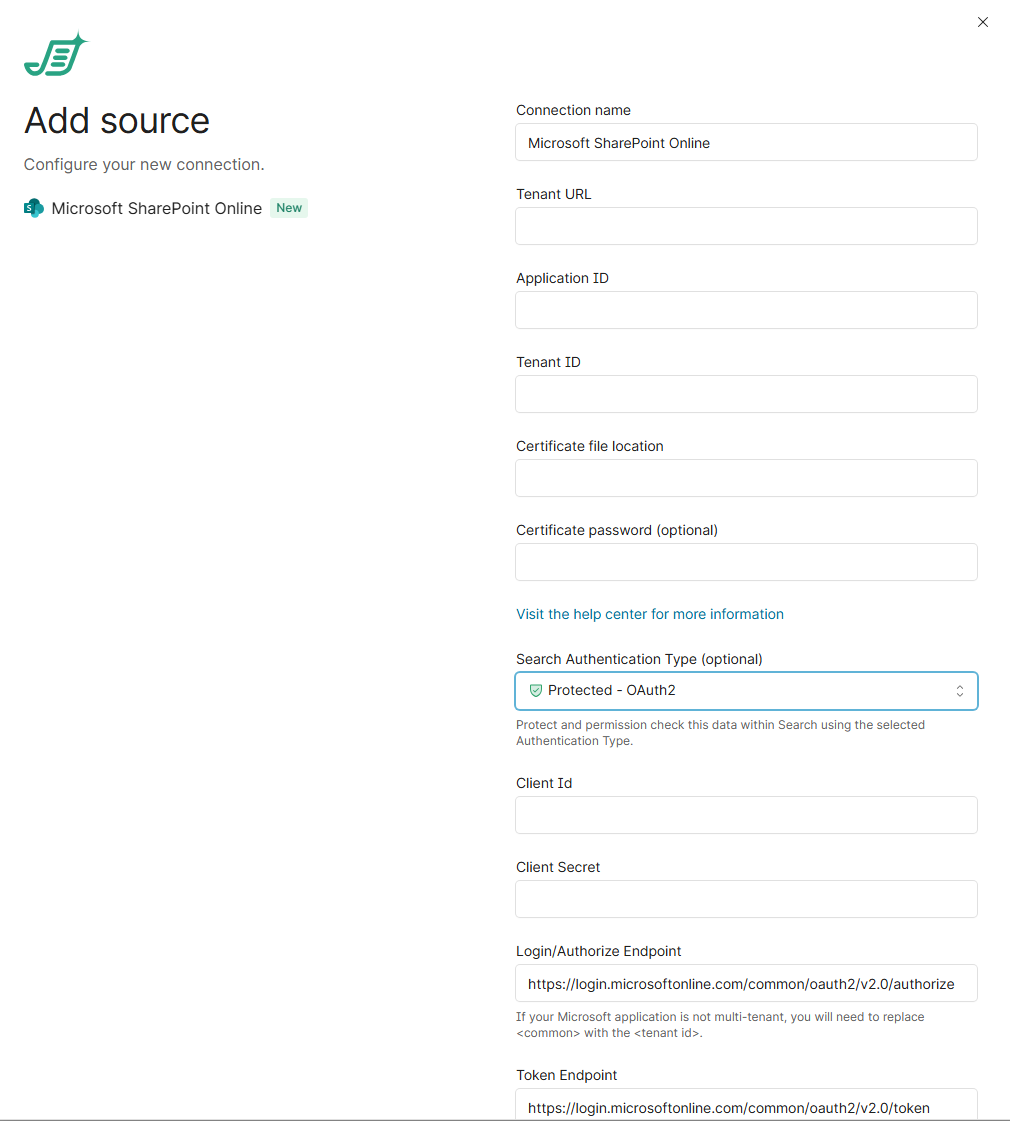
Configure search with a new source
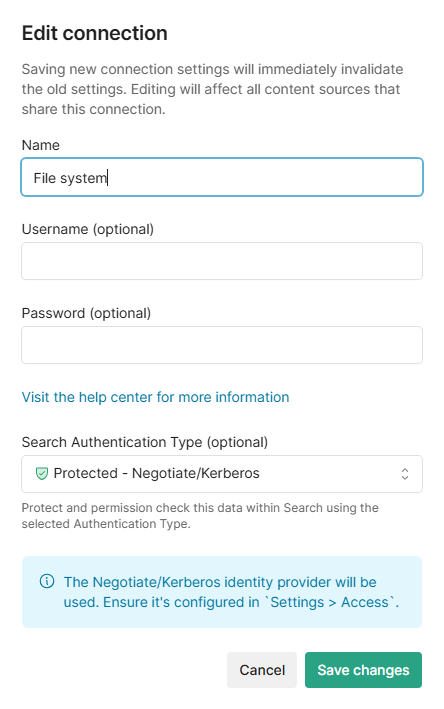
Configure search with an existing source
Either in Edit connection or Add source, select Protected - OAuth2 in Search Authentication Type
Enter the Client ID from your application registration
Enter the Client Secret (key) from your application registration
For Login/Authorize Endpoint, replace “common” with your Tenant ID
e.g.
https://login.microsoftonline.com/42abc123-a76a-4j03-bf1e-4e51c696d65d/oauth2/v2.0/authorize
For Token Endpoint, replace “common” with your Tenant ID
e.g.
https://login.microsoftonline.com/42abc123-a76a-4j03-bf1e-4e51c696d65d/oauth2/v2.0/token
Click Save changes
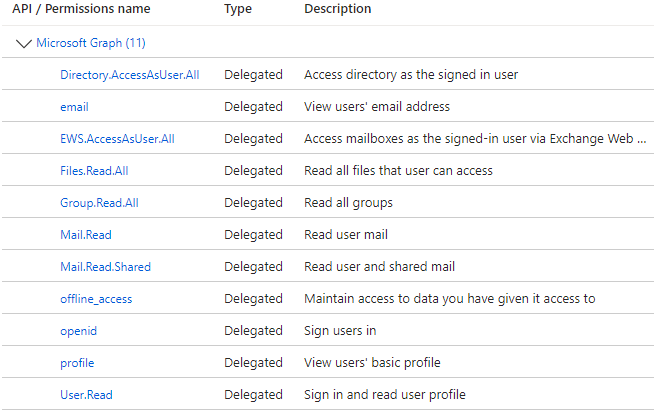
Microsoft Exchange Online Set API Permissions
To allow Shinydocs Pro Search to access SharePoint Online and perform searches, configure API permissions.
Configure Microsoft Graph Permissions
In the app registration, go to API permissions.
Click Add a permission.
Select Microsoft Graph > Delegated permissions.
Grant the following delegated permissions:
Directory.AccessAsUser.All
email
EWS.AccessAsUser.All
Files.Read.All
Group.Read.All
Mail.Read.All
Mail.Read.Shared
offline_access
openid
profile
User.Read
Click Add permissions
Click Grant admin consent for _____ to apply the permissions.
Your API permissions should look like this
Shinydocs Control Center Configuration
With the introduction of Shinydocs Streamlined Search, which is now part of Shinydocs Control Center, search configuration is now performed in the Sources page of Control Center.
You can choose this setting when creating a source, or update it later by editing the connection from the Sources page (see images below).
Either in Edit connection or Add source, select Protected - OAuth2 in Search Authentication Type
Enter the Client ID from your application registration
Enter the Client Secret (key) from your application registration
For Login/Authorize Endpoint, replace “common” with your Tenant ID
e.g.
https://login.microsoftonline.com/42abc123-a76a-4j03-bf1e-4e51c696d65d/oauth2/v2.0/authorize
For Token Endpoint, replace “common” with your Tenant ID
e.g.
https://login.microsoftonline.com/42abc123-a76a-4j03-bf1e-4e51c696d65d/oauth2/v2.0/token
Click Save changes
Microsoft OneDrive Set API Permissions
To allow Shinydocs Pro Search to access SharePoint Online and perform searches, configure API permissions.
Configure Microsoft Graph Permissions
In the app registration, go to API permissions.
Click Add a permission.
Select Microsoft Graph > Delegated permissions.
Grant the following delegated permissions:
offline_access
openid
profile
User.Read
Files.Read.All
Directory.Read.All
Click Add permissions
Click Grant admin consent for _____ to apply the permissions.
Shinydocs Control Center Configuration
With the introduction of Shinydocs Streamlined Search, which is now part of Shinydocs Control Center, search configuration is now performed in the Sources page of Control Center.
You can choose this setting when creating a source, or update it later by editing the connection from the Sources page (see images below).
Either in Edit connection or Add source, select Protected - OAuth2 in Search Authentication Type
Enter the Client ID from your application registration
Enter the Client Secret (key) from your application registration
For Login/Authorize Endpoint, replace “common” with your Tenant ID
e.g.
https://login.microsoftonline.com/42abc123-a76a-4j03-bf1e-4e51c696d65d/oauth2/v2.0/authorize
For Token Endpoint, replace “common” with your Tenant ID
e.g.
https://login.microsoftonline.com/42abc123-a76a-4j03-bf1e-4e51c696d65d/oauth2/v2.0/token
Click Save changes
Microsoft Teams Set API Permissions
To allow Shinydocs Pro Search to access SharePoint Online and perform searches, configure API permissions.
Configure Microsoft Graph Permissions
In the app registration, go to API permissions.
Click Add a permission.
Select Microsoft Graph > Delegated permissions.
Grant the following delegated permissions:
offline_access
openid
profile
User.Read
Files.Read.All
Sites.Read.All
Directory.Read.All
Channel.ReadBasic.All
ChannelMember.Read.All
Chat.Read
Group.Read.All
Team.ReadBasic.All
TeamSettings.Read.All
Click Add permissions.
Click Add permissions
Click Grant admin consent for _____ to apply the permissions.
Shinydocs Control Center Configuration
With the introduction of Shinydocs Streamlined Search, which is now part of Shinydocs Control Center, search configuration is now performed in the Sources page of Control Center.
You can choose this setting when creating a source, or update it later by editing the connection from the Sources page (see images below).
Either in Edit connection or Add source, select Protected - OAuth2 in Search Authentication Type
Enter the Client ID from your application registration
Enter the Client Secret (key) from your application registration
For Login/Authorize Endpoint, replace “common” with your Tenant ID
e.g.
https://login.microsoftonline.com/42abc123-a76a-4j03-bf1e-4e51c696d65d/oauth2/v2.0/authorize
For Token Endpoint, replace “common” with your Tenant ID
e.g.
https://login.microsoftonline.com/42abc123-a76a-4j03-bf1e-4e51c696d65d/oauth2/v2.0/token
Click Save changes
Try it out!
You can test that permissions are working by trying a search in Streamlined Search. To do so, click the Search icon in Shinydocs Control Panel or go to https://servername:9701/search.
Verify your current account by clicking on the burger menu in the top left
The side panel will slide over revealing your sources and the account you are currently logged in as
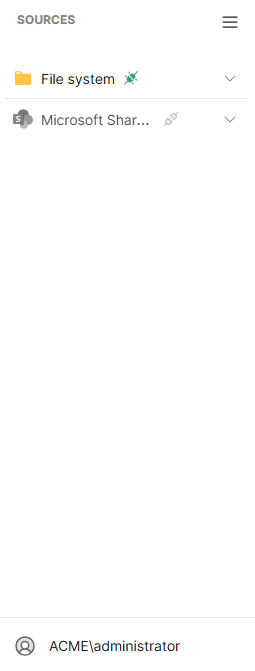
You will notice that Microsoft SharePoint Online is grey - click the connection on the left to launch the OAUTH login. Sign in with your credentials.
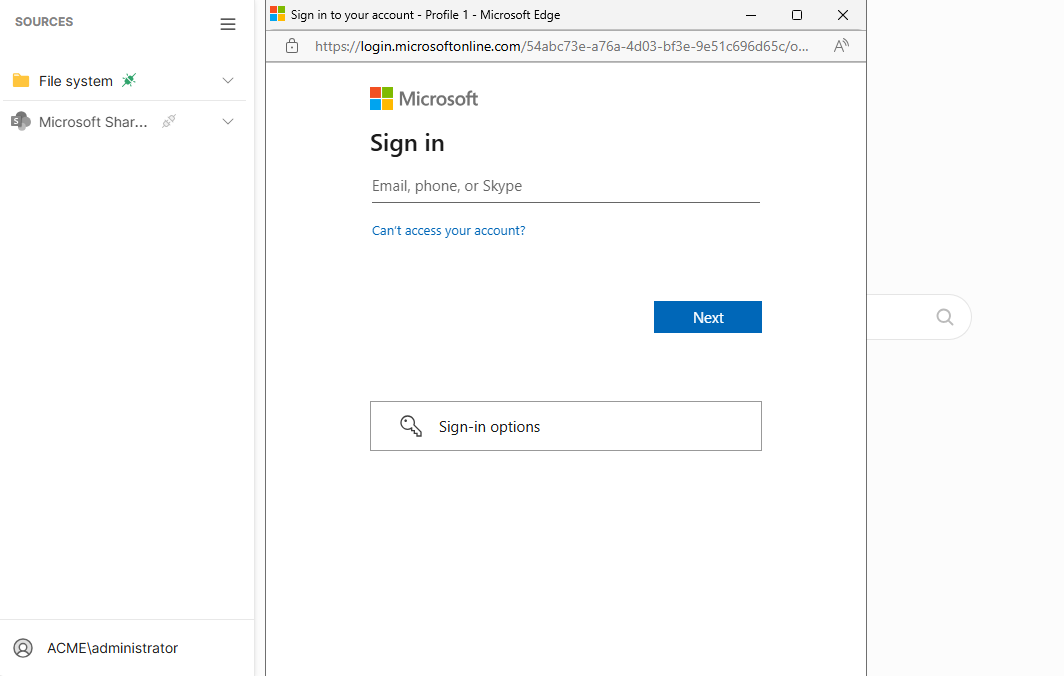
Once you are successfully connected, you will see the icon light up in color!

Perform a search for content you know you have access to. Try an exact file name if you can. You will see results if everything was configured properly
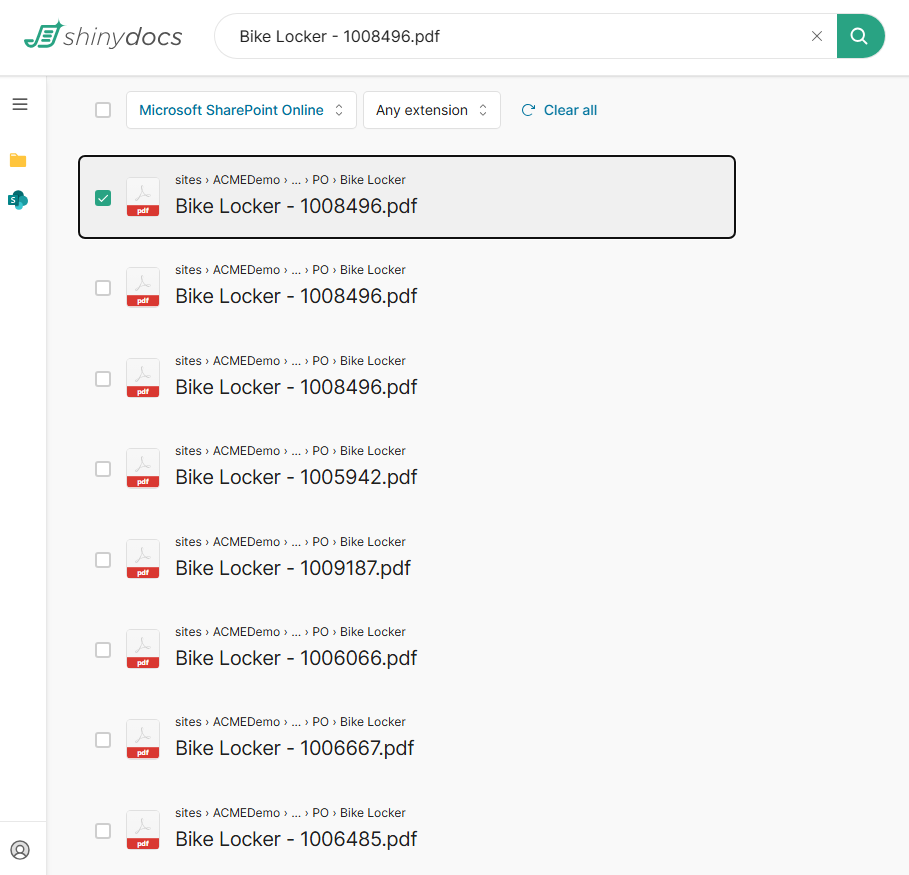
Example of permissioned results from Microsoft SharePoint Online
Congratulations! You are ready to start searching!