AI Enrichment (Content Tagging)
This feature is currently in development but is available to use. Please note that UI and functionality might change from release to release.
Head up!
The GPT-OSS model family by OpenAI does not currently support structed output, meaning it is not able to be used for AI Enrichment.
Important tip!
This process often takes a bit of trial and error.
We recommend starting with a small set of sample documents, some relevant and some irrelevant to the prompts you're testing in Shinydocs Pro. This lets you quickly see how the model responds and make adjustments to your prompt or model choice without sifting through a massive dataset.
Different models can interpret prompts differently, and outputs may not always be what you expect. Testing with a small, focused sample helps you dial it in faster.
AI Enrichment allows you to analyze document content and generate structured metadata fields using large language models. These fields can be used for tagging, classification, or extraction during a crawl. Enrichments are defined through prompts and executed conditionally based on the document’s metadata.
This guide will walk you through how to configure your enrichment, what each field does, and how to design effective prompts.
How it works/workflow
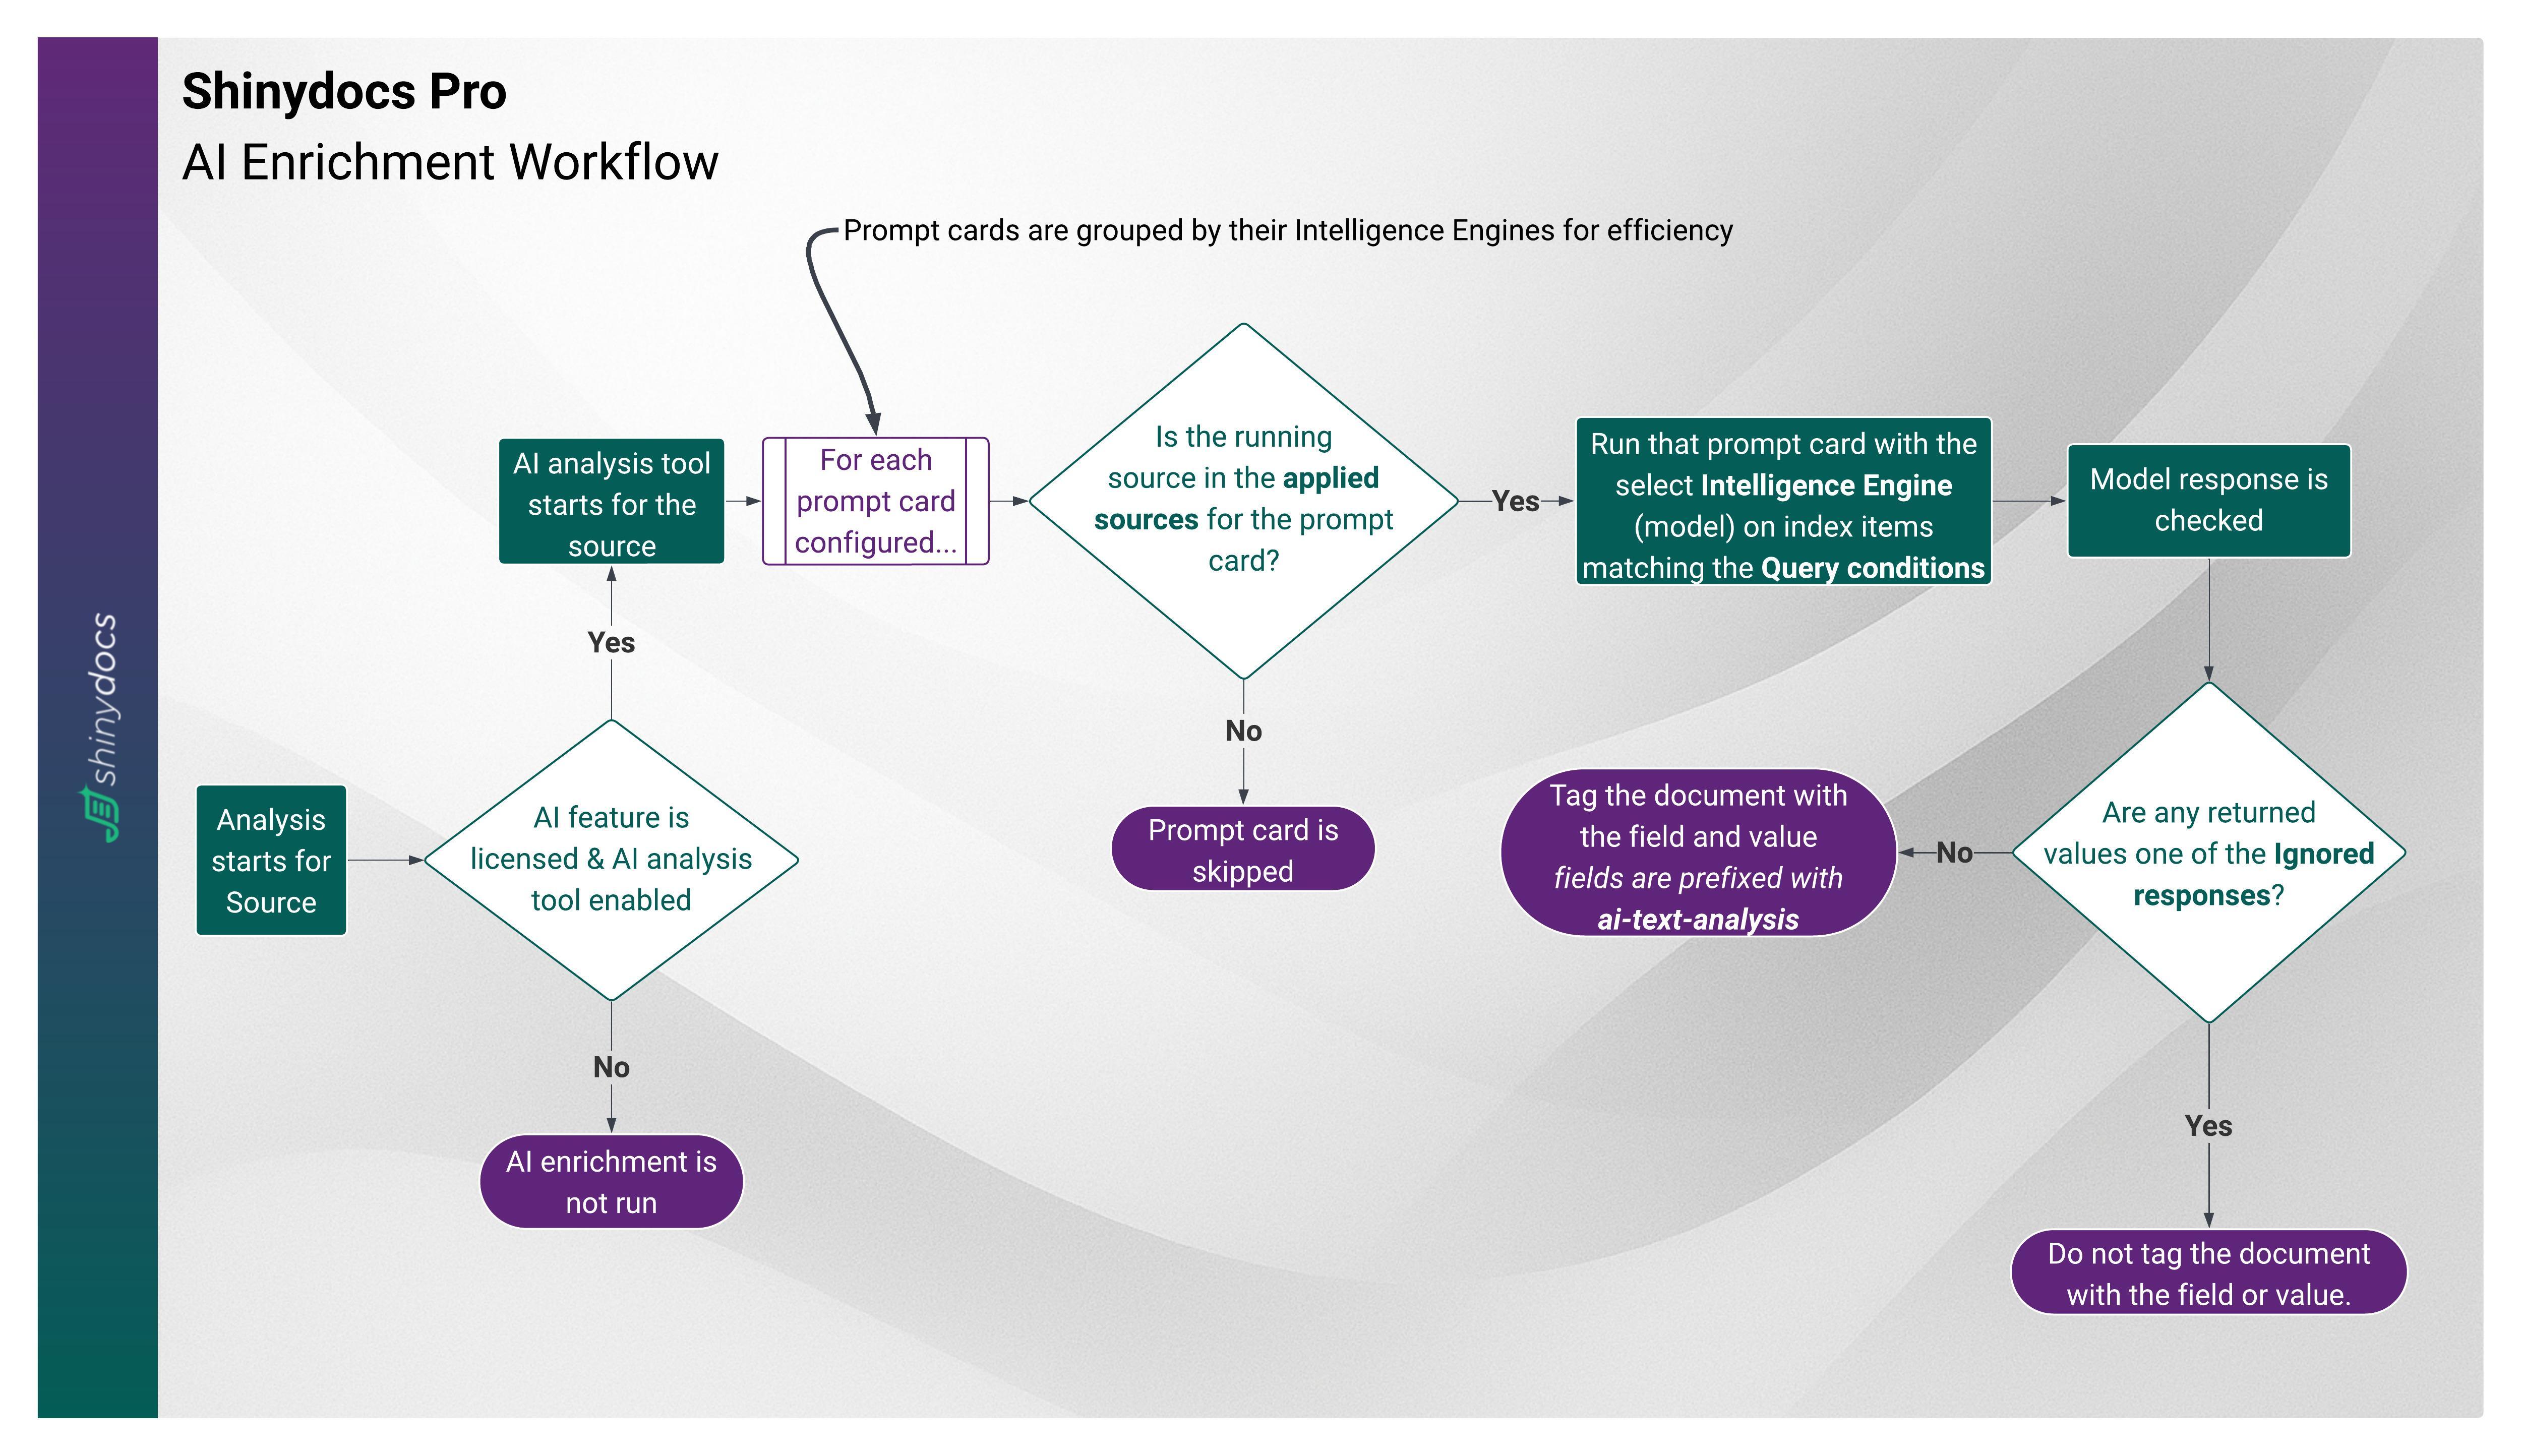
AI Enrichment Workflow
Start of Analysis
When a crawl begins, the AI analysis tool starts for each source that has AI enrichment enabled and licensed. If not licensed or enabled, enrichment is skipped.Prompt Cards
Each configured prompt card is grouped by its Intelligence Engine (model) for efficiency. The system checks whether the running source is included in the applied sources for that prompt card. If not, the card is skipped.Query Conditions
If the source matches, the model processes only the index items that meet the defined query conditions (for example, ensuring the file has text, or that it hasn’t already been enriched).Model Execution
The Intelligence Engine runs the prompt card against the filtered items. The model’s response is then checked.Ignored Responses
If the model returns a value defined as an ignored response (such as “N/A”), the system does not tag the document.Tagging Documents
If the response is valid, the document is tagged with the specified fields. All AI enrichment fields are automatically prefixed withai-text-analysisfor easy identification.
Guidelines for AI Enrichment
Use ISO date format
If requesting date/time information, always ask in the system prompt toreturn or normalize dates in ISO 8601 format (YYYY-MM-DD or YYYY-MM-DDTHH:mm:ssZ).Start with small test sets
Test your prompts and model choice on a small set of documents first to refine results before scaling up.Pick the right model for the task
Small models (≤1b): fast, good for summarization, tagging, or simple classification.
Larger models (≥8b): slower, better for extraction, detailed classification, or complex analysis.
Very large models (≥ 30b): only use these models on small datasets that are very complex. These models take a long time to produce a response.
Be specific in prompts
Write prompts as if you’re instructing a junior analyst. State exactly what you want returned and how to handle uncertain cases. Use{{text}}to inject document content.Set query conditions
Always define conditions to control when enrichment runs. Common examples:fullText | exists(only process files with extracted text)path-valid | is not | false(skip deleted files)Skip files already enriched by checking if enrichment fields exist.
e.g.
ai-text-analysis-summary | does not exist
Handle uncertain or null results
Define ignored responses likeN/Aor[N/A]so they don’t get written as real values.Define result fields properly
Usually mark fields as Required (checked) so results are only valid if all fields are filled.
Primarily use string field types.
Use number only for values that can only be numeric (using it incorrectly will cause errors).
Use array only when you expect multiple values (like keywords).
Use the seed option for consistency
Setting aseedensures the model gives repeatable results during testing.Control randomness with temperature
Use 0.2–0.5 for reliable results.
Use 0.0 if asking the model to find content that exists in the system prompt
Use higher values only when creativity is more important than consistency.
Save before crawling
Enrichment only runs during a crawl, so make sure you save all changes to prompts, fields, and options first.
Enable the Feature
To access AI Enrichment, you must be licensed for AI features. Please contact your Shinydocs sales rep or visit Artificial Intelligence for more information.
Enable the Feature Flags
Warning! You can break stuff here.
Only enable and disable options recommended by Shinydocs (guide or via support).
Access the Shinydocs Control Center hidden flags page:
https://<ShinydocsProServerHostname>:9701/flags
e.g.https://localhost:9701/flagsEnable the following feature flags:
Tool configuration
AI Analysis Tool
Navigate to Sources from the left-side menu
Next, Disable AI Analysis Tool for all sources besides your test source (you can enable them later)
Select the kebab (3 vertical dots) menu for the source

Slide the toggle for AI Analysis Tool to disable
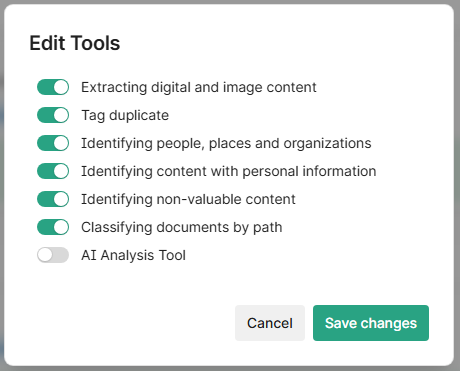
Repeat for other, non-testing sources.
Step 1 - Choose an Intelligence Engine
For the specific task of using large language models to enrich content with tags, your choice of model matters a lot more than document Q&A. The goal is to balance performance and quality of output for your given enrichment.
For example, a smaller parameter model (e.g. cogito:3b) will perform much faster than a larger parameter model (e.g. cogito:32b), however it will not be as intelligent in what you ask of it.
For tagging and enrichment, smaller models (<= 1b parameters) are highly recommended. While they are not as robust as the larger parameter counterparts, you can process documents much, much faster with smaller models.
Small parameter models are great at general tasks like summarizing, sentiment, or gleaming simple information.
Large parameter models are better at understanding the content and your instructions (prompt) and can handle more complex tasks like data extraction, finding patterns, and accuracy.
Start by selecting an Intelligence engine from the dropdown. This list comes from what you've configured in the Intelligence settings. You must configure at least one model there first.
Step 2 - Select the sources to apply to
In the Applied Sources section of the prompt card, check the boxes beside the sources this enrichment should run on.
New sources will not be automatically enabled.
Step 3 - Configure Options
If needed, you can add Options like temperature, top_k, seed, or max_tokens to control model behavior. These settings behave the same as in the Intelligence setup.
Important tip!
The seed option is a useful option for repeatability. When testing prompts in Shinydocs Pro or working with enrichment tasks, adding seed to your model options ensures the model generates consistent outputs each time. This is especially helpful when refining prompts or comparing model behavior, since randomness is reduced or eliminated. Pick a number, any number! Try using 42, the number it self doesn’t really matter.
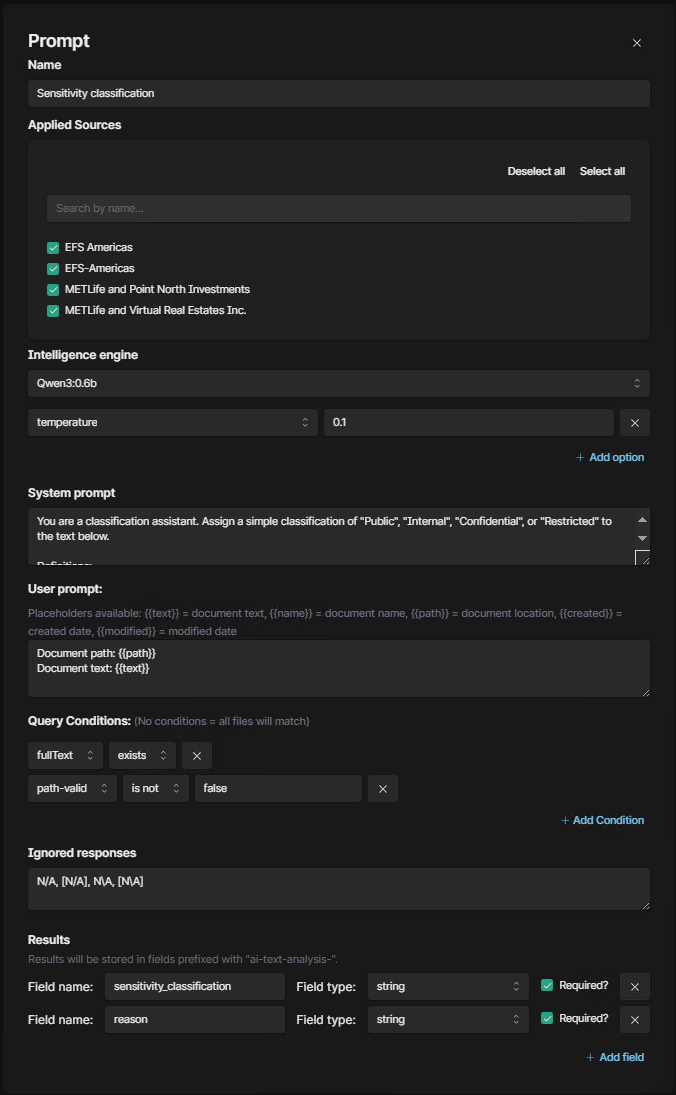
Step 4 - Write the Prompts
System Prompt
The system prompt defines the role and goal of the model. This is what sets context for the model's behavior and should explain the task in simple but precise terms.
Important tip!
Write this like you're briefing a junior analyst. Be specific about the task, what you expect returned, and how to handle uncertain cases.

Example of a System prompt
Example
You are a data extraction assistant. Your task is to analyze a document and determine if it pertains to any of the client matters listed below. If you identify a match, return all fields from the matching row exactly as shown. If you are not sure or cannot confidently match the document to a matter, respond with "N/A".
User Prompt
This is where you inject the actual text of the document. Use {{text}} in your prompt to insert the full document content that Shinydocs Pro extracted during the crawl. The User prompt is usually much simpler than the System prompt.
Available placeholders:
Placeholder | Use |
|---|---|
| Replaced with the text data Shinydocs Pro has extracted for the document. Index field used: |
| Replaced with the path value for the document. Index field used: |
| Replaced with the file name for the document (including the extension). Index field used: |
| Replaced with the document’s creation time. Index field used: |
| Replaced with the document’s last modified time. Index field used: |
Example
Document to check:
{{text}}
You can also add follow-up instructions after the injected text if needed, such as "Return results in JSON format" or "Respond with field values only." which can help with older or smaller parameter models.
To get started, we recommend the following configurations based on your use case. These are starting points, prompts and model choice may need to be refined given your data.
Try to use the Source selection & Query conditions in the prompt card to limit the content the model is analyzing to save processing time on irrelevant content.
Starting prompts and models
These prompts offer a great starting point on your AI journey. If a prompt looks similar to what you are trying to achieve, try adapting it to your use case.
If you would like to install these models on your Ollama, use the following commands in your OS terminal (e.g. CMD):
ollama pull qwen3:0.6
ollama pull qwen3:8b
ollama pull cogito:3b
ollama pull cogito:8b
ollama pull phi4:14b
Shinydocs recommends phi4:14b for complex tasks like client/matter discovery, logical/conditional extraction, and other prompts that require very accurate analysis.
💡Remember this is a large model, it can take 10-20 seconds for a single response for a large document depending on your hardware. Use query conditions to minimize the analyzed content.
Task/Prompt type | Suggested starting model (or) | Query conditions | System Prompt | User Prompt | Result fields |
|---|---|---|---|---|---|
Summarization |
|
|
CODE
|
CODE
|
|
Topic identification |
|
|
CODE
|
CODE
|
|
Document sensitivity |
|
|
CODE
|
CODE
|
|
Extract entities from resumes |
|
|
CODE
|
CODE
|
|
Document type |
|
|
CODE
|
CODE
|
|
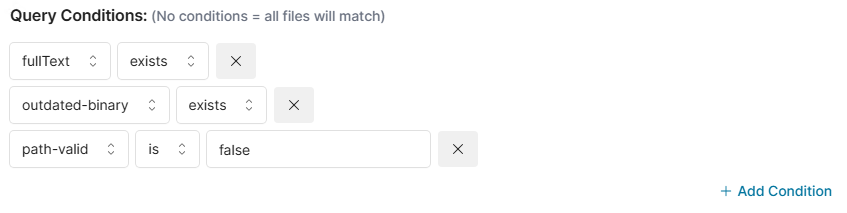
Step 5 - Set Query Conditions
Query conditions let you control when an enrichment should run. Only files that meet all conditions will be sent to the model.
Each condition checks metadata about the file. Some examples:
Field | Operator | Example Value |
|---|---|---|
|
| Ensures the file has extracted text |
|
|
|
|
|
|
|
| (Avoid re-processing already enriched files where the field |
You can add multiple conditions to narrow down processing scope.
We recommend having the following query conditions at minimum, as these conditions allow the tool to only run on new or modified data.
Field | Operator | Value |
|---|---|---|
|
| Ensures the file has extracted text |
|
| Files new to the system will automatically have this field, telling the tools "I'm new or have been modified since you last saw me" |
|
|
During Shinydocs Pro’s delta analysis, it checks if a file still exists or not. Adding this condition prevents the tool from running on data that doesn’t exist anymore. |
Step 6 - Ignored Responses
Define any values that should be treated as a non-result and skipped from enrichment output. For example:
N/A[N/A]NA
If the model returns any of these values, the enrichment will be considered empty and no fields will be written.
By default, the UI will have N/A, [N/A] prefilled for you. Adjust the values in here based on how your model responds.
Step 7 - Define Result Fields
This section is where you map out what you want the AI to extract from the document and where that extracted information will be stored.
When the model processes a document, it doesn't just give you raw text back. Instead, it responds with a structured result, a set of named fields, like client, matter_number, or custom_description. Shinydocs Pro prefixes these fields with ai-text-analysis-, that way you know this field’s data came from AI enrichment. The values the model returns for those fields get saved as metadata alongside the document in the Shinydocs index. That means they can be searched, filtered, visualized, or exported just like any other metadata.
You’re telling the system: “Here’s what I expect back from the AI, and this is what type of data it should be.”
How it works
You're setting up the schema for what the AI should return - field names, their data types, and whether they're required. This tells the system how to handle the response, and it tells the model what kind of format you're expecting.
The results of AI Enrichment are dependent on the chosen model. Different models will respond in different ways, which is why choosing the right model for the task at hand is so important. Most models will respect the instructions you provide it, but will vary model-by-model. Experimentation is key!
Each field definition includes:
Field name: This is the name that will be stored in the index. Shinydocs will automatically prefix it with
ai-text-analysis-.For example,
clientbecomesai-text-analysis-client.
Field type: The expected data format of the returned value. Options include:
string: A single piece of text (most common).
number: A numeric value (integer or decimal).
boolean:
trueorfalse.array: A list of values (e.g. a list of names, IDs, keywords).
When to use
array:The
arraytype is used when you expect the model to return multiple items for the same field, for example:A list of people mentioned in the document
Multiple project codes or legal clauses
A list of risks or key terms
Required?: If checked, this field must be returned for the enrichment to be considered valid. If it's missing or blank, the entire result will be discarded for that file.
Example field setup
Field Name | Type | Required? |
|---|---|---|
| string | ✅ Yes |
| array | ❌ No |
In this case:
client_nameis required because it's the primary value you're trying to extract. If the model can't confidently identify a client name, you likely don't want to keep or act on the result at all. It's the anchor for the rest of your logic.related_tagsis optional because it's supplemental. The model might extract useful keywords, topics, or flags if they exist, but you're not relying on them to validate the result. If they're missing or the document doesn't contain any, that’s fine, you still want to keep the enrichment.
Step 8 - Save
Once your enrichment is ready, click Save Changes. Your enrichment configuration will now run as part of your next crawl, processing only documents that match the conditions and storing extracted data into the specified fields.
Need help writing your prompt or tuning results? Reach out to the team or use one of the sample prompts we provide in the documentation.