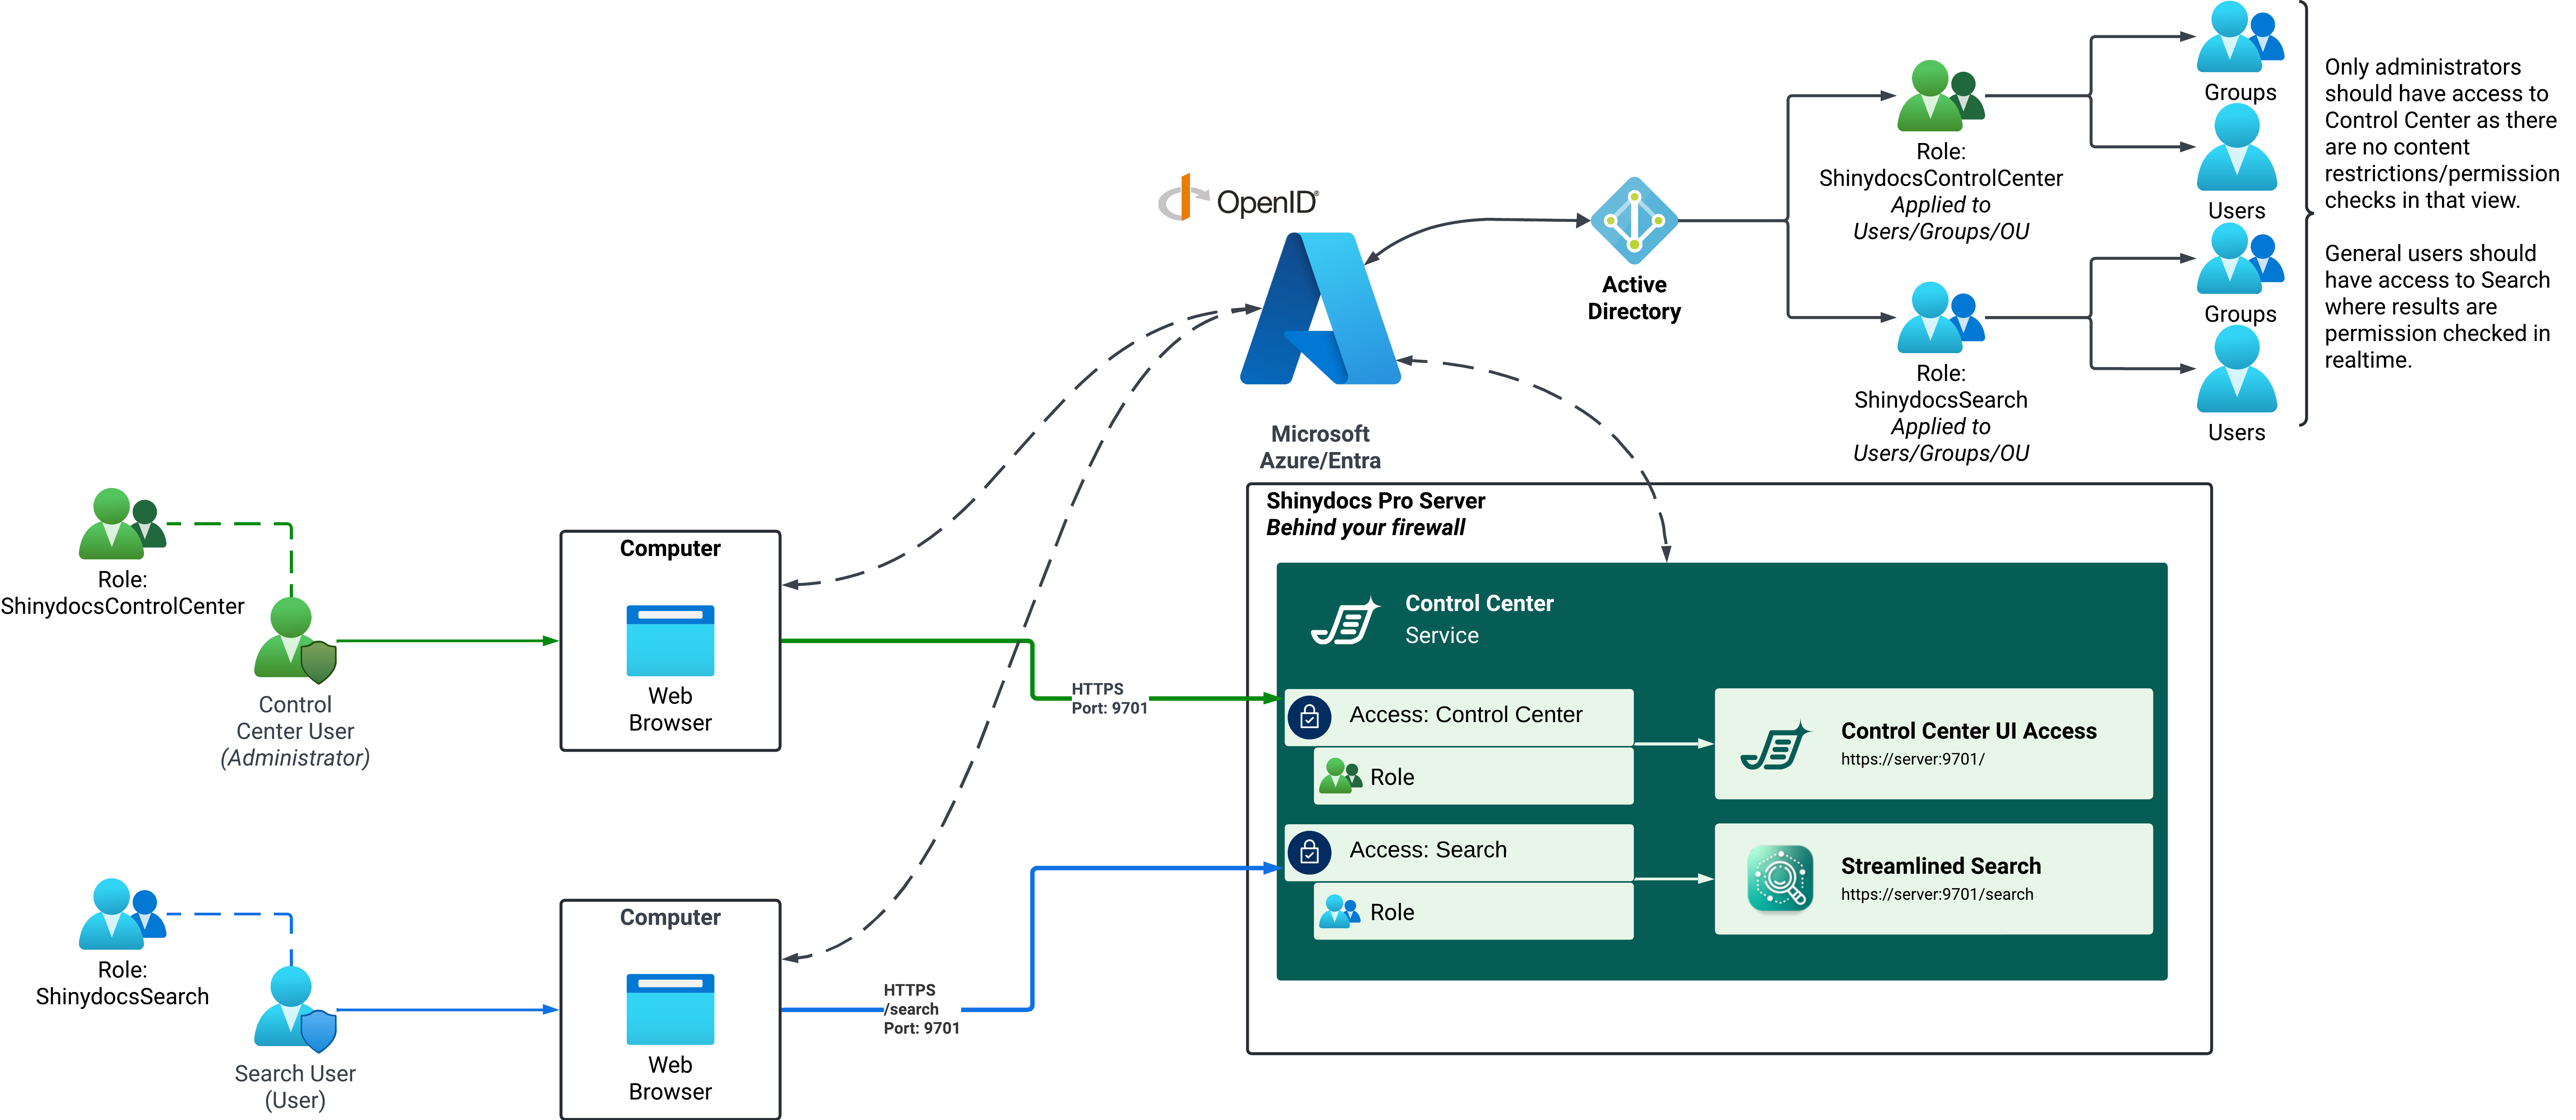
Role-Based Access (RBAC) in Shinydocs Pro Control Center
Role-Based Access Control (RBAC) is used to control access to Shinydocs Pro Control Center. This allows administrators to manage access by assigning roles to users or groups, ensuring that only authorized users can access the Control Center.
Shinydocs Pro Control Center supports the following identity providers to authenticate users and manage roles for access:
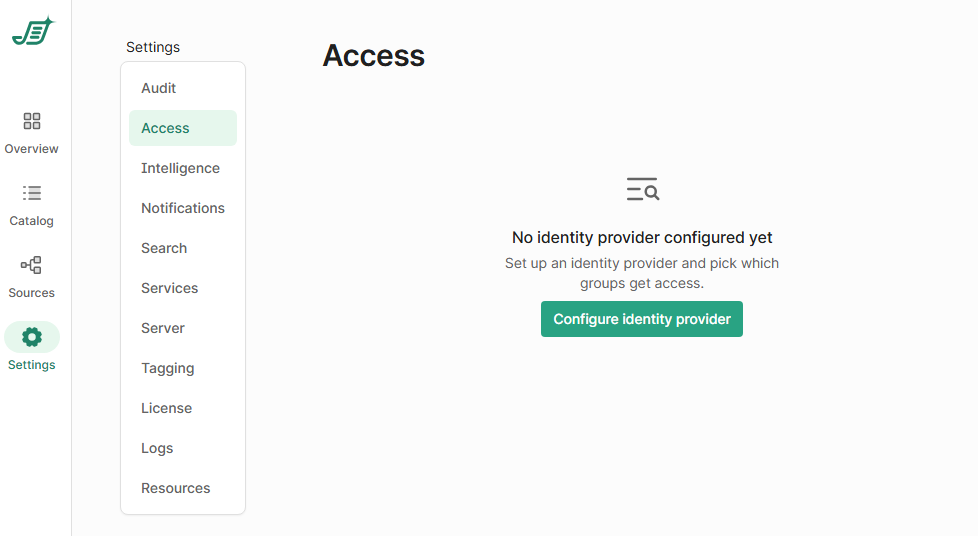
Click Configure identity provider
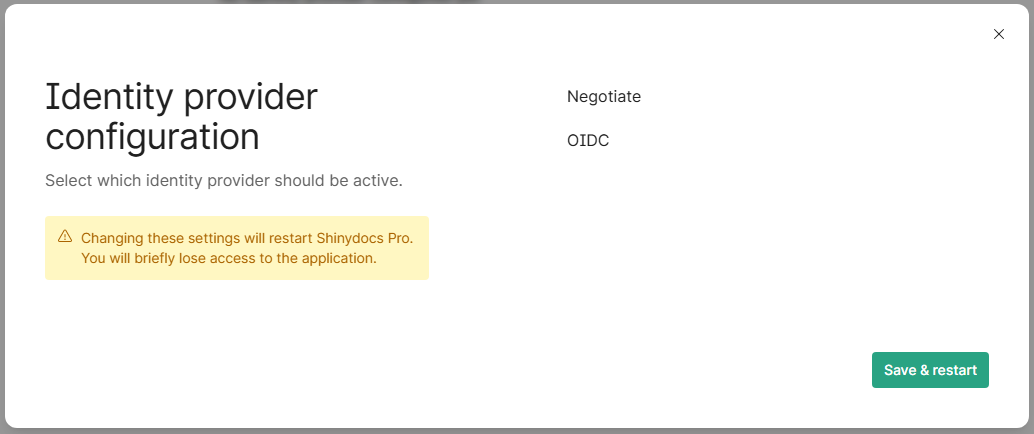
Select the provider you want to use
None (for testing and troubleshooting)
No authentication is required. Anyone who can reach Shinydocs Pro can access it without verifying their identity.
Because no user identity is established, audit entries in the Control Center will show actions as Anonymous. You will still see what happened, but not who did it.
This option is not secure and should only be used for local testing, demos, or short-term troubleshooting where authentication would get in the way.
Negotiate (Active Directory users & groups) - Default
Negotiate uses Windows Integrated Authentication and relies on Kerberos to automatically identify users who are already signed in to your Windows domain.If Shinydocs Pro and your users are part of the same Active Directory environment, authentication is seamless. Users are signed in automatically with their domain account and do not see a login prompt.
Audit entries will include user names, and access can be controlled using Active Directory users and groups.
Use this option when:
Shinydocs Pro is deployed on-premises or in a domain-joined environment
Users authenticate with Windows accounts
You want simple, frictionless sign-in and AD-based access control
You do not need external or cloud-based identity providers
OpenID Connect (OIDC) (Entra ID or similar providers)
OpenID Connect is a modern authentication standard built on OAuth 2.0. Shinydocs Pro trusts an external identity provider to authenticate users and confirm who they are.This option is commonly used with Microsoft Entra ID (formerly Azure AD), but it also works with other OIDC-compatible providers. Users sign in through the provider’s login page, and Shinydocs Pro receives verified identity and role information.
Audit entries include user identities, and access can be managed using roles or groups defined in the identity provider.
Use this option when:
Users are not domain-joined or are remote
You are using cloud or hybrid identity (Entra ID, SSO, MFA)
You want consistent authentication across multiple applications
You need modern security features like conditional access or multi-factor authentication
Using Negotiate
Important note!
During this setup, if you are creating groups/accounts in your active directory, you will need to restart the Shinydocs Pro machines. Windows requires this restart to cache the newly created groups.
Requirements
Shinydocs Pro Control Center is running on a domain-joined server
Administrative access to Active Directory with the ability to:
Create a new Security Group
Add users or groups
Access to Shinydocs Pro Control Center
Recommendations
If your server supports snapshots/checkpoint/etc. for quick backups, it is recommended that you take a snapshot before proceeding in case you lock your self out. There are built-in ways to unlock yourself, but restoring from a snapshot is MUCH easier.
Shinydocs recommends you start small and simple, adding complexity only as needed. Unless your organization has specific rules around Active Directory users and groups, you are welcome to use this recommended configuration.
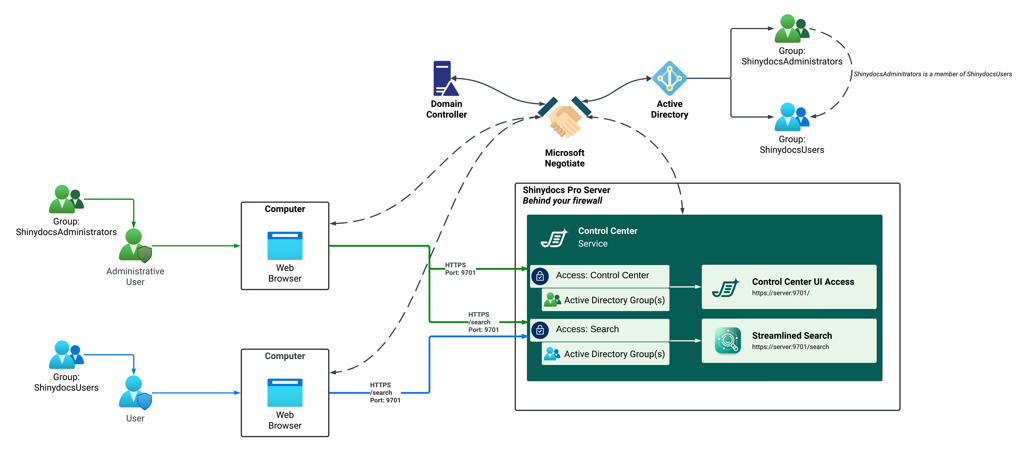
You will want two security groups in Active Directory:
ShinydocsAdministrators
The user you are logged into the Shinydocs server as MUST be in this group or you will be locked out!
ShinydocsUsers
ShinydocsAdministrators should be a member of ShinydocsUsers
Group | Access | Considerations |
|---|---|---|
ShinydocsAdministrators | The user you are logged into the Shinydocs server as MUST be in this group or you will be locked out! Will be able to access Control Center UI and Search. | This group is for the most privileged users, the technical and business administrators of Shinydocs Pro. Users in this group will have access to all data in Shinydocs Pro. |
ShinydocsUsers | ShinydocsAdministrators should be part of this group to give them access to Search as well! Will be able to access Streamlined Search only. | This group is for your end-users, who will need access to the Search application. Ensure your sources in Shinydocs Pro are configured as Public or Protected to appear in Search. All results in Search are permission-checked in real-time. |
Instructions
IMPORTANT!
If you create the users and groups at this point, you MUST restart the Shinydocs Pro server. Windows will cache AD groups on logon, and if these groups are created while the server is on, the groups will not resolve properly.
On a domain-joined Windows server, open Active Directory Users and Computers
Windows Server does not come with this pre-installed. You will need access to a server (e.g. the domain controller) that can manage Active Directory users and groups
Create the administrators security group ← Skip if you already have groups set up
In the left-side pane, find the Organizational Unit (OU) or Users when you want to create the Security Group for Shinydocs Pro Control Center access
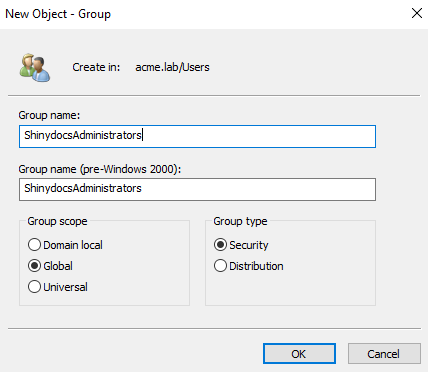
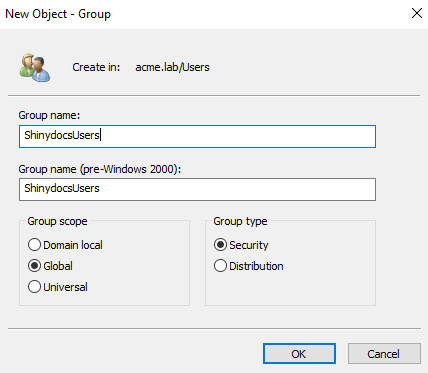
Right-click on the desired location (OU or Users) and select New > Group
In the new window, name your group(example:
ShinydocsAdministrators)Set Group Scope as Global
Set the Group Type as Security
Click OK to create the group
Create the users security group ← Skip if you already have groups set up
In the left-side pane, find the Organizational Unit (OU) or Users when you want to create the Security Group for Shinydocs Pro Control Center access
Right-click on the desired location (OU or Users) and select New > Group
In the new window, name your role (example:
ShinydocsUsers)Set Group Scope as Global
Set the Group Type as Security
Click OK to create the group
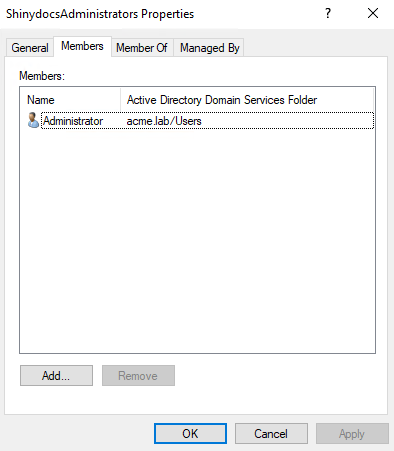
Add Users/Groups to the administrators security group
Find the group you created (
ShinydocsAdministrators)Right-click the group and select Properties
In the Members tab, click add
IMPORTANT: Make sure the account you use on the Shinydocs Pro server is also assigned this group, otherwise you will be locked out.In Enter the object names to select, enter the names of the users/groups you want to give access to Shinydocs Pro Control Center or use the find feature.
Click Check Names to ensure they are valid
Click OK to add them
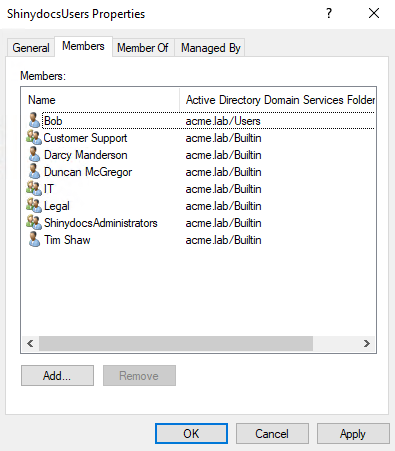
Add Users/Groups to the users security group
Find the group you created (
ShinydocsUsers)Right-click the group and select Properties
In the Members tab, click add
In Enter the object names to select, enter the names of the users/groups you want to give access to Shinydocs Pro Streamlined Search or use the find feature.
Click Check Names to ensure they are valid
Click OK to add them
Select Negotiate as your provider and assign the Groups in Shinydocs Pro
In Shinydocs Pro Control Center, go to Settings > Access
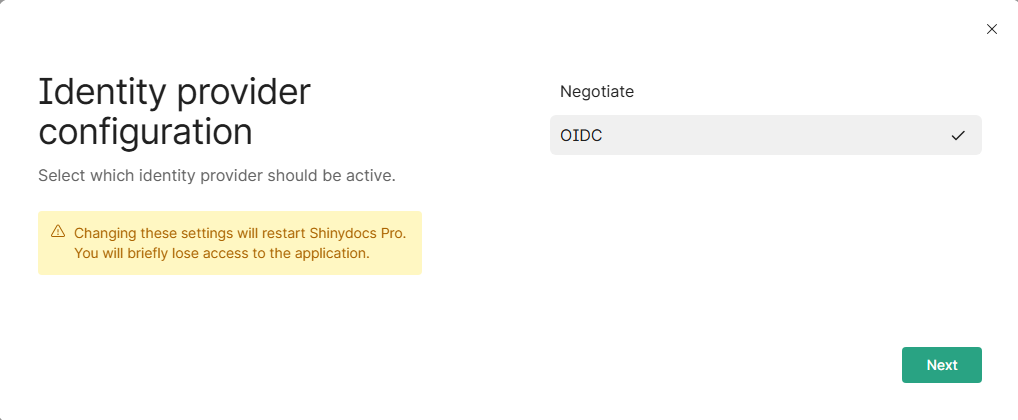
Click the
 button
Select Negotiate and click

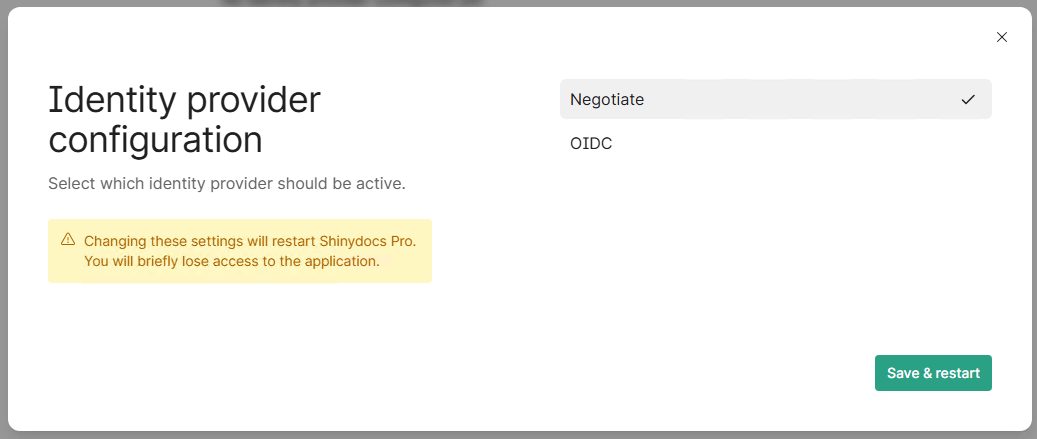
Wait for the service to restart. When you access the site next, you will be prompted for credentials. You need to enter a local account credentials, for example:
Username:.\administrator(.\ is short for local system instead of domain)
Password:the account password
Note: If your domain account is already a local administrator, you can use that account instead.Under Control Center groups, configure the group(s) with access to the Control Center
This will be the
ShinydocsAdministratorsgroup or another group you have in Active Directory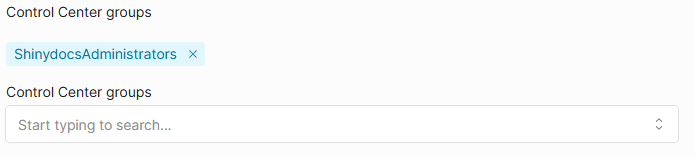
If your group is not appearing in the autocomplete field, you need to restart the server
Under Search groups, configure the group(s) with access to the Control Center
This will be the
ShinydocsUsersgroup or another group you have in Active Directory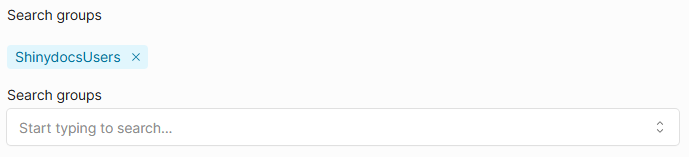
Your configuration should look similar to this
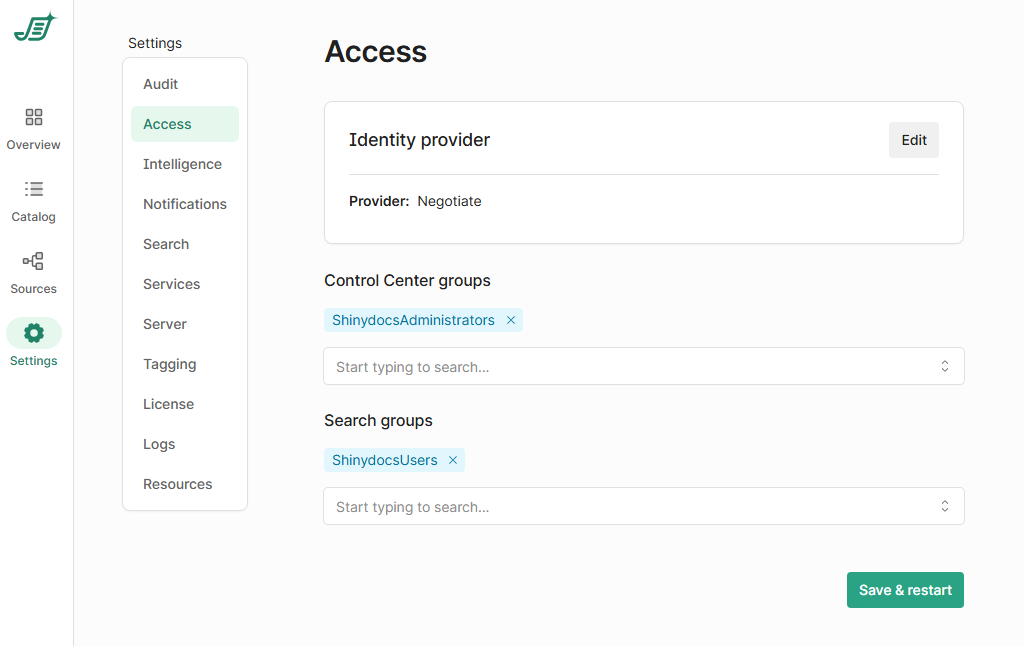
Click Save changes and Shinydocs Pro Control Center will restart.
Test the access by attempting to access the control center from another machine that can access the server. In your browser go to:
https://localhost:9701
If it is configured correctly, you should be authenticated automatically! If you cannot access the site, please review the steps above. Missing one step or having a typo could result in being locked out of the application. See the Recovery section of this article for recovering from a broken authentication state.
Using OpenID Connect in Entra/Azure
There are many ways to perform these actions within your organization. You can perform these actions in your preferred method, for this guide we will focus on using one method.
Requirements
Shinydocs Pro Control Center is set up and running
Access to Azure/Entra Portal with permissions to:
Create a new App Registration
Set API permissions and roles
Assign users and groups to the app
Instructions
Register an App in Azure
Go to portal.azure.com
Navigate to Azure Active Directory > App registrations
Click New Registration
Name your app (e.g., "Shinydocs Pro Control Center")
Redirect URI: Enter
https://[ShinydocsProServerName]/api/v1/oidc/signin-callback.
Replace[ShinydocsProServerName]with your actual server name
Note: If the Shinydocs Server has an FQDN, use that instead of[ShinydocsProServerName]Click Register to create the app
Configure OpenID Connect
In the new app registration, go to Authentication
Redirect URI should be set to:
https://[ShinydocsProServerName]/api/v1/oidc/signin-callback.Under Implicit grant, check both Access tokens and ID tokens
Click Save
Create a Client Secret
Go to Certificates & Secrets
Click New client secret
Description: Enter a name (e.g., "Shinydocs Pro Secret")
Expires: Set an expiry period following your organizations security practices
Click Add
Copy the secret key (save it securely - you’ll need this later).
Set App Roles
Go to App roles
Click Create app role
Display Name:
ShinydocsControlCenterAllowed member types: Select Users/Groups
Click Save
Configure API Permissions
Go to API permissions
Click Add a permission > Microsoft Graph
Select Delegated permissions, and add:
openidprofileemailUser.Readoffline_accessDirectory.Read.All
Click Add permissions
Click Grant admin consent to approve these permissions.
Assign Users and Groups to the App
Go to Azure Active Directory > Enterprise applications
Find and select your Shinydocs Pro Control Center app
Click Users and groups
Click Add user/group
Search for the users or groups to assign to the app
Click Assign to add them.
Configure OpenID in Shinydocs Pro Control Center
In Shinydocs Pro Control Center, go to Settings > Access
Click the
buttonSelect OIDC and click Next
Fill out the following fields:
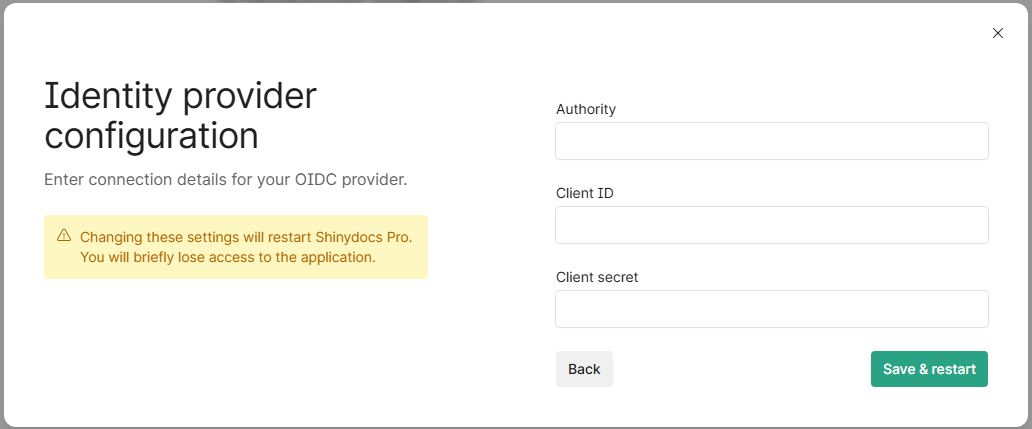
Authority:
The URL will vary depending on your authority (Entra/Azure, OKTA, etc.), please see their documentation for more information on which URL you should use.
For Entra/Azure:https://login.microsoftonline.com/<tenantid>/v2.0
Replace[Azure Tenant ID]with your Azure tenant ID
For OKTAhttps://[tenantURL].okta.com/oauth2/default
Replace[tenantURL]with your Okta tenantClient ID: The Client ID from your app registration
Client Secret: The secret key you created
Save changes, Shinydocs Pro Control Center will restart automatically
Add a Role in Shinydocs Pro Control Center
Go to Settings > Access > Roles
In Add a role, type
ShinydocsControlCenter
IMPORTANT: Make sure the name matches exactlyPress Enter to add the role.
Save Changes and Test
Save changes and allow Shinydocs Pro Control Center to restart automatically
Test access by logging in with a user assigned to the
ShinydocsControlCenterrole.
If you use Azure/Entra for OpenID, you will be presented with the Microsoft sign-in page.
Recovery
If you're locked out of Shinydocs Pro Control Center because of a configuration issue, you can use the appsettings.json file to override the settings temporarily. Follow these simple steps to recover access.
Step 1: Locate the appsettings.json File
Go to the install directory for Shinydocs Pro Control Center.
The path is:
[Drive]:\[Install directory]\Shinydocs Professional\ControlCenter
Open the
appsettings.jsonfile using a text editor like Notepad.
Step 2: Understand the Overrides
The settings in appsettings.json can override your database configuration. Only use these for recovery purposes.
Each section is commented out with // to prevent it from running. You'll remove the // to activate the section you want to use.
Here’s what each section does:
Negotiate Authentication
CODE,"IdentityProvider": { "Negotiate": { "Enabled": true } }Uncomment this section to enable Negotiate authentication.
Set
"Enabled": falseto disable all authentication temporarily, which lets you access the Control Center without any login.
OpenID Connect (OIDC) Authentication
CODE,"IdentityProvider": { "Oidc": { "Authority": "", "ClientId": "", "ClientSecret": "" } }Uncomment and fill in these values to override OIDC settings for Azure/Entra.
Authority: Your OpenID Connect authority URL.
ClientId: The Client ID from your Azure/Entra app registration.
ClientSecret: The Secret Key from the app registration.
Access Roles (OpenID)
CODE,"Access": { "HasControlCenterAccess": [] }Uncomment this section and add roles to override which Active Directory (AD) or OpenID roles can access the Control Center.
You can add multiple roles by putting them in the brackets as a list.
Step 3: Save your changes and restart
Once you have saved the file, restart the Shinydocs Control Center service. Once you navigate to the Control Center home page, your new settings will be applied. You may need to clear your browser's cache.
If you are still unauthorized, that means your configuration did not work, please check the Control Center logs for more details. You can set negotiate to false to disable authentication (details below) if you need to investigate the issue further.
Step 4: Fix your configuration
The override is a temporary solution. Shinydocs Pro Control Center will display a warning in the Settings > Access section if you are using the override. You need to properly configure your Negotiate setup or OpenID in the Contol Panel UI (Settings > Access). Before saving your changes, you will need to add the comments back to the settings file and then save your changes in the Control Center UI. Shinydocs Pro Control Center will restart automatically with your new configuration.
// This configuration overrides the database configuration
// ONLY USE IN RECOVERY SCENARIO ⬇
/*
,"IdentityProvider": {
  "Negotiate": {
    "Enabled": true
  }
}
*/
/*
,"IdentityProvider": {
  "Oidc": {
    "Authority": "",
    "ClientId": "",
    "ClientSecret": ""
  }
}
*/
/*
,"Access": {
"HasControlCenterAccess": [],
"HasSearchAccess": []
}
*/Example Scenarios
Scenario 1: You want to disable all authentication to access the Control Center directly.
Uncomment Negotiate section.
Set
"Enabled": false.Leave all other sections commented out.
,"IdentityProvider": {
  "Negotiate": {
    "Enabled": false
  }
}
Scenario 2: You need to override OpenID Connect (OIDC) settings temporarily.
Uncomment OIDC section.
Fill in the
"Authority","ClientId", and"ClientSecret"with the correct values.Leave Negotiate and Access sections commented out unless you need to change them as well.
,"IdentityProvider": {
  "Oidc": {
    "Authority": "https://login.microsoftonline.com/your-tenant-id",
    "ClientId": "your-client-id",
    "ClientSecret": "your-client-secret"
  }
}
Scenario 3: You want to change which AD/OpenID roles have access to the Control Center.
Uncomment Access section.
Add roles to the
HasControlCenterAccessarray (e.g.,"HasControlCenterAccess": ["RoleName1", "RoleName2"]).Leave Negotiate and OIDC sections commented out unless you also need to change authentication settings.
,"Access": {
  "HasControlCenterAccess": ["ShinydocsAdmin", "ShinydocsUser"]
}
Scenario 4: You need to enable Negotiate (Windows authentication) again after disabling it.
Uncomment Negotiate section.
Set
"Enabled": true.Leave OIDC and Access sections commented out if you don't need to override them.
,"IdentityProvider": {
  "Negotiate": {
    "Enabled": true
  }
}
Troubleshooting
401 Unauthorized after disabling negotiate due to being locked out.
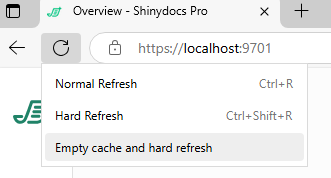
This is a browser cache issue. Either close your browser and all windows completely or:
Press the F12 key in Edge or Chrome to bring up Dev Tools
Right-click the browser refresh icon and select Empty cache and hard refresh
My Active Directory groups are not showing in the groups autocomplete field.
Windows will cache AD groups on logon, and if these groups are created while the server is on, the groups will not resolve properly. To fix this, simply restart the Shinydocs Pro server and the groups should appear in the dropdown. You may have to type in the first 3 letters to see it if you have many groups.
All of my settings and configuration are right but I’m still getting 403 unauthorized
First, make sure your current account (type
whoamiand press enter in CMD to see the account you are currently logged into Windows as. Make sure that account is in the group you assigned to Control Center access.Verify the server is still trusted by the domain
On the server running Shinydocs Pro, open PowerShell as administrator
Run Test-ComputerSecureChannel, if it responds with True the server is trusted and part of the domain

If it returns False, the server Shinydocs Pro Control Center is installed on is no longer trusted by the domain and will need to be resolved before proceeding
More information on this command and how to repair the connection can be found here: Test-ComputerSecureChannel (Microsoft.PowerShell.Management) - PowerShell | Microsoft Learn
Try restarting the server Shinydocs Pro Control Center is installed on