
Unstructured content can feel like a maze. Years of growth, copied folders, and drifting naming habits make it hard to see what matters at a glance. Even so, the clues you need are already there. Hidden in those paths and patterns is the story of your clients and their matters, waiting to be brought into the light. With Shinydocs Pro as your tool, you turn that noise into something clear, searchable, and genuinely useful. You can aggregate reports based on clients, matters, and even find the time and date files were last modified for every client and every matter.
This guide shows you ways to pull client and matter values from your content.
Approach 1 - Regex pattern matching
When client & matter details are in your file path
Does this look familiar?
Shinydocs Pro stores file location information in the path (includes the file name) and parent (path without the file name) field for all of our connectors, leading to a seamless experience.
You can near-instantly realize these patterns in Shinydocs Pro for analysis or action. It’s time to get your content working for you.
Identify the pattern segments
Your content has a pattern in their file paths, all you need to do is identify how many levels deep the path the details live.
To pull client and matter values out of a path, you first need to understand where they sit in the folder structure that Shinydocs Pro captures.
Shinydocs Pro stores the folder path in the parent field. In the Shinydocs Search Engine (powered by OpenSearch), that value is stored as JSON, so a Windows path looks like this in the raw JSON:
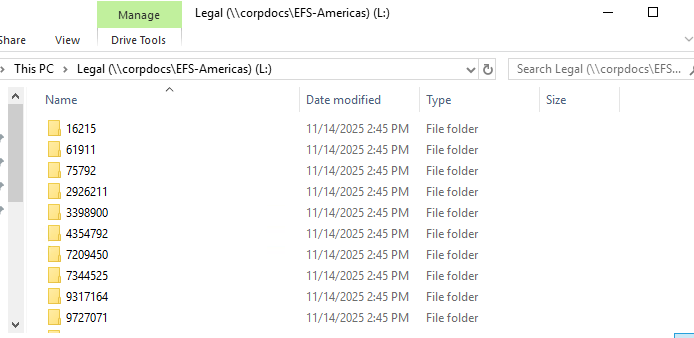
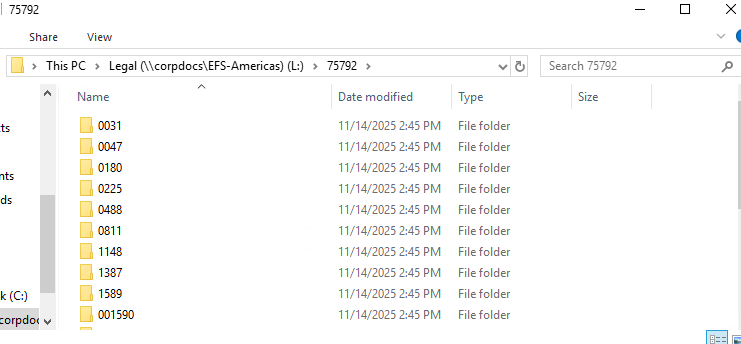
"parent": "\\\\firmfs01\\Shared\\Legal\\Clients\\987654\\2201\\Discovery"
Visually, you can read that as a normal UNC path:
\\firmfs01\Shared\Legal\Clients\987654\2201\Discovery
You can think of this path as a list of segments separated by backslashes:
-
\\firmfs01Server -
SharedShare -
LegalRoot -
ClientsWorkspace or container -
987654Client number -
2201Matter number -
DiscoverySubfolder
In this example, the client is the fifth segment and the matter is the sixth segment.
What is Grok?
Not the AI chatbot. This Grok is part of the Shinydocs Search Engine, it’s a powerful regex-based extractor that runs in real time as content is ingested or updated in the index.
Your Grok pattern follows that same structure. Each folder before the client and matter is treated as “some folder name here,” and the client and matter segments are captured with named groups. Let’s build out the pattern:
|
Path segments (in JSON) |
Regex pattern |
|---|---|
|
\\\\firmfs01 |
|
|
\\Shared |
|
|
\\Legal |
|
|
\\Clients |
|
|
\\987654 |
|
|
\\2201 |
|
|
\\Discovery |
|
That gives use the regex pattern:
\\\\\\\\[^\\\\]+\\\\[^\\\\]+\\\\[^\\\\]+\\\\[^\\\\]+\\\\(?<path_client>[^\\\\]+)\\\\(?<path_matter>[^\\\\]+).*
You can break this reusable pattern down to the following:
-
Start with
\\\\\\\\[^\\\\]+ -
Add
\\\\[^\\\\]+for each segment that comes before the client or matter numbers -
Use
\\\\(?<path_client>[^\\\\]+)for the segment that represents the client number, name, etc. creating the index field “path_client” -
(optional) Add any additional
\\\\[^\\\\]+if there are segments between the client and the matter -
Use
\\\\(?<path_matter>[^\\\\]+)to capture the matter creating the index field “path_matter” -
End the pattern with
.*
You will need another variation of this patter to deal with files at the root of the path_matter segment
\\\\\\\\[^\\\\]+\\\\[^\\\\]+\\\\[^\\\\]+\\\\[^\\\\]+\\\\(?<path_client>[^\\\\]+)\\\\(?<path_matter>[^\\\\]+)
Note: we didn’t add the .* to the end.
Using tools like regex101: build, test, and debug regex are very helpful when building the regex

Now we have our patterns, it’s time to register them into a pipeline.
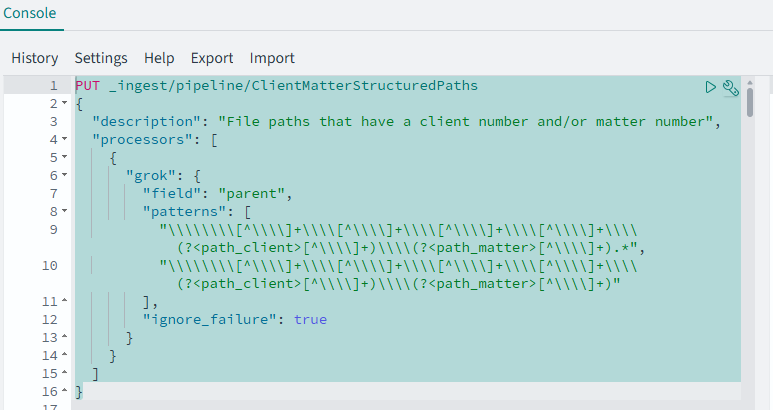
First, you will need to create the pipeline processor like this:
PUT _ingest/pipeline/ClientMatterStructuredPaths
{
  "description": "File paths that have a client number and/or matter number",
  "processors": [
    {
      "grok": {
        "field": "parent",
        "patterns": [
		      "\\\\\\\\[^\\\\]+\\\\[^\\\\]+\\\\[^\\\\]+\\\\[^\\\\]+\\\\(?<path_client>[^\\\\]+)\\\\(?<path_matter>[^\\\\]+).*",
		      "\\\\\\\\[^\\\\]+\\\\[^\\\\]+\\\\[^\\\\]+\\\\[^\\\\]+\\\\(?<path_client>[^\\\\]+)\\\\(?<path_matter>[^\\\\]+)"
        ],
        "ignore_failure": true
      }
    }
  ]
}
This will:
-
Create an ingest pipeline called
ClientMatterStructuredPaths -
The type of processor is
grok -
The field we want to match with our regex is called
parent -
The
two patternswe are looking for are defined -
ignore_failureis set totrueto prevent the pipeline from stopping
You can also add other regex patterns to this processor, say to capture parent paths with no matter number if you wanted.
Now, it’s time to register the pipeline:
-
Navigate to Dashboard’s dev tools (http://localhost:5601)
-
Click the burger menu (top left) and select Dev Tools
-
Paste the pipeline processor you have configured
-
Press the play/run button near the wrench button, if there were no problems, you will receive the following message in the right-side panel
{ "acknowledged": true }-
If you get an error, it’s likely related to your regex pattern. Double check your \'s if you are using something like
\d, it needs to be\\dwhen registering (JSON).
-
-
The pipeline is now registered! Next, you need to apply it to an index, to do that, run the following command in Dashboard’s Dev Tools, replacing
indexNamewith the name of your indexPUT indexName/_settings { "index.default_pipeline": "ClientMatterStructuredPaths" }-
The name of your index can be found in the Shinydocs Control Center > Sources > Click your source
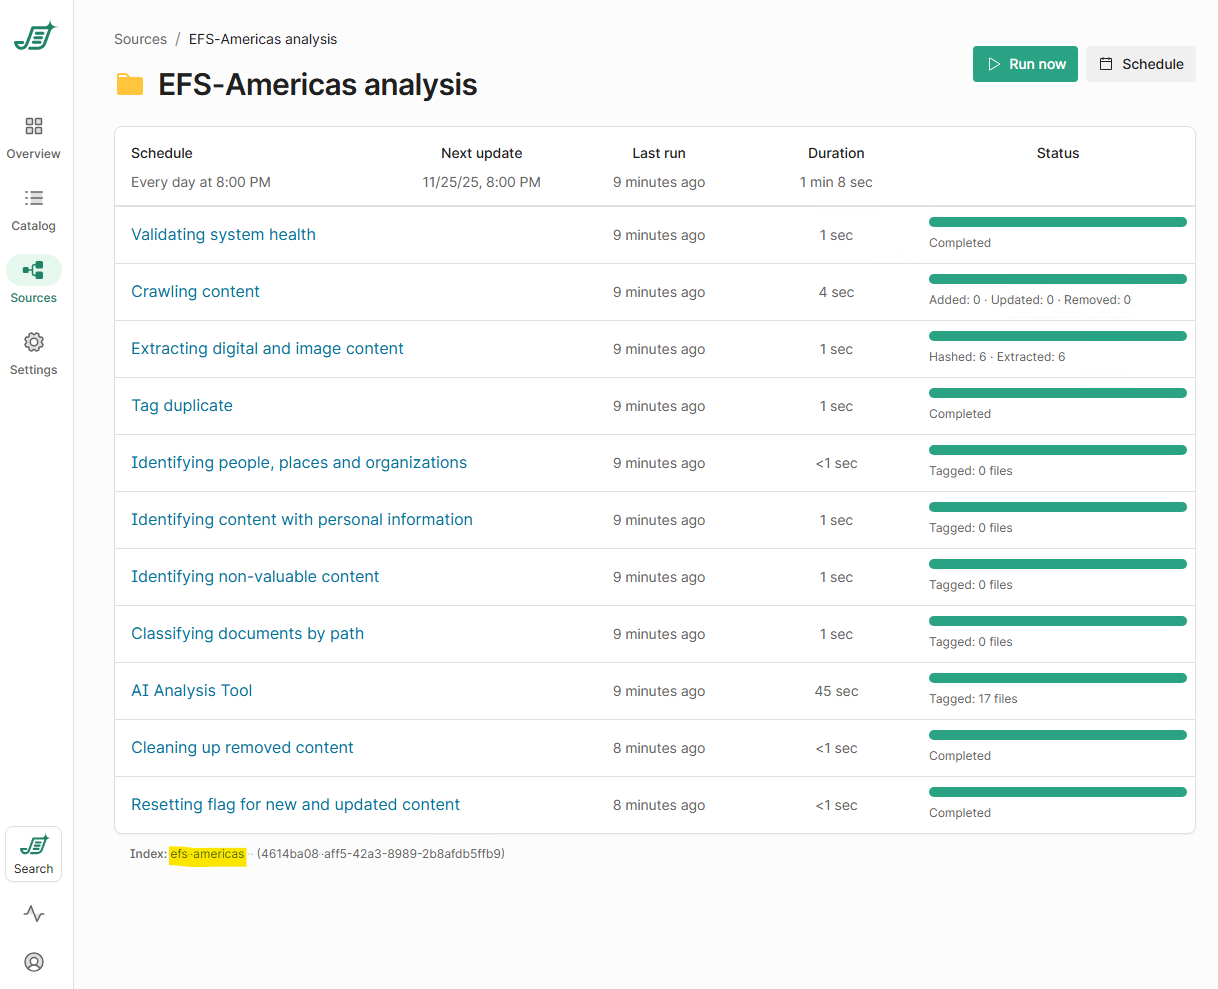
The index name in this case is efs-americas
-
-
Run the PUT command with the play/run button, you should receive
{ "acknowledged": true } -
Great! Now this pipeline will run any time an item is touched in the index (new or modifications), but we also need to update the existing content in the index, to do that, we will send a blank update across all items, allowing them to be processed by the pipeline. To do this, run this command replacing
indexNamewith your index namePOST indexName/_update_by_query?wait_for_completion=false&conflicts=proceed -
Run the POST command with the play/run button. You should get a response with a “task” back
{ "task": "xoV2W9AoSdyuAJCkMjpfLw:88589" } -
This task id can be used to monitor the progress of applying the pipeline to previously crawled content. To check the status:
-
Run the following to get info about the task using the task id in the _tasks api:
GET _tasks/xoV2W9AoSdyuAJCkMjpfLw:88589 -
You will get a response back like this:
{ "completed": true, "task": { "node": "xoV2W9AoSdyuAJCkMjpfLw", "id": 88589, "type": "transport", "action": "indices:data/write/update/byquery", "status": { "total": 10, "updated": 10, "created": 0, "deleted": 0, "batches": 1, "version_conflicts": 0, "noops": 0, ... -
completedwill betruewhen it is complete,falsewhile it is running -
status.totalshows the total number of items that will be updated -
status.updatedshow the number of items that have been updated
-
-
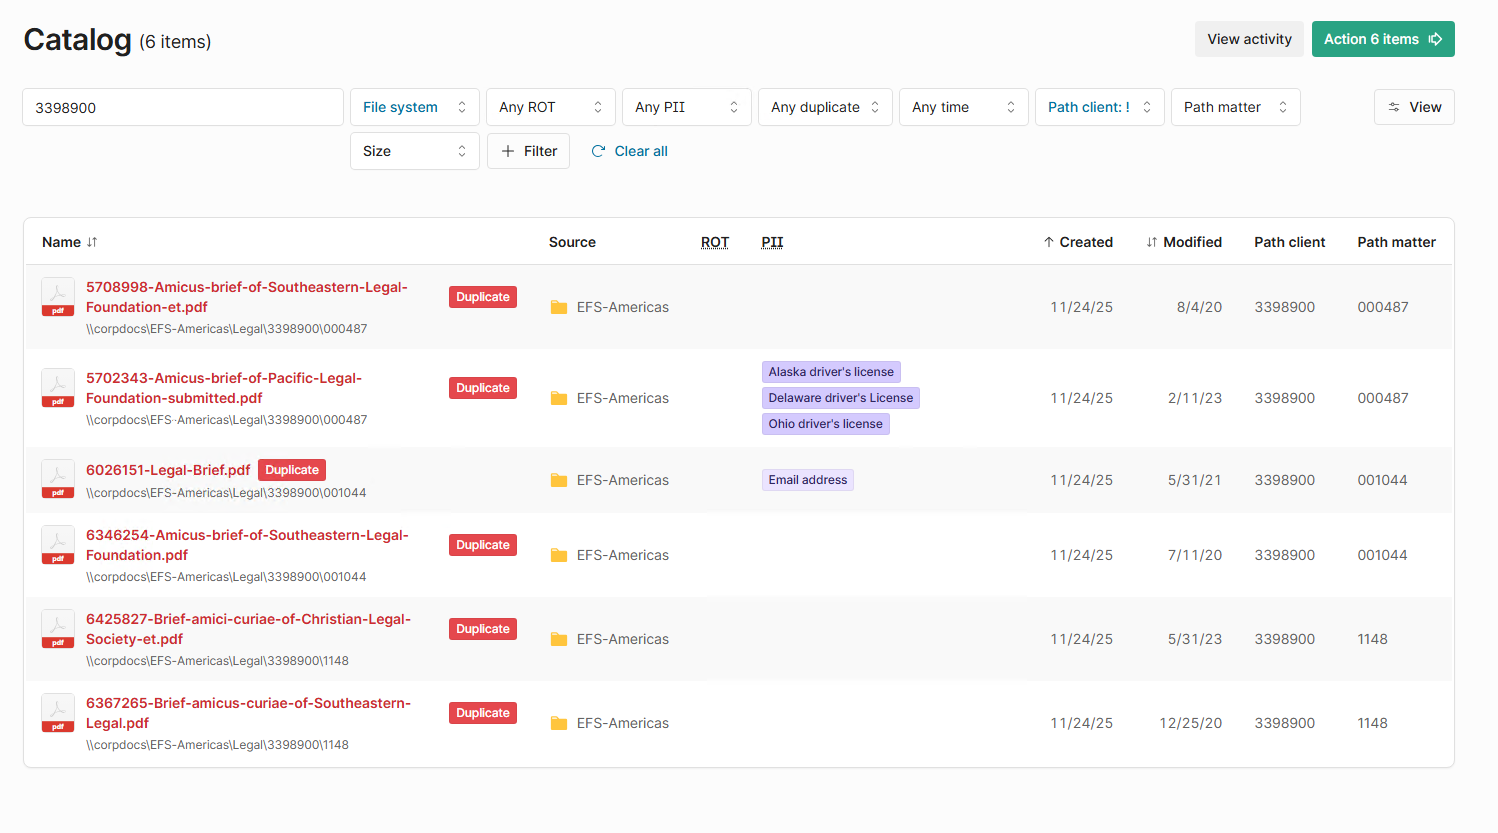
Even while this is running, you can check how it’s applying to your content in the Catalog of Shinydocs Control Center
-
Go to the Catalog page in Shinydocs Control Center
-
Click the + Filter button
-
Type in path and check Path client and Path matter
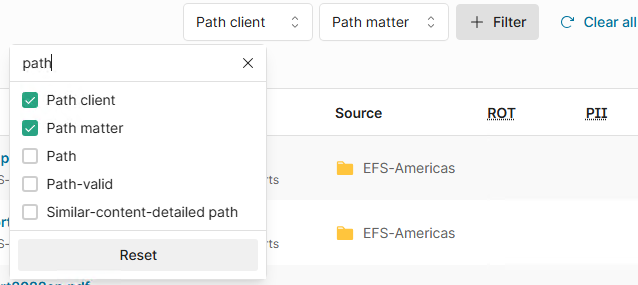
-
This will add filters for these two fields as well as enable the columns in the catalog

-
You can then filter for files with the tag applied by using the ! operator in the filter box
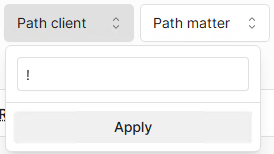
-
If your filter looks like this:
-
Set the condition to Greater and the Amount to 0
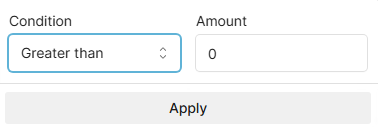
-
-
-
Your enrichment should be displaying in the catalog
-
-
This pipeline that you have set up is a set and forget type of processor that you will only need to adjust when you pattern changes.
-
You can also apply the same pipeline to other indices by running steps 5 - 8 again with your other indices.
Approach 2 - Term matching with Search & Tag
This method works well when your content already carries some structure. If client and matter numbers appear in the metadata, the file name, the path, or even inside the text itself, and you have a list of known client numbers and matter numbers, term matching becomes a very direct way to find what you need.
You choose which metadata fields to search. You can also include the document’s text through the fullText field. Shinydocs Pro then looks for your client and matter numbers across those sources and returns every file that contains a match.
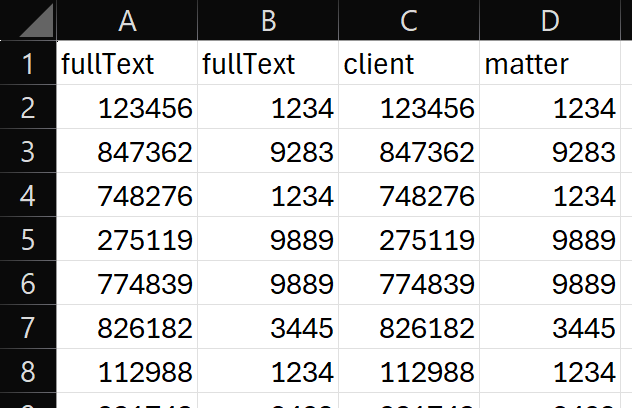
First, you will need to gather your client and matter numbers into a spreadsheet. The spreadsheet will help keep you organized at this stage. Shinydocs recommends using six columns: fullText, fullText, client and matter. You need to save this file as a CSV (no tabs).
Why fullText and why is it duplicated? The file’s text content is located in our index field fullText. We put these in the spreadsheet as the search columns, then the client and matter columns are our tagging columns.
This will check the fullText field of each file and if both the client and matter number are found, it will tag the data with the client and matter number.
Once you have your list complete, you can import the spreadsheet into Shinydocs Control Center’s Search & Tag:
-
Go to Shinydocs Pro’s Control Center (on the server, https://localhost:9701)
-
Go to Settings > Tagging > Search & Tag
-
Fill out the name and optionally give it a description
-
Select the source(s) you would like this rule to run on
-
For Query conditions, use fullText | Exists
-
In the Rules section, click the Import button
-
Browse for your CSV file and click Open
-
It may take a moment to load if you have a CSV with many rows and columns
-
If you do have a large CSV, a portion of the CSV will be loaded into view as displaying the entire file is not performant for your browser
-
-
In the fullText columns, select the header and choose Search for this for each.
-
In the client and matter columns, select Tag with this and then select Overwrite.
-
Save your configuration with the save button
On the next cycle of the sources you selected in the rule configuration, your Search & Tag rules will apply to your data.
The value in the column headers you have set to Tag with this will be the field name created. In this case: client and matter. However, we append rs-<id>- to your field name so the app knows where these tags came from. In this guide, if this is your first ruleset, it will be the fields rs-1-client and rs-1-matter.
Now in the Catalog page of Shinydocs Control Center, you can + Add filter for the new fields (eg. rs-1-client and rs-1-matter) you created. This will also enable the columns in your catalog view.