File System Migration
Prerequisites:
-
Shinydocs Pro
-
Content Server connectivity and credentials
-
File share access and read permissions
-
RDP access to the Shinydocs Pro server
-
Service Account access
-
Shinydocs Pro license file, for CLI activation.
-
A text editor such as Notepad++ (optional) or Windows' Notepad
Files and Folders:
Please replace x:\ with your preferred location based on your internal standards.
-
x:\Shinydocs and:
-
x:\Shinydocs\batchfiles
-
x:\Shinydocs\sources
-
x:\Shinydocs\queries
-
-
ShinySync.cmd
-
contentserver.json in sources folder
-
match_all.json in queries folder
Command Line Interface (CLI) Activation:
This should only need to be performed once, or after a new license is issued.
-
As the Service Account, open a Command Prompt as an Administrator and...
-
Navigate to the Shinydocs Pro ControlCenter folder: (typically, C:\Program Files\Shinydocs Professional\ControlCenter)
-
Use the command,
CognitiveToolkit.exe activate -p "<path>"where the path is the location and filename of the license file. -
The CLI, Cognitive Toolkit, has been activated.
-
Note this folder location for later use as CogFolder in the script.

Configuring the Secure Credentials:
-
As the Service Account, open a Command Prompt as an Administrator and...
-
Navigate to the Shinydocs Pro Control Center folder: (typically, C:\Program Files\Shinydocs Professional\ControlCenter)
-
Use the command,
CognitiveToolkit.exe savevalue, to save credentials -
When prompted, enter the UserID, then the password.

-
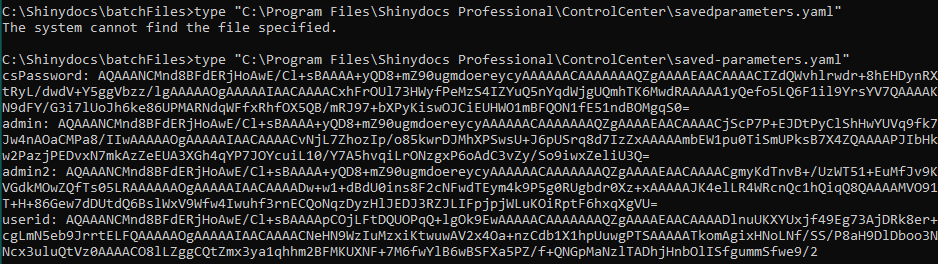
The credentials will be saved securely into a file called saved-parameters.yaml in the ControlCenter folder.
-
To verify the credentials have been stored you can use the command, type, to display the file in its encrypted form.
-
Only the user that created the credentials, can use those credentials. Ensure that credentials are created by the same user, the Service Account, and will be using them for executing the scripts.
-
If there is a credentials change, re-run the
savevaluecommand as above to overwrite the value.
Deploying the Script:
Please remember to Unblock the zip file, Shinydocs_Migrate.zip, in the file's properties using File Explorer.
-
Unzip the file to x:\Shinydocs

-
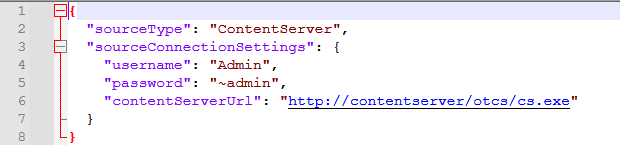
Navigate to sources, open contentserver.json in a text editor.
-
Update line 4 with the correct Content Server UserID
-
Line 5 is a placeholder and can be left as is, or set to "~userid" to match the userid, the tilde (~), indicates this is a secure value.
-
Line 6 must be updated to your Content Server's base URL (for cs.exe).
-
Save this file.
-
navigate to the batchfiles folder.
-
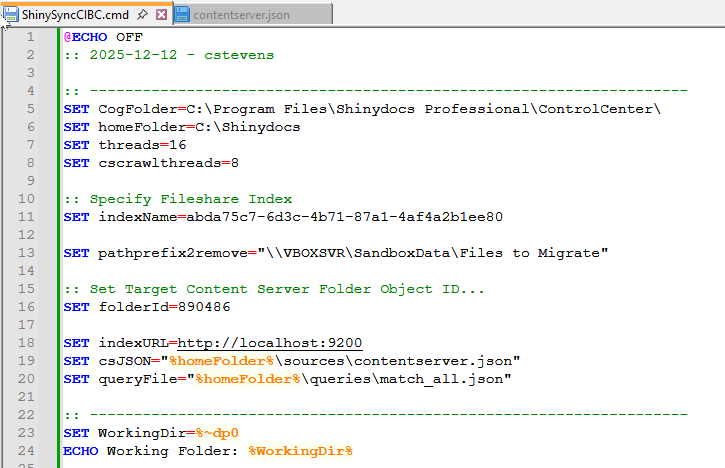
Open the command script, ShinySync.cmd, in your text editor.
-
The variables we need to set are in this first section:
-
Line 5, CogFolder, is the location of the Cognitive Toolkit, as noted above.
-
Line 6, is the location of these scripts, i.e. C:\Shinydocs
-
Line 11, is the guid of the file share or source index as crawled by Shinydocs Pro
-
Line 13, is the full path to the folder that was crawled.
-
Line 16, is the target folder object in Content Server. This folder does not need to be empty, but this is preferred on first execution.
-
Line 18, this is the location of the OpenSearch index, a default, and should not need to be changed.
-
Line 19, This is the location of the file, contentserver.json, and is required.
-
Line 20, is the location of the default filter query, match_all.json, and is required.
-
Unless directed, there's no need to modify the command script beyond line 20.
Running the Script:
-
Open a Command Prompt as the Service Account
-
Navigate to the batchFiles folder, x:\Shinydocs\batchfiles
-
Enter the command:
ShinySync.cmd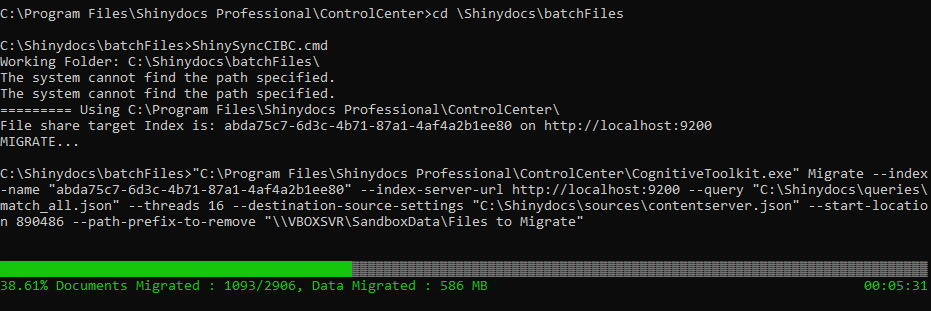
-
The script will begin the migration...
Subsequent Source Migrations:
Once this script is proven and working and File System source crawled in Shinydocs Pro can be migrated by duplicating the script file, perhaps adding a name to each filename:
i.e. ShinySync.cmd >> ShinySync-LegalShare.cmd
Change the values for Lines 11, 12, 16, and perhaps 19 (only if this requires an alternate Content Server login) to correspond to the new location.