Best Practices: Finding and classifying similar documents
This topic describes how to use the Shinydocs Cognitive Suite and Discovery Search to classify documents based on their “similarity” to other, already classified documents, in the Analytics Engine.
For example, you can choose 5–20 documents of a similar kind and classify them by their document type, such as offer letters or purchase orders. The Shinydocs Cognitive Suite will “learn” from those examples and will be able to find other similar documents for classification.
Throughout this topic, we will use financial planning concepts as examples in many cases (including in .bat and .json files). Please replace these examples with your own terms where appropriate.
Getting started
Before you begin, the dataset must have been:
Crawled for metadata
Full text extracted
Applying ROT rules (and cleaning up that ROT) is strongly recommended.
Classify by Find Similar
Classify by Find Similar is a process that uses a small set of example documents that are about a particular topic (or classification). Once example documents are identified, their structure will be used to find other similar documents and automatically classify them.
This topic is demonstrated using OpenText™ Content Server but can be applied to other sources for your dataset with some adjustments.
Step 1 – Create an enrichment tag in Discovery Search
Before discovering and tagging example documents in Discovery Search, you need to set up an enrichment tag for this.
Create an enrichment tag
Open Discovery Search as an Admin
Click Enrichment tags on the left navigation panel
Specify a name for your enrichment tag (for example, TAG-find-similar)
Click Save changes
Optional (but recommended) – Create a result tag
Click Result tags on the left navigation panel
Select
enrichmentTagsin the Index field name fieldSpecify the name of your enrichment tag in the Value field
Select a color in the Style field
Specify a name for your result tag (for example, Find Similar Tag) in the Text field
Click Save Changes
Now, any search results in Discovery Search that include your enrichment tag are highlighted with the result tag.
Step 2 – Tag example documents in Discovery Search
In Discovery Search, apply your enrichment tag to approximately 5–20 of the “best” example documents, so they can be used to find other similar documents.
Open Discovery Search
Log on to OpenText™ Content Server
Search for relevant terms to find your example documents
For example, if you want to classify documents related to financial planning, you could use search queries like corporate financial planning, finances, and budget.Review the search results for relevant documents. For each relevant document (at least 5):
Toggle on Enrichment view
Check the box for your enrichment tag
Click Save changes
Toggle off Enrichment view
Documents with your enrichment tag are now highlighted with the result tag.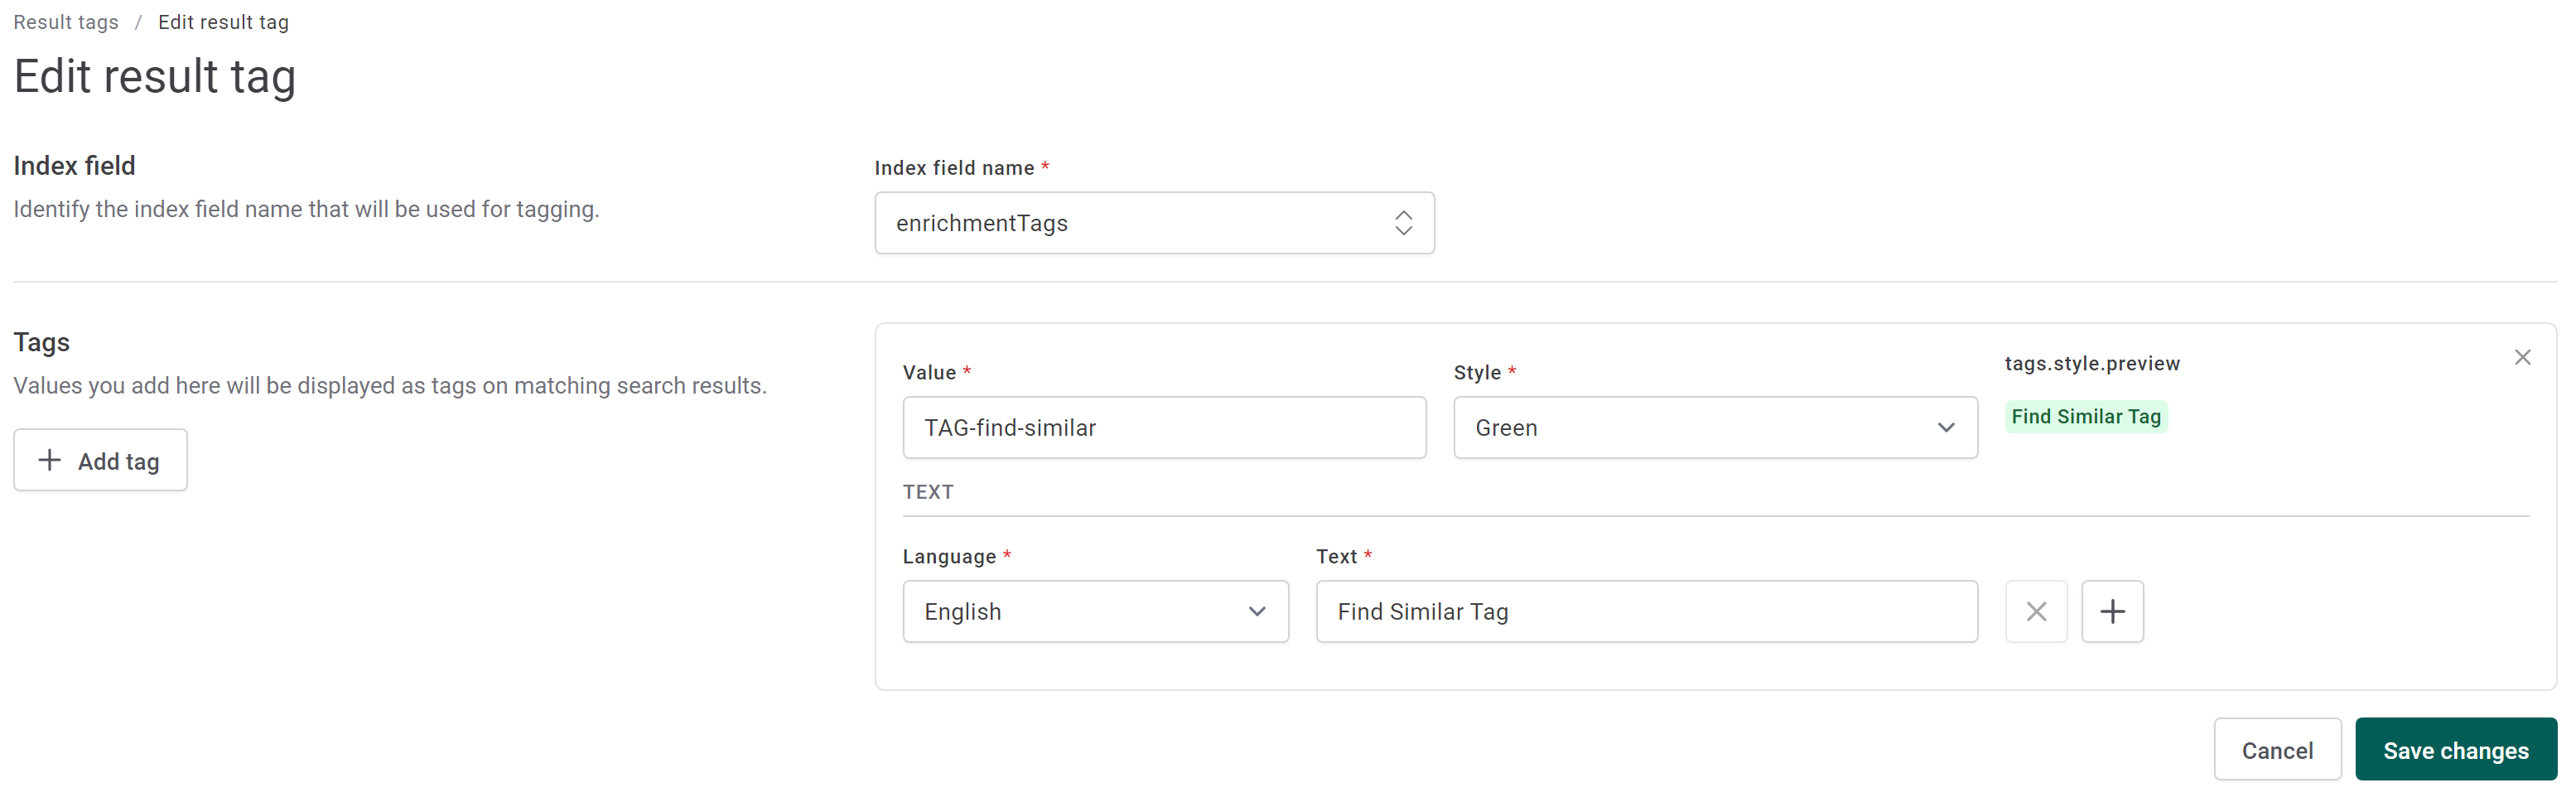
Validate your set of example documents in Discovery Search using enrichment tags: [your enrichment tag] as your search term
We recommend opening each example document again in their native application for final validation.
Step 3 – Determine parameters for the .bat and .json files in the Visualizer
After tagging example documents with your enrichment tag, you can use the Visualizer to determine how to modify the .bat and .json files to support your use case.
Make sure your Open Clustering visualization is pointing to the correct Index (shiny-cs in this example)
Assuming this has already been set up by your Administrator, open the Open Clustering Dashboard and add a filter for enrichmentTags.keyword is [your enrichment tag]
Click Save
Scroll down to view the Open Clustering visualization. Using this visualization, you should be able to determine values for the following parameters:
Tokens:
--tokensMinimum documents:
--min-docsMinimum terms:
--min-termsMinimum word length:
--min-word-lengthThreshold:
--thresholdMatch:
--match
Example: Determining parameters for the .bat and .json files using Open Clustering visualization
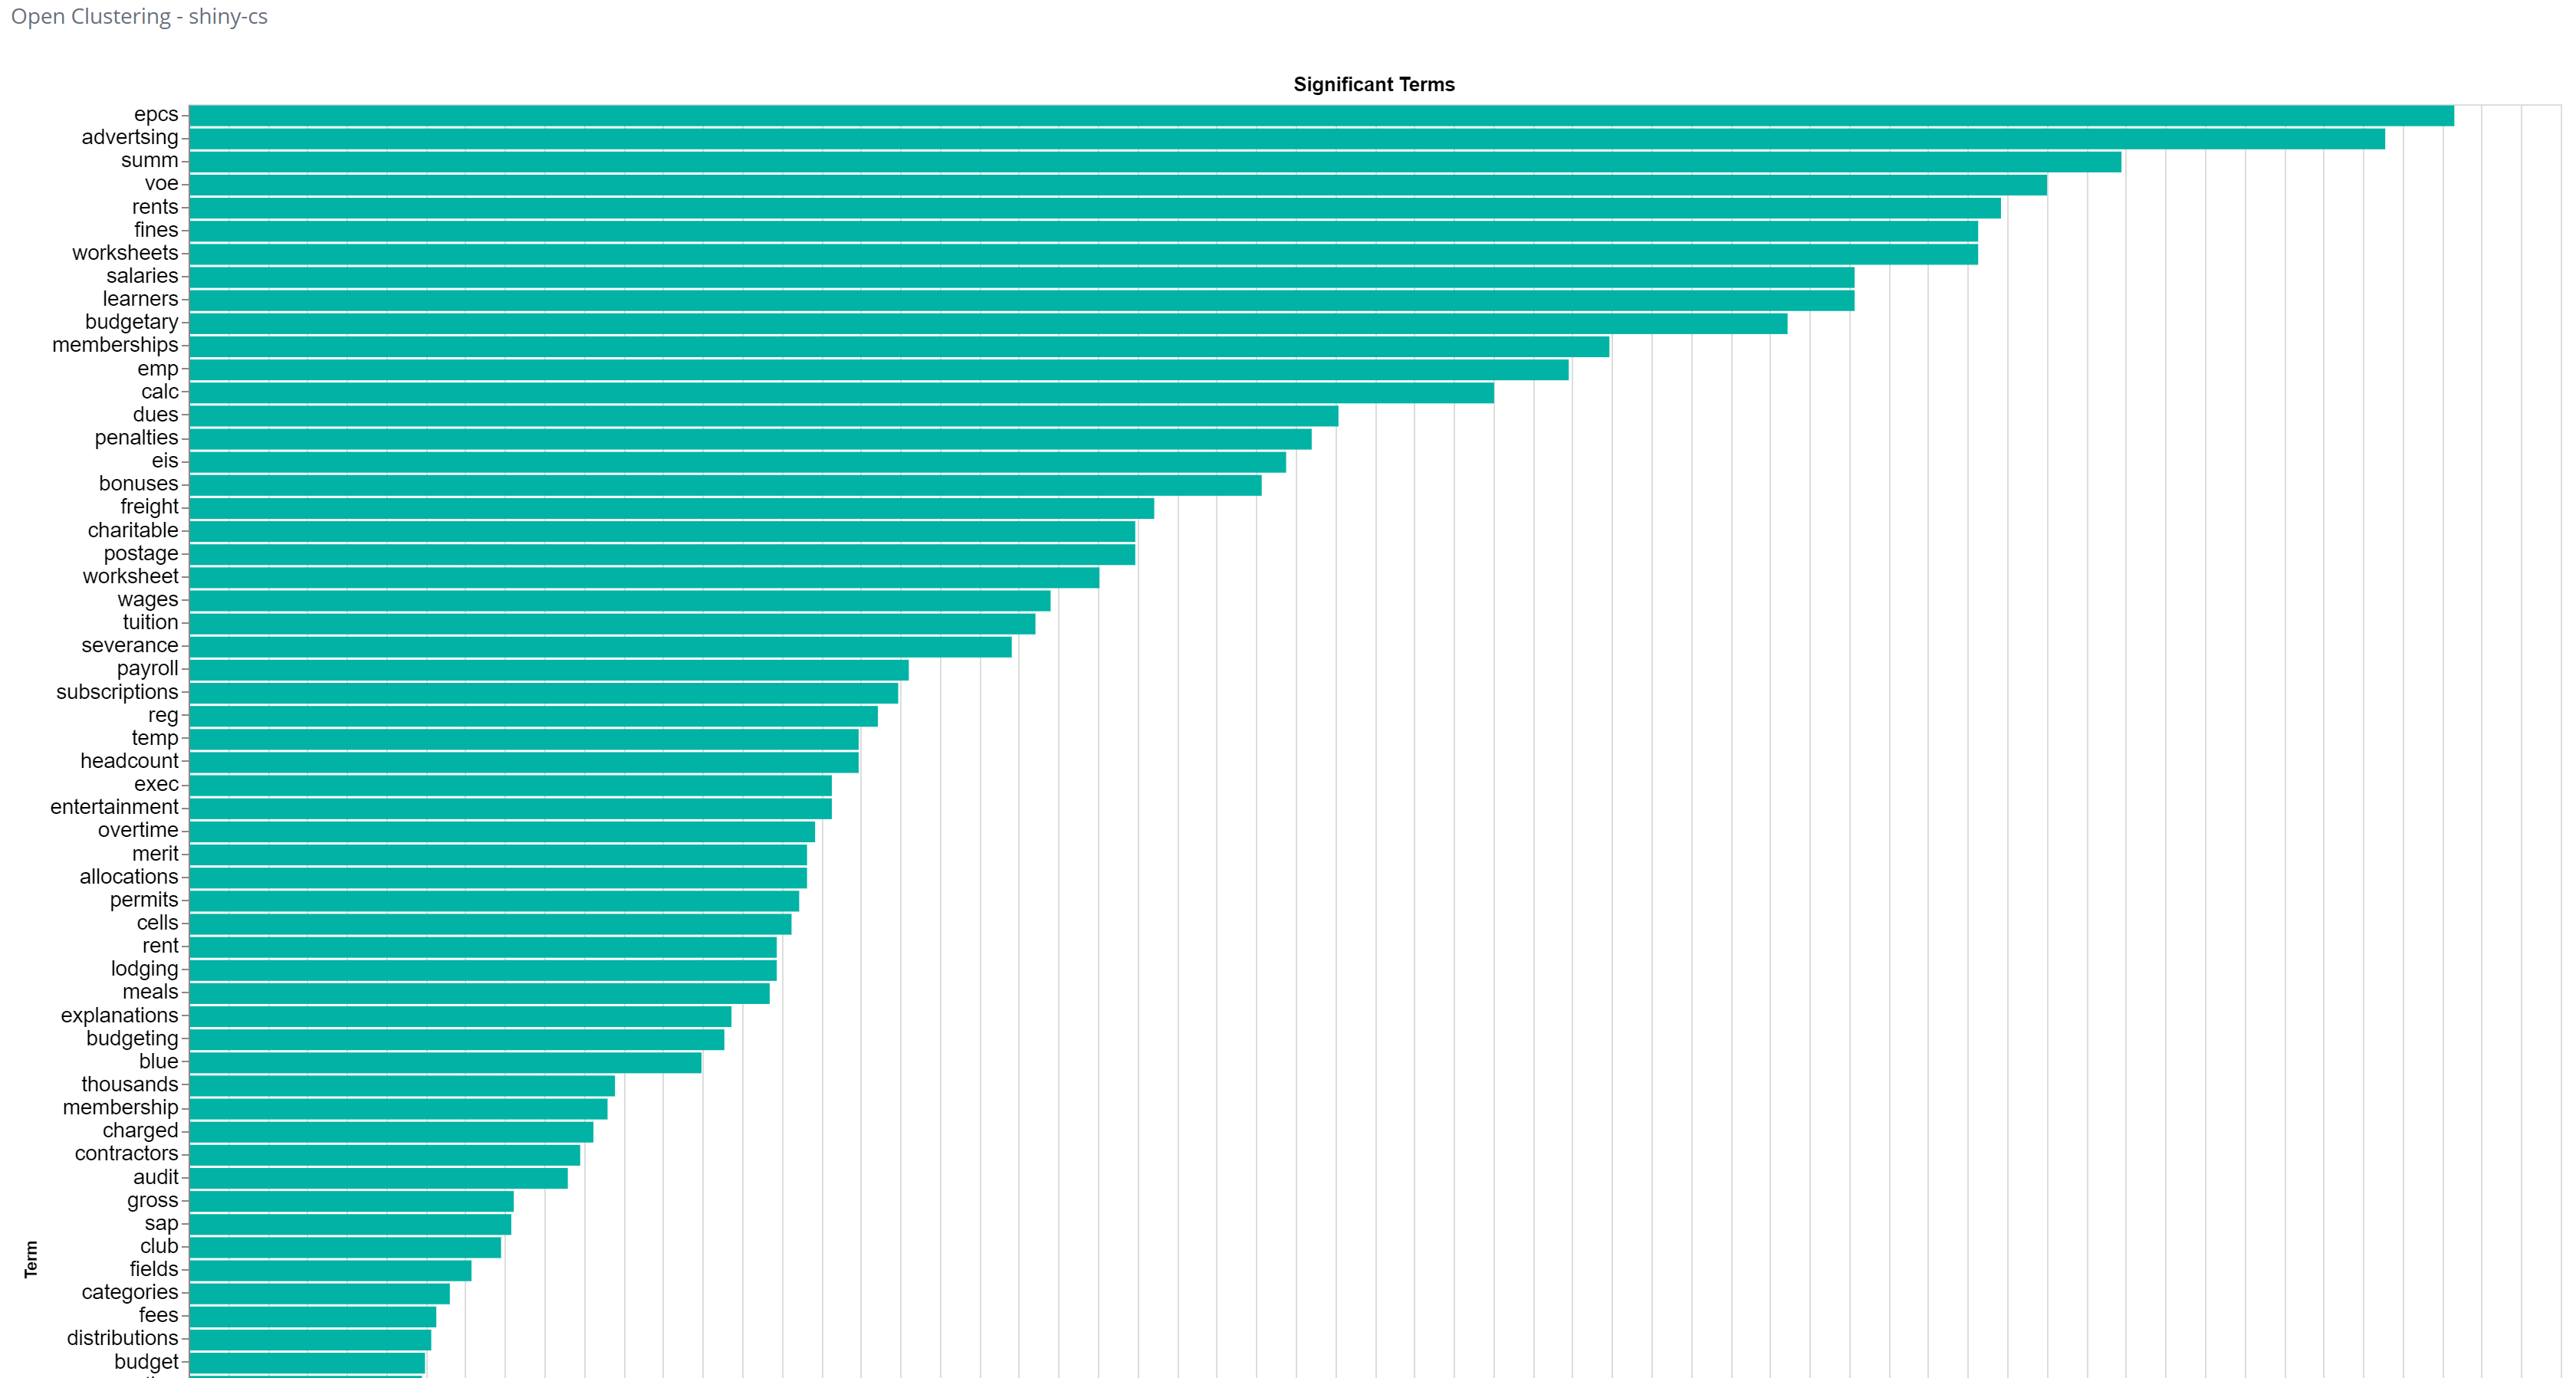
In this graph, we are reviewing an Open Clustering visualization of a set of example documents tagged with an enrichment tag. What this graph shows are the words or terms that are used a lot in those selected documents, that are likewise NOT used very much in the rest of the index (these are words likely to be associated with financial planning). These words provide insight into how we can configure the following parameters for the Find Similar Classification process:
Tokens: For the 100 top words (or tokens) listed, note the drop-off after the word “blue”. The words listed above this are used a lot in all of these documents, but those below not so much. So, we should consider that and the 42 words above it.
--tokens 42Minimum Documents: With our example document set (33,000 documents), the minimum number of emails in which the word must occur for it to be considered should be about 20. This would most likely be either higher for a larger dataset, or lower for a smaller one.
--min-docs: 20Minimum Terms: Since many of these documents (emails in this example) include attached spreadsheets, the minimum number of times that the word must occur in order for it to be considered can be fairly high.
--min-terms: 20Minimum Word Length: In looking at the above graph, there are a few words we want to consider that are only 3 letters in length, so we should likely include those. Generally we want to make this number a little higher in most cases (4 or 5) if we can, however your Open Clustering visualization should guide you.
--min-word-length: 3Threshold: This is a measure for the words that will occur in different documents, for the words we are considering, how many of these (by percentage) need to be the same for them to be considered similar. A good starting point is 90%.
--threshold: 90Match: For a given document to be considered “similar” to the original set of example documents, this is the number of documents it needs to match. Since our document set is only 6, this is set to a low value. If our example document set was larger (say 20, 30, or 40), we might want to consider setting this to 2, 3, or 4.
--match: 1
Step 4 – Modify .bat and .json files
With the above parameters determined, it is time to modify the supplied .bat and .json files for your use case.
We recommend using a code editor, such as NotePad++, to edit these files.
Download the CS - find similar classification.zip provided in the Resources for this topic
Create a folder named COG Batch Files in the same folder your CognitiveToolkit.exe is located
Unzip the contents of the zip file into the COG Batch Files folder
If applicable, edit the file contents and file names to reflect your use case by replacing financial-planning with something more specific to your use case
* Note: These files can be copied/duplicated for each of the classifications that you wish to use.These .bat files are configured to run on a system in which the
IndexNameis shiny-cs and theIndexURLis http://localhost:9200. Change these values so that they point to your specific environment URL and index nameThe .bat files are configured to use the TAG-find-similar enrichment tag. Change these values so that they use the enrichment tag name you created in Step 1 – Create an enrichment tag in Discovery Search.
Run the .bat files in the following sequence:
COG-RunScript-Tag-CS-classification-example-financial-planning.bat – In the Index, each
enrichmentTagsfield with your enrichment tag creates a newclassification-examplefield with the value financial planningCOG-Query-FindSimilarClassification-financial-planning.bat – In the Index, based on the
classification-examplefield, for the specified parameters (--tokens,--min-docs, etc.), run the ShinydocsFindSimilarClassificationfield. This .bat file is where you should apply your edits to the options as determined in Step 3 - Determine parameters for the .bat and .json files in the Visualizer. The result of running this process is that matching Index records are tagged with thepossible-classification-examplefield with the value financial planningCOG-RunScript-Copy-Possible+Example-financial-planning-to-Classification.bat – In the Index, perform the following steps:
* Note: When you run the .bat files you will be prompted before each step to press y to continue.Copy each
classification-examplefield with the value financial planning to theclassificationfieldCopy each
possible-classification-examplefield with value financial planning to theclassificationfieldRemove all of the
possible-classification-examplefields with value financial planning
COG-RunScript-Remove-Classification=financial-planning.bat can be used to remove the specified values (financial planning in this example) from the classification, classification-example, and possible-classification-example fields, if needed.
Step 5 – Find similar documents and auto classify them
The Shinydocs Cognitive Toolkit is an executable stored with its dependencies, examples, and resources. These are all located in a zip file provided by Shinydocs with the following naming convention: shinydocs-cognitive-toolkit-yyyy-mm-dd (X.X.X).zip.
Open a Windows command prompt as Administrator, and then navigate to the child COG Batch Files folder of the Cognitive Toolkit installation folder you created in Step 4 – Modify .bat and .json files
Run COG-RunScript-Tag-CS-classification-example-financial-planning.bat to tag similar example documents in the index based on those that were tagged in Step 2 – Tag example documents in Discovery Search
Press y to execute the command
Next, run COG-Query-FindSimilarClassification-financial-planning.bat to find similar documents using the tagged example documents and the parameters you set in Step 3 – Determine parameters for the .bat and .json files in the Visualizer
Press y to execute the command
The Analytics Engine analyzes your data set based on the original documents we tagged as examples of financial planning, and all similar documents are identified and classified as possible financial planning documents based on the text in those documents. Once this process has completed you can view the results in Discovery Search.
Step 6 – View results in Discovery Search
You can quickly view the results in Discovery Search by entering the following query in the search bar: possible-classification-example: “financial planning”.
Review a few of the results by clicking on the links and viewing them in their native application to verify that they are what you are expecting. If they are not, look at the values you set previously — we have found that the following tend to be values to consider refining first:
Threshold: Is your threshold set too low (or too high)? Typically values below 85–90% may cause misclassification
Minimum Word Length: Consider increasing this by 1 depending on the initial list of words
Tokens: Is this value set too high? Try reducing the value by 10% and running your search query. Or, look again at the shape of the Open Clustering visualization — are you including too many words that are not significant for the purposes of similarity? Generally speaking, fewer words to match are better than more words
If you are still having difficulty, look a little closer at your example documents. There may be a stray one included that is causing issues that you are not expecting (for example, a document that is very long and covers many topics may skew your similarity results).
Step 7 – Lock in the results
If you are happy with the results, you can now “lock them in” by copying the temporary values to the classification field (or another field, if applicable).
Copy your results to the classification field
Open a Windows command prompt as Administrator, and then navigate to the child COG Batch Files folder of the Cognitive Toolkit installation folder you created in Step 4 – Modify .bat and .json files
Run COG-RunScript-Copy-Possible+Example-financial-planning-to-Classification.bat. This command does the following:
Copies your financial planning examples into the
classificationfieldCopies the new possible financial planning examples into the
classificationfieldRemoves the
possible-classification-examplefield for examples that equal financial planning
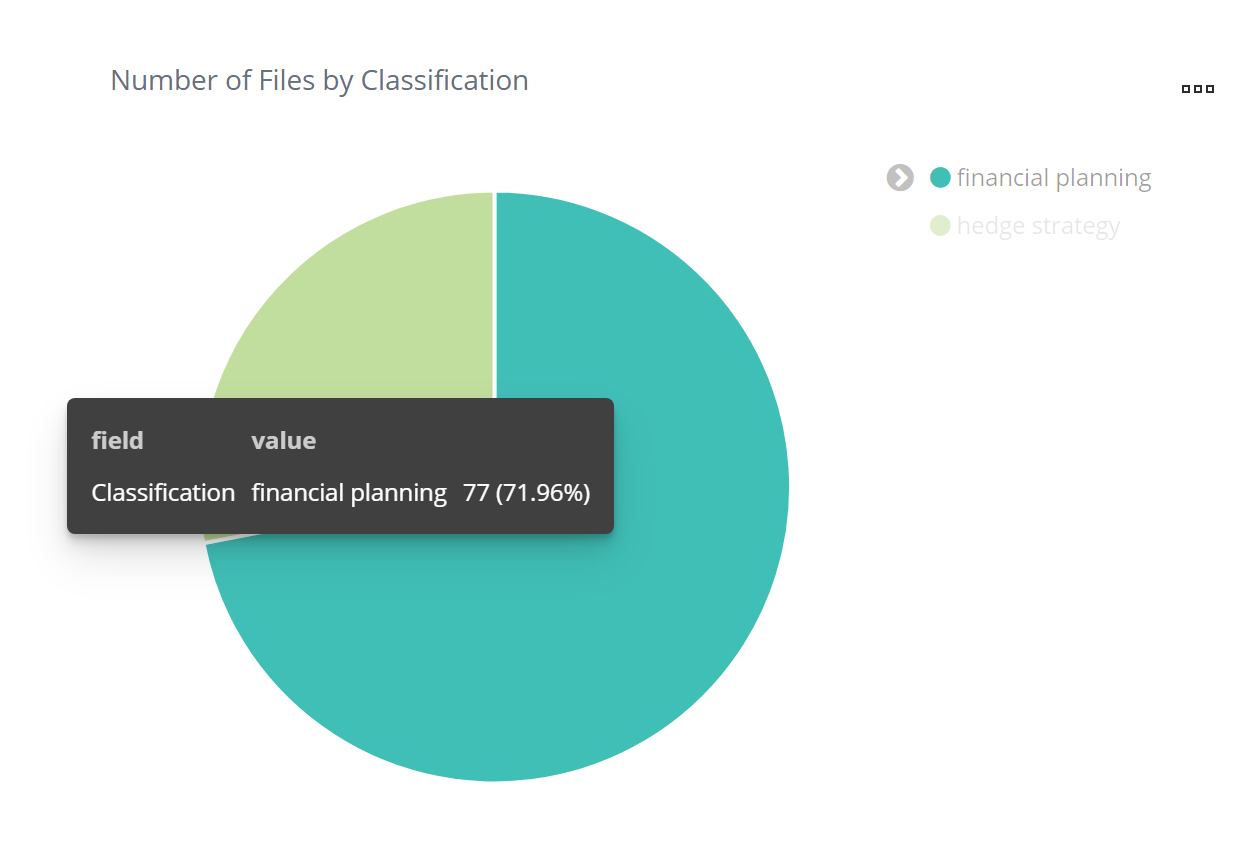
View your results using the Visualizer
You can now view the results on the Classifications Dashboard in the Visualizer. In the example screenshot, there are now 77 files classified as financial planning in addition to what was classified previously.
Step 8 – Cleanup
Assuming you are doing a bunch of these back-to-back, be sure to remove the enrichment tags for the classifications you just applied so that these documents are not used for the next set of documents you are tagging.
In Discovery Search, search using enrichmentTags: [your enrichment tag]
Turn on Enrichment View and select all of the documents that you want to remove the enrichment tag from
Click Remove Tags and check the box on the right
Click Save Changes to remove the enrichment tags
Resources
CS - find similar classification folder
The folder of .bat & .json files as described in Step 4 – Modify .bat and .json files.
CS - find similar classification (1).zip
Possible actions for .bat files
Action | Required | Description | Default |
|---|---|---|---|
--field-list <FIELD_LIST> | The fields to compare - typically fullText | fullText | |
--classification-field <CLASSIFICATION_FIELD> | * | Name of the field where classifications are found | |
--tokens <TOKENS> | Number of the most commonly occurring, unique words to compare in each document | 500 | |
--min-docs <MIN_DOC_FREQUENCY> | Minimum Document Frequency - for each word to be considered, the minimum number of documents in which the word must occur in order for it to be considered. So, “5” means that words that are very unique (and only in 4 or fewer documents) would be ignored. | 5 | |
--min-terms <MIN_TERM_FREQUENCY> | Minimum Term Frequency - for words to be considered in a given document, the minimum number of times they must appear to be considered. So, “1” would consider all words in each document, “2” would only consider those words that occur twice in a given document, etc. | 2 | |
--max-docs <MAX_DOC_FREQUENCY> | Maximum Document Frequency - for each word to be considered, the maximum number of documents in which the word can occur before it is no longer considered (so words like “the” for example). If omitted, no limit is placed on any word. | ||
--min-word-length <MIN_WORD_LENGTH> | Minimum Word Length - for each word to be considered, the minimum length of those words. If omitted, any length is considered. | ||
--threshold <SIMILARITY_THRESHOLD> | Similarity Threshold - for any 2 documents to be considered “similar”, this percentage of their considered words (see above for which words are not considered) must be the same. Depending on the words in documents being compared, this number can be higher (more exact) or smaller (less exact). | 90 | |
--match <MATCH> | For a given document to be considered “similar”, for the original classified set, it must match this number of them. 1 might be a perfectly valid number to use here. | 5 | |
--size-similarity <SIZE_SIMILARITY> | This is a +/- percentage, based on the actual file size of the documents in question. So for a document to match it must also be within this percentage difference of the original classified set. | 20 | |
--inclusion <INCLUSION> | File Extension Inclusion List (Comma delimited) | ||
--exclusion <EXCLUSION> | File Extension Exclusion List (Comma delimited) | ||
--print-query | Print the Elasticsearch query in the logs. Does not run operation! | false | |
--dry-run | See how many documents would be affected. Does not run operation! | false | |
--query <QUERY> | * | Search query (file or json input) | |
--silent | Turn off the progress bar | false | |
--nodes-per-request <NODES_PER_REQUEST> | Number of nodes per request | 100 | |
--threads <THREADS> | Number of parallel processes to start | 1 | |
--skip-errors | Skip re-processing errors | false | |
--index-server-url <INDEX_SERVER_URL> | * | URL of the index server | |
--index-name <INDEX_NAME> | * | Name of the index | |
--index-type <INDEX_TYPE> | Type name for index objects | shinydocs | |
--force | Forcefully remove / Suppress prompt for confirmation | false |