Skip table of contents

Search Configuration for Microsoft Connectors

App Registration & API Permissions

To configure Shinydocs Pro Search, you need to register the app in Azure and set the necessary API permissions. Shinydocs Search is designed to use a single Microsoft app registration for all supported Microsoft connectors. This simplifies management and ensures streamlined integration across different connectors.

You should create one app registration for Shinydocs Search and then add the appropriate permissions based on the specific Microsoft connector(s) you intend to use, such as SharePoint, OneDrive, or Teams.

Create the App Registration

  1. Log in to the Azure portal as an administrator.

  2. Navigate to Azure Active Directory > App registrations.

  3. Click New registration.

  4. Enter a name for the app (e.g., "Shinydocs Pro Search").

  5. For Supported account types, select Accounts in this organizational directory only.

  6. In the Redirect URI section, select Web and enter http://[server]:9702/azuread/success (you can update this later). Replace [server] with your server name or FQDN.

    1. You can have multiple values for the redirect

    2. If using an FQDN, you likely will not need the port information.

  7. Click Register.

Generate a Secret Key

  1. In the app registration, go to Certificates & secrets.

  2. Click New client secret.

  3. Add a description (e.g., "Shinydocs Pro Key") and select an expiration period.

  4. Click Add.

  5. Copy the secret value and store it securely. You will not be able to view it again.

Microsoft SharePoint Online

Microsoft SharePoint Online Set API Permissions

To allow Shinydocs Pro Search to access SharePoint Online and perform searches, configure API permissions.

Configure Microsoft Graph Permissions

  1. In the app registration, go to API permissions.

  2. Click Add a permission.

  3. Select Microsoft Graph > Delegated permissions.

  4. Grant the following delegated permissions:

    • offline_access

    • openid

    • profile

    • User.Read

    • Sites.Read.All

  5. Click Add permissions.

Configure SharePoint Permissions

  1. In API permissions, click Add a permission.

  2. Select SharePoint > Delegated permissions.

  3. Grant the following permission:

    • AllSites.Read: Allows the app to view any sites and their contents the signed-in user has access to. This enables permissions checks during searches.

  4. Click Add permissions.

  5. Click Grant admin consent for _____ to apply the permissions.

If you are configuring a seperate application registration for Search, seperate from Shinydocs Pro Control Center (crawling), your permissions should look like this. If you are using the same application registration, these permissions are in addition to your existing entries.

image-20241219-211807.png

Configure SharePoint

Next, associate the app with SharePoint.

  1. As a SharePoint Administrator, go to: https://<tenant>-admin.sharepoint.com/_layouts/15/appinv.aspx.

  2. In the App Id field, enter the Application (client) ID of the app created in the previous steps.

  3. Click Lookup to autofill the app details.

  4. In the App Domain field, enter your top-level domain (e.g., contoso.com).

  5. Paste the following XML into the Permission Request XML field:

    CODE
    <AppPermissionRequests AllowAppOnlyPolicy="true">
        <AppPermissionRequest Scope="http://sharepoint/content/tenant" Right="Read" />
    </AppPermissionRequests>

    This grants the app read access to SharePoint while respecting user permissions.

  6. Click Create to associate the app with SharePoint.

  7. When prompted, click Trust It to complete the process.

Shinydocs Search Configuration

Shinydocs Pro Search requires specific configuration to authenticate against Azure AD and enable searching SharePoint Online. Follow these steps:

  1. Navigate to the admin page in Shinydocs Pro Search.

    • Example: http://localhost:9702/admin

  2. From the sidebar, click Application settings.

  3. Select Microsoft® settings.

  4. Enter the following values:
    Note: You do not need to update or change these values if you have previously set up a Microsoft Source.

    • Azure AD client ID: Available from the App registration overview page in the Azure portal.

    • Azure AD tenant ID: Available from the App registration overview page in the Azure portal.

    • Azure AD secret: The value of the secret created when adding a client secret.

      • Note: If not copied at the time, you will need to create a new one.

    • Azure AD Redirect URL: The URL Azure AD redirects to after successful authentication (e.g., http://server/azuread/success).

      • Note: This should match the one added to the Authentication page in the Azure portal.

  5. Set the SharePoint Online site URL: The URL to your SharePoint Online instance (e.g., https://tenant.sharepoint.com).

  6. Click Save changes.

  7. Restart Shinydocs Pro Search service.

Test the Configuration

  1. Navigate to the Shinydocs Pro Search homepage.

    • Example: https://localhost:9702/

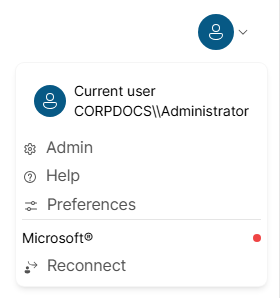
  2. Click the user dropdown menu.

  3. Select Reconnect under Microsoft®.

    image-20250107-142217.png
  4. Enter your login credentials when prompted.

    • Note: If you have already logged into Azure AD, you will be redirected to the success screen automatically.

  5. Click Close to exit the login success screen.

  6. Perform a search in Shinydocs Pro Search for known items in SharePoint Online.

  7. Confirm that search results from SharePoint Online are returned successfully.

Microsoft Exchange Online

Microsoft Exchange Online Set API Permissions

To allow Shinydocs Pro Search to access SharePoint Online and perform searches, configure API permissions.

Configure Microsoft Graph Permissions

  1. In the app registration, go to API permissions.

  2. Click Add a permission.

  3. Select Microsoft Graph > Delegated permissions.

  4. Grant the following delegated permissions:

    • Directory.AccessAsUser.All

    • email

    • EWS.AccessAsUser.All

    • Files.Read.All

    • Group.Read.All

    • Mail.Read.All

    • Mail.Read.Shared

    • offline_access

    • openid

    • profile

    • User.Read

  5. Click Add permissions

  6. Click Grant admin consent for _____ to apply the permissions.

Your API permissions should look like this

image-20241220-203520.png

Shinydocs Search Configuration

Shinydocs Pro Search requires a specific configuration to authenticate against Azure and enable searching Exchange Online. Follow these steps:

  1. Navigate to the admin page in Shinydocs Pro Search.

    • Example: http://localhost:9702/admin

  2. From the sidebar, click Application settings.

  3. Select Microsoft® settings.

  4. Enter the following values:
    Note: You do not need to update or change these values if you have previously set up a Microsoft Source.

    • Azure AD client ID: Available from the App registration overview page in the Azure portal.

    • Azure AD tenant ID: Available from the App registration overview page in the Azure portal.

    • Azure AD secret: The value of the secret created when adding a client secret.

      • Note: If not copied at the time, you will need to create a new one.

    • Azure AD Redirect URL: The URL Azure AD redirects to after successful authentication (e.g., http://server/azuread/success).

      • Note: This should match the one added to the Authentication page in the Azure portal.

  5. Set the Exchange Online site URL: The URL to your Exchange Online. This will likely be https://outlook.office365.com/ews/exchange.asmx

  6. Click Save changes.

  7. Restart Shinydocs Pro Search service.

Test the Configuration

  1. Navigate to the Shinydocs Pro Search homepage.

    • Example: https://localhost:9702/

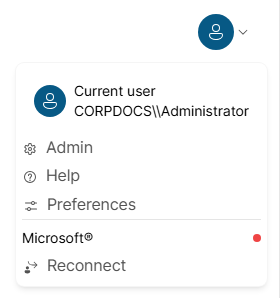
  2. Click the user dropdown menu.

  3. Select Reconnect under Microsoft®.

    image-20250107-142225.png
  4. Enter your login credentials when prompted.

    • Note: If already logged into Azure AD, you will be redirected to the success screen automatically.

  5. Click Close to exit the login success screen.

  6. Perform a search in Shinydocs Pro Search for known items in Exchange.

    1. If you have more than one source, you can select your Exchange source by name in the Search dropdown.

  7. Confirm that search results from Exchange Online are returned successfully.

Microsoft OneDrive

Microsoft OneDrive Set API Permissions

To allow Shinydocs Pro Search to access SharePoint Online and perform searches, configure API permissions.

Configure Microsoft Graph Permissions

  1. In the app registration, go to API permissions.

  2. Click Add a permission.

  3. Select Microsoft Graph > Delegated permissions.

  4. Grant the following delegated permissions:

    • offline_access

    • openid

    • profile

    • User.Read

    • Files.Read.All

    • Directory.Read.All

  5. Click Add permissions

  6. Click Grant admin consent for _____ to apply the permissions.

Shinydocs Search Configuration

Shinydocs Pro Search requires a specific configuration to authenticate against Azure and enable searching Exchange Online. Follow these steps:

  1. Navigate to the admin page in Shinydocs Pro Search.

    • Example: http://localhost:9702/admin

  2. From the sidebar, click Application settings.

  3. Select Microsoft® settings.

  4. Enter the following values:
    Note: You do not need to update or change these values if you have previously set up a Microsoft Source.

    • Azure AD client ID: Available from the App registration overview page in the Azure portal.

    • Azure AD tenant ID: Available from the App registration overview page in the Azure portal.

    • Azure AD secret: The value of the secret created when adding a client secret.

      • Note: If not copied at the time, you will need to create a new one.

    • Azure AD Redirect URL: The URL Azure AD redirects to after successful authentication (e.g., http://server/azuread/success).

      • Note: This should match the one added to the Authentication page in the Azure portal.

  5. Scroll down to OneDrive® filtered indices, in the Indices field copy and past the indices for your OneDrive sources (use the + add button to add addidtional OneDrive indices).

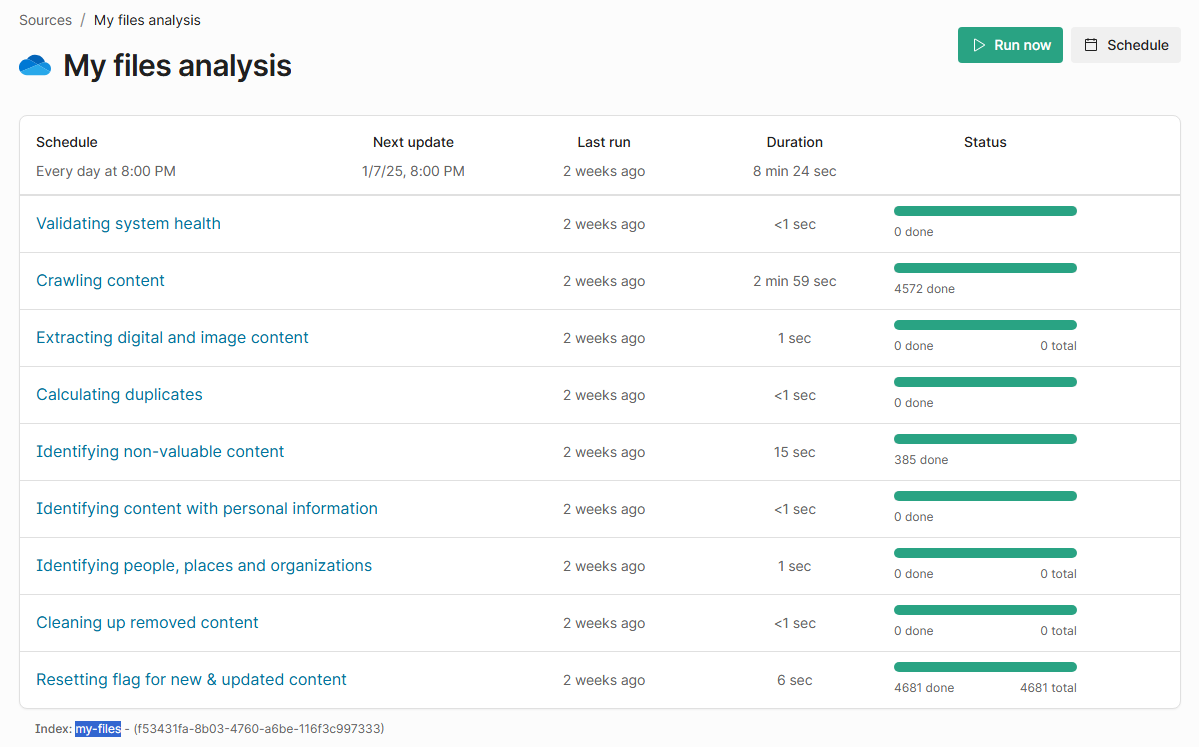
    1. To get the proper names to use in this field, navigate to Shinydoc Pro Control Center > Sources (https://localhost:9701/sources).

    2. Select your OneDrive source(s) to open the Analysis page.

    3. Locate the proper index name at the bottom of page.

      image-20250107-141605.png

      The value is “my-files” in this example. Use this value for OneDrive® filtered indices.

      image-20250107-141822.png
  6. A green checkmark will appear if the index name is recognized. If not, check the value entered is correct and that Search can access the Search Engine endpoint (default: https://localhost:9200).

  7. Click Save changes.

  8. Restart Shinydocs Pro Search service.

Test the Configuration

  1. Navigate to the Shinydocs Pro Search homepage.

    • Example: https://localhost:9702/

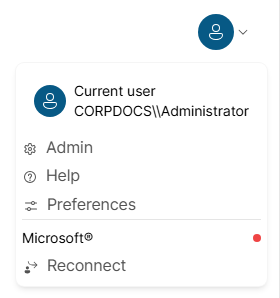
  2. Click the user dropdown menu.

  3. Select Reconnect under Microsoft®.

    image-20250107-142232.png
  4. Enter your login credentials when prompted.

    • Note: If already logged into Azure AD, you will be redirected to the success screen automatically.

  5. Click Close to exit the login success screen.

  6. Perform a search in Shinydocs Pro Search for known items you personally have in OneDrive.

    1. If you have more than one source, you can select your OneDrive source by name in the Search dropdown.

  7. Confirm that search results from OneDrive are returned successfully.

Microsoft Teams

Microsoft Teams Set API Permissions

To allow Shinydocs Pro Search to access SharePoint Online and perform searches, configure API permissions.

Configure Microsoft Graph Permissions

  1. In the app registration, go to API permissions.

  2. Click Add a permission.

  3. Select Microsoft Graph > Delegated permissions.

  4. Grant the following delegated permissions:

    • offline_access

    • openid

    • profile

    • User.Read

    • Files.Read.All

    • Sites.Read.All

    • Directory.Read.All

    • Channel.ReadBasic.All

    • ChannelMember.Read.All

    • Chat.Read

    • Group.Read.All

    • Team.ReadBasic.All

    • TeamSettings.Read.All

  5. Click Add permissions.

  6. Click Add permissions

  7. Click Grant admin consent for _____ to apply the permissions.

Shinydocs Search Configuration

Shinydocs Pro Search requires a specific configuration to authenticate against Azure and enable searching Exchange Online. Follow these steps:

  1. Navigate to the admin page in Shinydocs Pro Search.

    • Example: http://localhost:9702/admin

  2. From the sidebar, click Application settings.

  3. Select Microsoft® settings.

  4. Enter the following values:
    Note: You do not need to update or change these values if you have previously set up a Microsoft Source.

    • Azure AD client ID: Available from the App registration overview page in the Azure portal.

    • Azure AD tenant ID: Available from the App registration overview page in the Azure portal.

    • Azure AD secret: The value of the secret created when adding a client secret.

      • Note: If not copied at the time, you will need to create a new one.

    • Azure AD Redirect URL: The URL Azure AD redirects to after successful authentication (e.g., http://server/azuread/success).

      • Note: This should match the one added to the Authentication page in the Azure portal.

  5. Click Save changes.

  6. Restart Shinydocs Pro Search service.

Test the Configuration

  1. Navigate to the Shinydocs Pro Search homepage.

    • Example: https://localhost:9702/

  2. Click the user dropdown menu.

  3. Select Reconnect under Microsoft®.

    image-20250107-142244.png
  4. Enter your login credentials when prompted.

    • Note: If already logged into Azure AD, you will be redirected to the success screen automatically.

  5. Click Close to exit the login success screen.

  6. Perform a search in Shinydocs Pro Search for known items in Teams.

    1. If you have more than one source, you can select your Teams source by name in the Search dropdown.

  7. Confirm that search results from Teams are returned successfully.

JavaScript errors detected

Please note, these errors can depend on your browser setup.

If this problem persists, please contact our support.