Ensure you have reviewed the hardware requirements and installed the prerequisites.
Installation checklist
Make sure the following items are handy for the Shinydrive server installation:
- Shinydrive Suite download folder (provided by Shinydocs)
- Shinydrive Suite license key (from Shinydocs)
- Apache Tomcat 9
- Running with Java 21
- Apache Tomcat 10
- Running with Java 17
- Content Server
cws.warfile (from OpenText)* - The activation-1.1.1.jar should already be deployed if not, place it in the
libdirectory of Tomcat 9 in it’s respective installation directory.
Recent versions of the cws.war from Open Text require Tomcat 10. Tomcat 10 can be installed and run on the same server alongside Tomcat 9, the cws.war file will be placed in the webapps folder under the running Tomcat10. You will need to define an alternate port (i.e. 8082 or 8445) and ensure this port is used in configuring Shinydrive in the Admin page.
Installing Shinydrive Server
-
On the Shinydrive server, open Services
-
Locate and Stop the Tomcat 9 and Tomcat 10 service
-
Right-click on the Shinydrive Suite ZIP file and select Properties
-
Under the General tab, select Unblock and Apply
-
Right-click on the Shinydrive Suite ZIP file and select Extract All...
-
Open the Shinydrive Suite folder
-
Open the server folder and locate the
shinydrive-server.warfile -
Copy the
shinydrive-server.warfile into the webapps folder of your Tomcat 9 folder (for example, C:\Program Files\Apache Software Foundation\Tomcat 9\webapps) -
Return to the Shinydrive Suite folder
-
Open the content server-module folder
-
Copy the
sd-csws.warinto the webapps folder of your Tomcat 9 folder -
Copy your Content Server’s
cws.warfile into the webapps folder of your Tomcat 10 folder -
Verify the Apache Tomcat 9 webapps folder now contains the following 2 files:
-
shinydrive-server.war -
sd-csws.war
-
-
Verify the Apache Tomcat 10 webapps folder now contains the following file:
-
cws.war
-
-
You now need to set specific Java options in Tomcat 9:
-
Open
Tomcat9w.exein[Install location]\Apache Software Foundation\Tomcat 9.0\bin -
Click the
Javatab -
Add the following line to the Java 9 options:
--add-opens=java.base/sun.reflect.misc=ALL-UNNAMED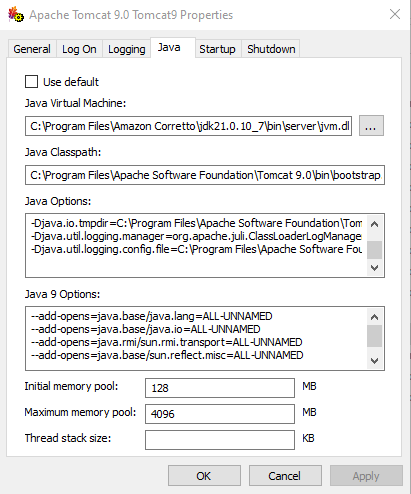
-
Click OK to apply
-
-
Start your Apache Tomcat 9 and Tomcat 10 service
Configuring the web.xml files
Edit the web.xml files by pointing them toward your Content Server location.
Configuring the web.xml file for cws
-
Navigate to the the cws folder of your Tomcat 10 folder (for example, C:\Program Files\Apache Software Foundation\Tomcat 10\webapps\cws) *
-
Open the WEB-INF folder
-
Open the
web.xmlfile using a text/source code editor (for example, Notepad++) -
Locate
<param-name>LivelinkServer</param-name>in the<context-param>section -
Update
<param-value></param-value>with the IP or fully qualified domain name to the machine hosting your Content Server -
Restart your Apache Tomcat 10 service
Configuring the web.xml file for sd-cws
-
Navigate to the sd-csws folder of your Tomcat 9 folder (for example, C:\Program Files\Apache Software Foundation\Tomcat 9\webapps\sd-csws)
-
Open the WEB-INF folder
-
Open the
web.xmlfile using a text/source code editor -
Locate
<param-name>LivelinkServer</param-name>in the<context-param>section -
Update
<param-value></param-value>with the IP or fully qualified domain name to the machine hosting your Content Server -
Restart your Apache Tomcat 9 service
Congratulations! You have completed installing Shinydrive Server. You are now ready to configure your Content Server and install the Shinydrive Client.