For various reasons, you may need to move the index and its data, along with the Visualizer to another disk, this guide will walk you through that process.
Overview
This guide will walk you through copying the data from one drive to another. From a high level, you are copying the install from one drive to your destination drive, then adjusting the Windows service to point to the new location.
Instructions
Steps per machine:
-
Stop Shinydocs Indexer and Visualizer services
-
Copy the parent install folder of the Indexer and Visualizer (ex. C:\Shinydocs)
-
This folder must contain:
└ indexer
└ utilities
└ visualizer
-
-
Paste the folder in the new drive (we recommend the root of the drive) (ex. D:\)
-
Open Command Prompt as a local administrator
-
In Command Prompt, navigate (
cd) into the “utilities” folder in the new drive (ex. D:\Shinydocs\utilities) -
Run the following command:
nssm.exe edit shinydocs-indexer
-
A new NSSM window will open for the service
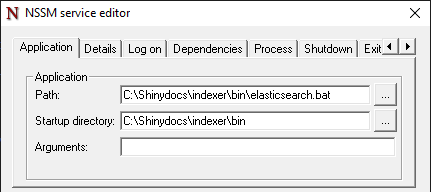
-
Change the “Path” and “Startup directory” to reflect the new drive and path to elasticsearch.bat

-
Once complete, save your changes by clicking “Edit Service”
-
Repeat steps 6 - 9 with the Shinydocs Visualizer
nssm.exe edit shinydocs-visualizer
-
Start “Shinydocs-Indexer” and Shinydocs-Visualizer” service
-
Confirm both services are running and that the Indexer and Visualizer are working
-
Remove old directory once you have confirmed the new services are working