Installing and Upgrading Cognitive Suite
Table of Contents
Hardware Prerequisites
The Shinydocs Cognitive Toolkit is your data worker, these machines are separate from the Analytics Engines and have different requirements. In most cases, more Cognitive Toolkit machines will improve throughput.
For information on hardware and software prerequisites, see Cognitive Suite Requirements.
Before you begin
Download the following files from your customer collaboration space or contact your support representative:
Cognitive Toolkit | shinydocs-cognitive-toolkit-[version]-[date].zip |
|---|---|
Cognitive Toolkit Resources | shinydocs-cognitive-toolkit-resources-[version]-[date].zip |
Shinydocs Extraction Service | shinydocs-extraction-[version]-[date].zip |
Analytics Engine | shinydocs-indexer-visualizer-[date] ([version]).zip |
Shinydocs Cognitive Suite
The Shinydocs Cognitive Suite installation involves the following components:
Cognitive Toolkit, Cognitive Resources, and Extraction Service
Analytics Engine and Visualizer
Installation
The following instructions outline how to complete a fresh installation of Shinydocs Cognitive Suite. Typically all installs should be done on a non OS drive.
Cognitive Toolkit
Right-click the Cognitive Toolkit (shinydocs-cognitive-toolkit-[version]-[date].zip) zip file and select Properties.
Under the General tab, select Unblock and then select Apply.
Right-click on the Cognitive Toolkit (shinydocs-cognitive-toolkit-[version]-[date].zip) zip file and select Extract All.
Note the location to which you extract the Cognitive Toolkit. The Cognitive Toolkit Resources will be extracted to this folder location in the next step.
Cognitive Toolkit Resources
Right-click the Cognitive Toolkit Resources (shinydocs-cognitive-toolkit-resources-[version]-[date].zip) zip file and select Properties.
Under the General tab, select Unblock and then select Apply.
Right-click on the Cognitive Toolkit Resources (shinydocs-cognitive-toolkit-resources-[version]-[date].zip) zip file. Select Extract All... and unzip the file into the same folder location the Cognitive Toolkit was extracted.
The Cognitive Toolkit folder now has 2 sub-folders: External Resources and Scripts.
Shinydocs Extraction Service
Ensure JAVA_HOME environment variable is set
Right-click the Shinydocs Extraction Service (shinydocs-extraction-[version]-[date].zip) zip file and select Properties.
Under the General tab, select Unblock and then select Apply.
Right-click on the Shinydocs Extraction Service (shinydocs-extraction-[version]-[date].zip) zip file. Select Extract All... and unzip the file into a temporary file location.
From the temporary file location above, run ShinydocsExtraction.Setup.
Follow the prompts during the installation.
When finished the shinydocs-extraction service will be installed and running.
Congratulations! You have completed the installation of the Cognitive Toolkit portion of the Shinydocs Cognitive Suite
Analytics Engine and Visualizer
Ensure the service account has administrative access and full rights to all directories used
in this installation.Ensure JAVA_HOME environment variable is set
Anti-Virus and security exclusions may need to be made to these folders
Navigate to the shinydocs-indexer-visualizer-yyyy-mm-dd.zip
Right-click on the zipper after downloading > Properties > Unblock
Extract the zipper to the drive where you wish to install the Analytics Engine and Visualizer
Open a Windows command prompt as Administrator and navigate to the extracted
shinydocs-indexer-visualizer-yyyy-mm-dd (X.X.X).zipRun install.bat and follow the prompts

The setup will then execute the installation of the two Windows services:
Shinydocs-Indexer
Shinydocs-Visualizer
Set your heap space for jvm.options:
Navigate to the directory where the indexer is installed. The default location would be C:\ShinyDocs\indexer\config\jvm.options
Scroll down to line 22, 23 (this is where these options will be by default), where you can configure “initial” and “maximum” total heap space and change the default value to half of your current server's RAM allocation - 4 GB (the 4 GB is to leave enough room for the OS).
For example, the server has 64GB of RAM. Change the values to 28.
The configuration should look like the following and then save the file.
-Xms28g
-Xmx28g
The following configurations are located in the
elasticsearch.ymlfile located in..\indexer\configLine 17 -
cluster.nameRemove the comment character
#at the beginning of the lineReplace
my-applicationwith a name for your cluster (e.g.acme-analytics)This name will need to be the exact same on every node in the cluster
Line 23 -
node.nameRemove the comment character
#at the beginning of the lineReplace
node-1with a unique name for this machine. This will be the name reported on the Monitoring page of Kibana. Using the server's name is a good choice!
Line 43 -
bootstrap.memory_lockRemove the comment character
#at the beginning of the lineKeep the value
true
Line 55 -
network.hostRemove the comment character
#at the beginning of the lineGenerally, the easiest value to set
network.hostto is0.0.0.0meaning that it will bind on all network interfaces on the machine. For more details see network.host | Elasticsearch Guide [6.8] | Elastic network.host | Elasticsearch Guide [6.8] | ElasticIf this line is not modified, the index and Kiabana will not be accessible outside of the local machine
If you are configuring a cluster of servers, please see our guide on Cluster Setup for Analytics Engine (Shinydocs Indexer)
Save the file and restart the Shinydocs Indexer service for your changes to take effect
To reach the visualizer from a different machine, you will need to edit the kibana.yml file:
kibana.ymlfile located in ..\visualizer\config
Line 7 - server.host
Remove the comment character # at the beginning of the line
Set the server.host to "0.0.0.0"
Save the file and restart the Shinydocs Visualizer service for your changes to take effect
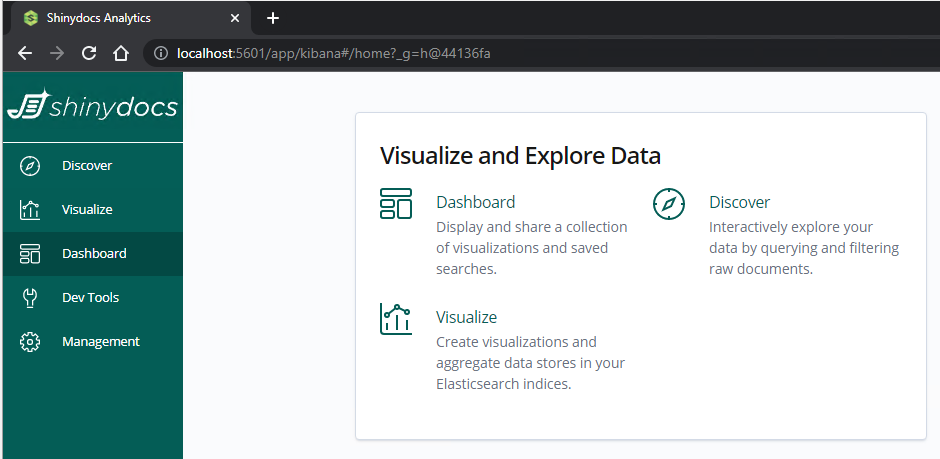
In your web-browser, verify you are able to access the following web pages:
a. http://localhost:9200 : Indexer - will return a JSON file if working normally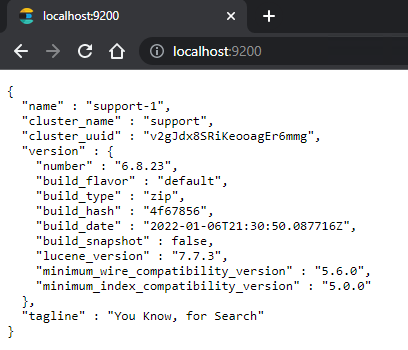
b. http://localhost:5601 : Visualizer - will load Shinydocs Analytics
Success! You’ve installed the Shinydocs Cognitive Suite!
What’s next? Get started by Activating the Cognitive Toolkit License.
Upgrade
The following instructions outline how to upgrade an existing version of Shinydocs Cognitive Suite to a newer version.
Cognitive Toolkit
Right-click the Cognitive Toolkit (shinydocs-cognitive-toolkit-[version]-[date].zip) zip file and select Properties.
Under the General tab, select Unblock and then select Apply.
Right-click on the Cognitive Toolkit (shinydocs-cognitive-toolkit-[version]-[date].zip) zip file and select Extract All...
When selecting the extraction location, overwrite the old Cognitive Toolkit directory with this new one.
Note the location to which you extract the Cognitive Toolkit. The Cognitive Toolkit Resources will be extracted to this folder location in the next step.
Cognitive Toolkit Resources
Make a copy of your source settings files BEFORE updating your Resources. If source settings files are updated, you will need to copy your existing authentication values to the new source settings files
If you use the SaveValue operation in the Cognitive Toolkit and have a saved-parameters.yaml file for encrypted passwords, ensure that file is not deleted. If it was previously stored within the old Cognitive Toolkit folder, it will need to be re-saved to the same location within the new folder.
Right-click the Cognitive Toolkit Resources (shinydocs-cognitive-toolkit-resources-[version]-[date].zip) zip file and select Properties.
Under the General tab, select Unblock and then select Apply.
Right-click on the Cognitive Toolkit Resources (shinydocs-cognitive-toolkit-resources-[version]-[date].zip) zip file. Select Extract All... and unzip the file into the same folder location the Cognitive Toolkit was extracted.
When selecting the extraction location, overwrite the old shinydocs-cognitive-toolkit-resources with this new one.
The Cognitive Toolkit folder now has 2 sub-folders: External Resources and Scripts.
If source settings files are updated, copy your existing authentication values to the new source settings files
Congratulations! You have completed the upgrade of the Cognitive Toolkit portion of the Shinydocs Cognitive Suite
Analytics Engine
Please see our Changes when using Elasticsearch and Kibana 6.8.23 (Free Tier) instead of Shinydocs Indexer and Visualizer 6.8.23 guide.