By integrating with Microsoft Azure, Shinydocs Cognitive Suite can operate with Microsoft SharePoint — maintaining secure and compliant access to this cloud application with policy-based access controls.
The following document describes how to enable Azure authentication for Microsoft SharePoint.
Table of Contents
Register Shinydocs Software with Azure
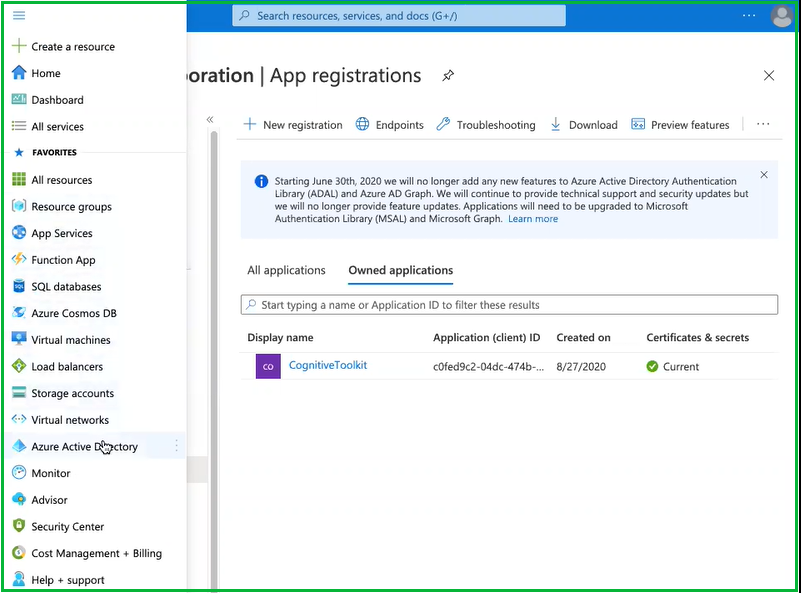
The first step of the process is to register your Shinydocs software with Azure, so that it can access SharePoint data. If Shinydocs is already listed as a registered application, skip this step.
-
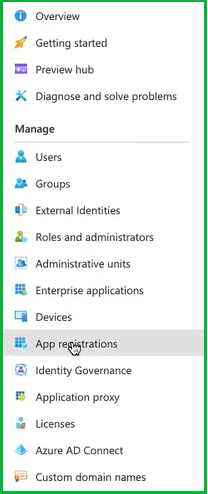
Open Microsoft Azure. In the upper left corner dropdown menu, navigate to Azure Active Directory.
-
From the sidebar menu, select App registrations
-
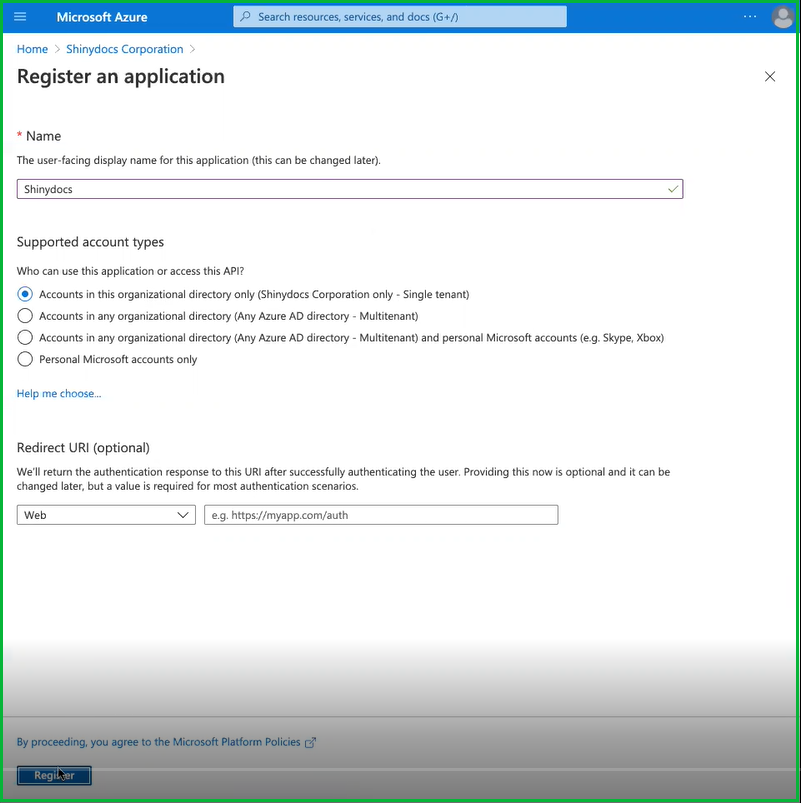
Select + New registration

-
Enter a name for the application. In this case, we used “Shinydocs” as the application name.
-
Select who, within your organization, can use or access the application. In most cases, the first option (Single tenant) will be selected (see below).
-
Enter a Redirect URl. This is optional at this point but is required for most authentication scenarios. In this example, we used “https://myapp.com/auth”.
-
Select Register to continue…
Permission to Access SharePoint Content
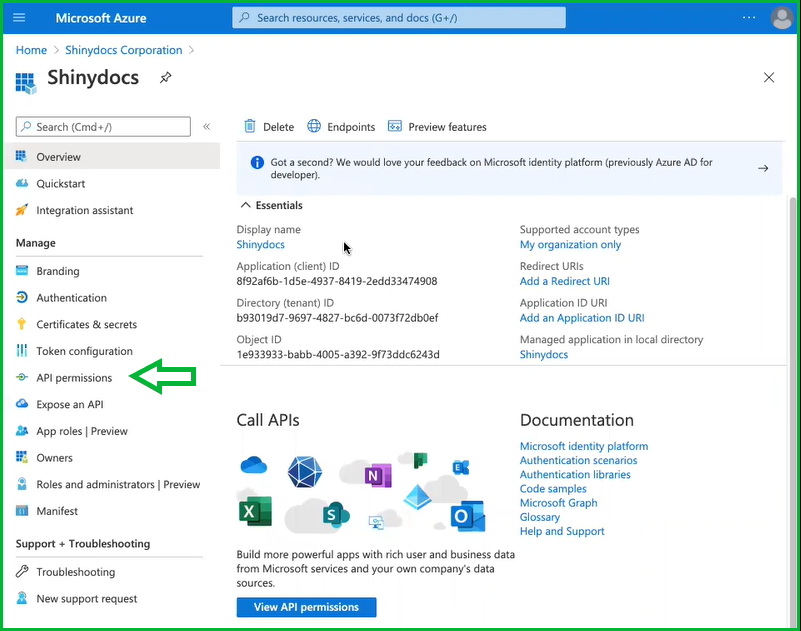
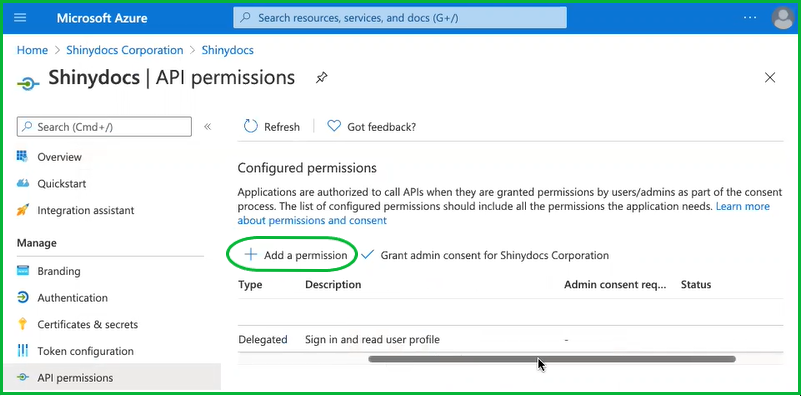
Now that the Shinydocs Application has been registered with Azure, it’s time to apply permissions to access content within SharePoint.
-
From the sidebar menu, select API permissions
-
Select + Add a permission
-
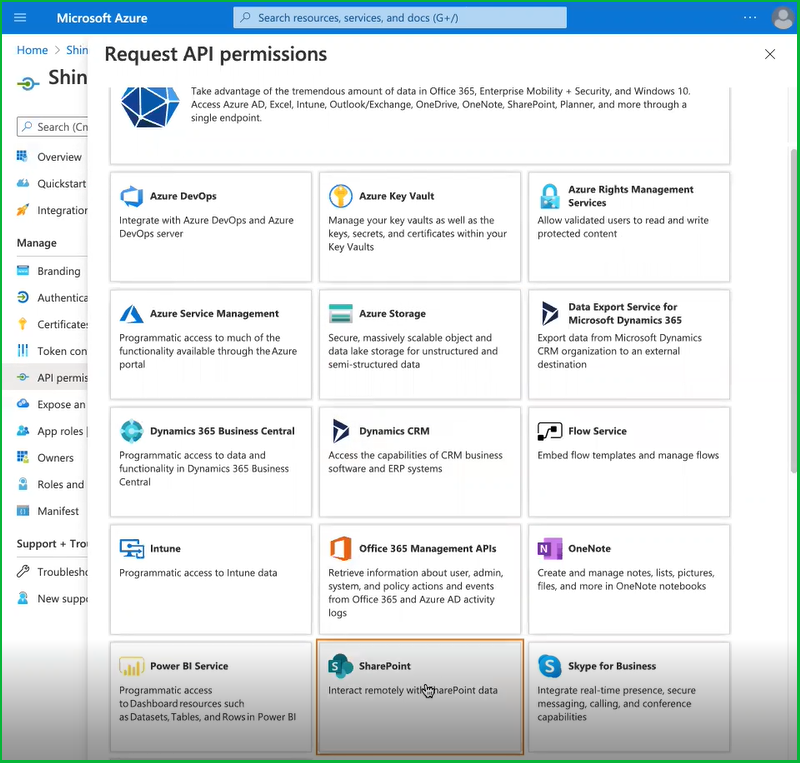
Add permissions for SharePoint by selecting SharePoint from the list of Microsoft Applications.
-
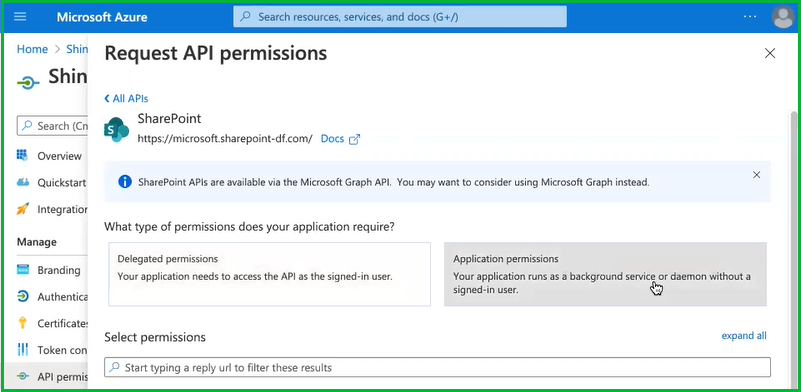
For the type of permissions, your application requires, select Application permissions
-
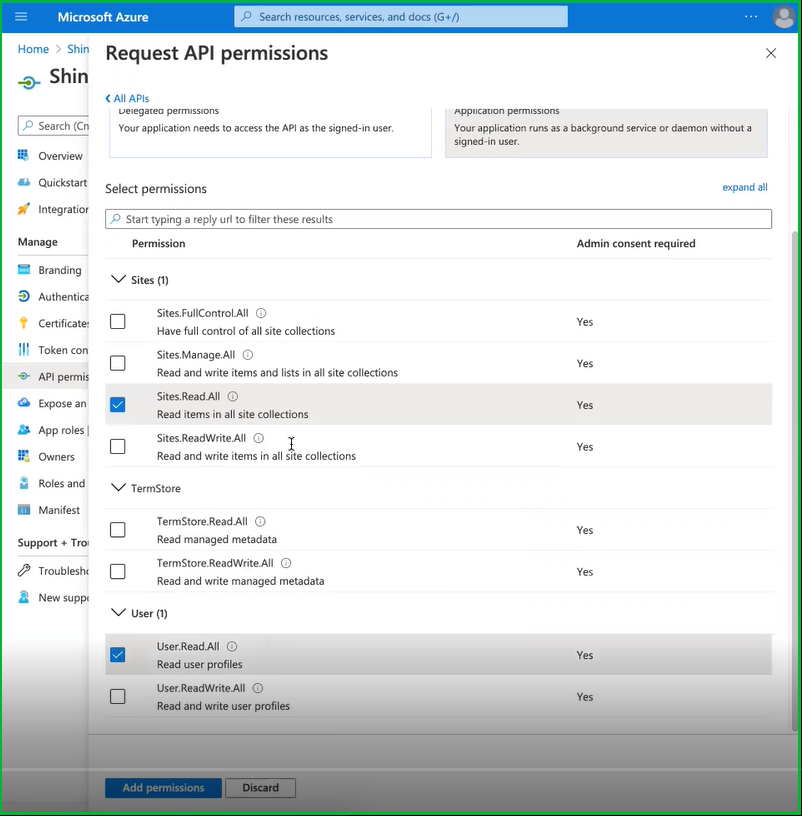
Select the required permissions at the site and user levels. At a minimum the following items should be selected:
-
Under the Sites permissions, select Sites.Read.All to set permissions to read items in all site collections.
-
Under User permissions, select User.Read.All to set permission to read user profiles.
-
If you are migrating to SharePoint Online, the app will require Sites.ReadWrite.All
-
Select Add permissions at the bottom of the page.
-
The API permissions should now be updated to included SharePoint
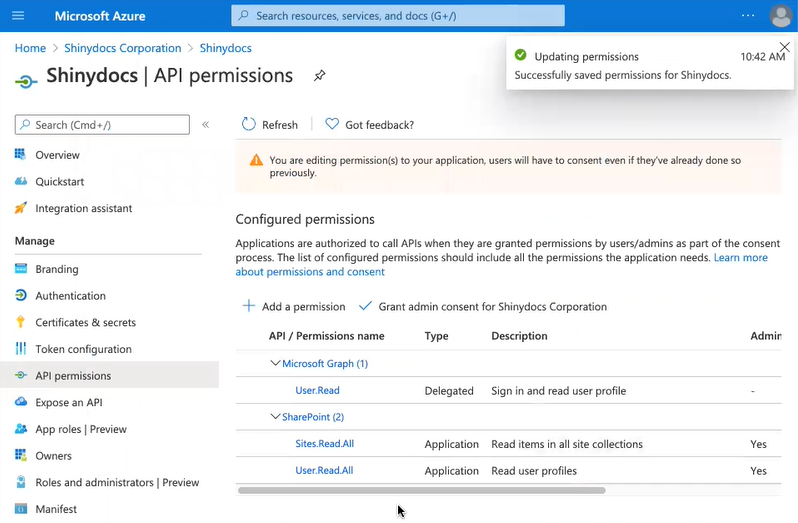
-
Next, select Grant admin consent for Shinydocs Corporation.
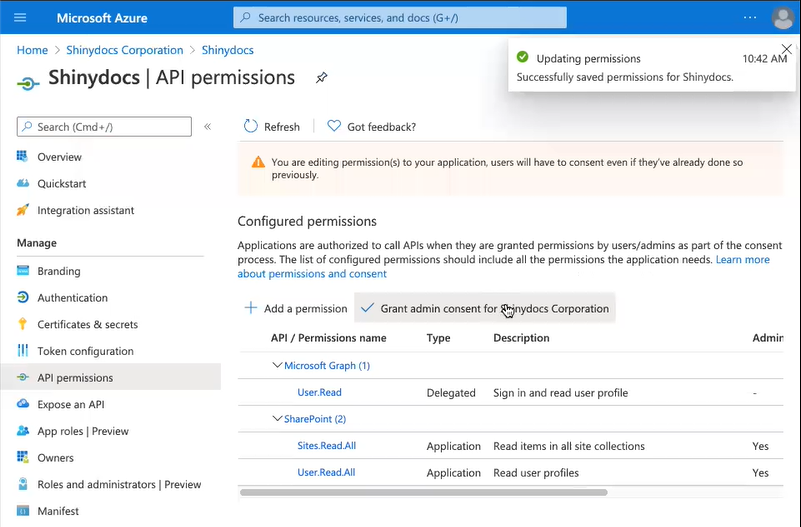
-
Select Yes to grant consent for the requested permissions for all accounts in Shinydocs Corporation.

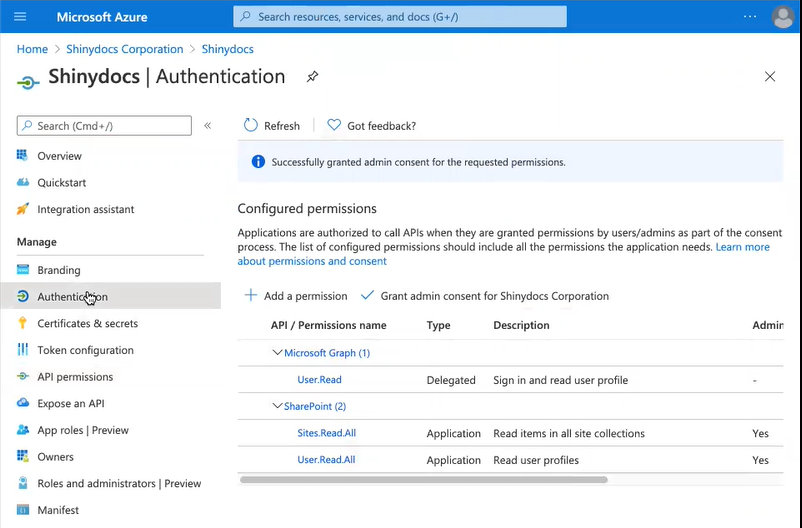
-
At the top of the page, there will be a notification that admin consent for the requested permissions was successfully granted.
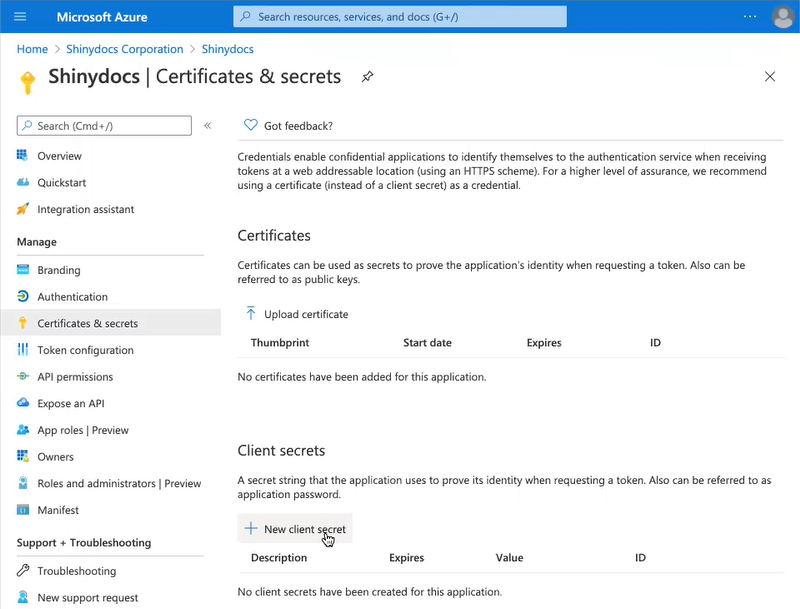
Certificates & secrets
📔 A client secret only needs to be generated once for the Cognitive Suite. If one has already been created and saved for use with other Shinydocs products, there is no need to generate a new secret.
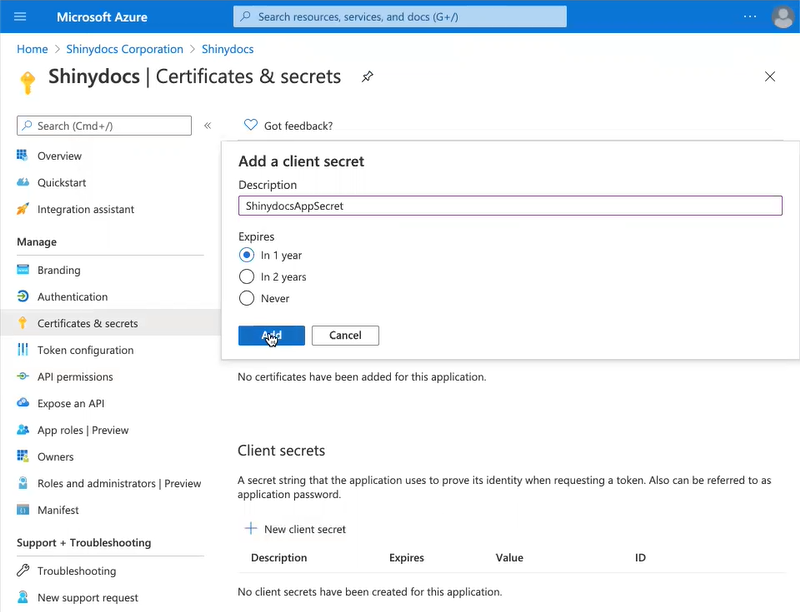
How to generate a client secret:
-
From the sidebar menu, select Certificates & secrets
-
Select +New client secret
-
Enter a description for the new client secret. In this case, we used “ShinydocsAppSecret”.
-
Select an expiry date based on your company protocol.
-
Select Add.
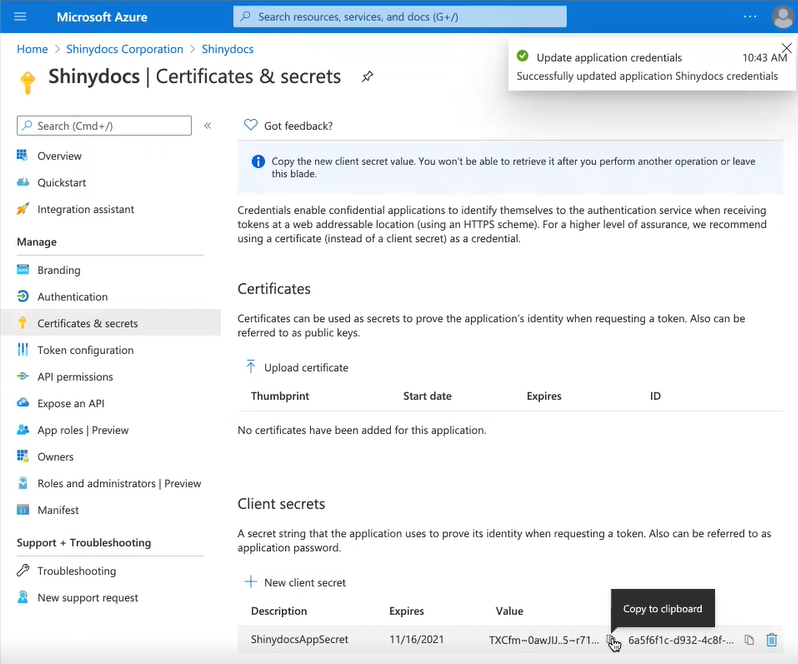
Save your secret
The secret only needs to be generated once for all Shinydocs products.
The first time it is generated, copy the Secret Value immediately and save it as this value will be hidden if the page reloads. Store it in a safe place for re-use when installing other Shinydocs products.
-
In the left hand menu, open Overview
-
Record and save the following information in a safe place for configuring Shinydocs Cognitive Suite and for re-use when installing other Shinydocs products.
- Azure AD® secret value: ___________________________________________________
- Azure AD® client (application) ID: ___________________________________________________
- Azure AD® tenant (directory) ID: ___________________________________________________
- Azure AD® redirect URL: ___________________________________________________
Note: The secret, client ID and tenant ID will be used within the Microsoft OneDrive Source Settings file within the Cognitive Toolkit configuration.
Note: If you plan to install Shinydocs Discovery Search, the secret, client ID, tenant ID, and the redirect URL will be required for configuring Azure AD® for Shinydocs Discovery Search. For more information, see Configuring Microsoft Online Settings.
Configure the Shinydocs Cognitive Suite
-
Navigate to the Cognitive Suite download provided by Shinydocs: shinydocs-cognitive-toolkit-[version]-[date].zip
-
Open the External Resources folder
-
Open the Sample Source Settings folder
-
Using a text editor such as Notepad++, open the sharepoint.json file and edit the code (lines 11,12 and 13 below) to reflect the items saved in the previous step:

{
  "comments" : [
      "Please don't forget to encrypt your sensitive fields with the cognitive toolkit",
      "For auth-type please enter 'up' for username and password or 'app' for azure application auth"
    ],
  "sourceType" : "SharePoint",
  "sourceConnectionSettings" : {
    "auth-type": "app",
    "site-url" : "https://shinydocs.sharepoint.com/sites/DevTest",
    "domain": "",
    "app-id": "8f92af6b-1d5e-4937-8419-2edd33474908",
	"tenant-id": "b93019d7-9697-4827-bc6d-0073f72db0ef",
    "secret-key": "TXCfm~0awJIJ..5~r71~.VwNRr6~0FUhSw"
  }
}
-
Save the changes.
Register Shinydocs Application with SharePoint Permissions
-
Note: For new tenants, access tokens are disabled by default. This can changed by running 'set-spotenant -DisableCustomAppAuthentication $false' (needs the latest SharePoint admin PowerShell).
-
In a web browser, go to the SharePoint tenant:
-
https://[tenant]-admin.sharepoint.com/_layouts/15/appinv.aspx
-

-
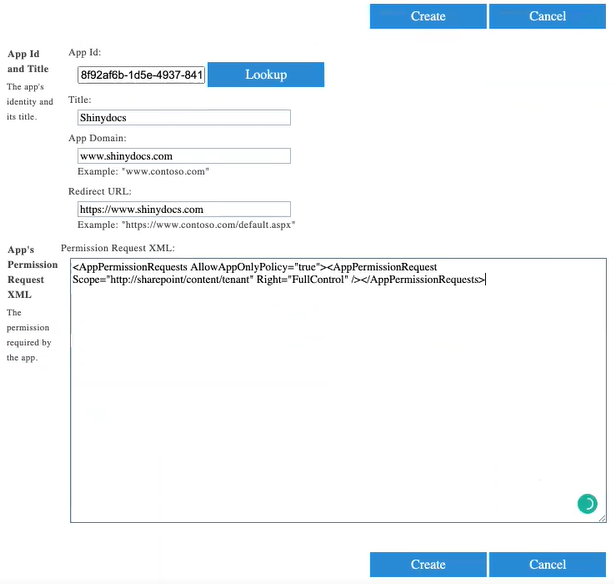
Fill out the form:
App Id and Title-
App Id: Copy and paste the App ID from the Overview page. Select Lookup.
-
Title: Populates automatically with Shinydocs.
-
App Domain: Enter a URL, such as www.shinydocs.com
-
Redirect URL: Enter a secondary URL, such as https://shinydocs.sharepoint.com/
-
-
App’s Permission Request XML
-
Permission Request XML: Copy and paste the following code:
<AppPermissionRequests AllowAppOnlyPolicy="true"><AppPermissionRequest Scope="http://sharepoint/content/tenant" Right="FullControl" /></AppPermissionRequests>
-
Select Create
-
Select Trust It
-
Verify Shinydocs Registration with SharePoint
-
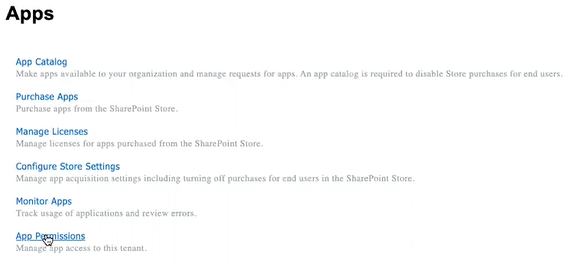
From the SharePoint admin center, select ⠸ More features in the left hand menu.
-
Scroll down to Apps, select Open
-
Select App Permissions
-
Verify the Shinydocs is included in the list of Apps with permissions
Congratulations! You’ve successfully enabled Azure authentication for SharePoint!
Token Authorization
If you plan to configure Discovery Search for integration with Microsoft Online applications, you must configure the tokens that will be issued from the authorizing endpoint. Please ensure Token Authorization is configured in Azure AD® as described in Preparing for Integration of Microsoft Online Applications with Discovery Search.
Next Steps
To set up Azure Authentication for other Microsoft applications, such as Office 365 Exchange Online and OneNote, see https://enterprisefile.atlassian.net/wiki/spaces/SHINY/pages/edit-v2/1540063298?draftShareId=3d383120-f230-43dc-8764-f9354c8ac49e.